I was standing in the baking aisle of my local grocery store last October, staring blankly at a display of pumpkin puree, when the smell hit me. It wasn’t from the cans or the nearby spice rack. It was coming from somewhere deep in my memory—a warm, cinnamon-scented kitchen belonging to my old neighbor, Mrs. Kowalski, who lived three doors down when I was twelve. She’d bring over a plate of cookies every time her grandkids visited, and I’d hover by the screen door pretending I wasn’t waiting. The cookies were always soft, always dusted with sugar, and always gone before I could ask for the recipe. Honestly, I never got the chance. She moved away the summer I turned thirteen, and I never saw her again.
That day in the store, I grabbed a can of pumpkin puree without really thinking about it. I mean, I had no plan. I just knew I needed to figure out that cookie. The one with the faint orange glow and the crackled top, the one that tasted like fall in a way that made you close your eyes without meaning to. So I went home, pulled out my biggest mixing bowl, and started experimenting. It took me four tries—four batches of cookies that were either too cakey, too flat, or just missing that snickerdoodle tang—before I landed on this version. And let me tell you, when I pulled that first perfect tray out of the oven, I actually texted my sister a photo with the caption, “I think I finally got it.”
You know that feeling when you bite into something and it transports you? That’s what these soft & chewy pumpkin snickerdoodle cookies do. They’re not your typical pumpkin cookie—the ones that puff up like little orange muffins. No, these are thin around the edges, chewy in the center, with that signature snickerdoodle crackle on top and a whisper of pumpkin in every bite. The one-bowl thing? That was pure accident. I was too impatient to dirty more dishes, and it turned out to be the best decision I made. Maybe you’ve been there too—standing in your kitchen with a craving you can’t quite name, hoping a recipe will bring back something you lost. This one did it for me. I think it might for you too.
Why You’ll Love These Pumpkin Snickerdoodle Cookies
I’ve tested this recipe more times than I care to admit. Some batches were too puffy. Some spread into sad, flat disks. But this version? It’s the one I keep coming back to, and here’s why I think you’ll feel the same way:
- One Bowl, Zero Fuss: No stand mixer required. No sifting. No separating wet and dry ingredients like some kind of baking scientist. Just one bowl, a spatula, and about ten minutes of your time.
- Soft & Chewy Texture: These cookies strike that perfect balance—crispy edges, soft centers, and a chew that lasts for days. The pumpkin keeps them tender without making them cakey.
- Simple Pantry Ingredients: You probably already have most of what you need. Butter, sugar, flour, eggs, cinnamon. The only “special” thing is a can of pumpkin puree, and honestly, that’s barely special.
- Perfect for Fall Baking: Whether it’s a cozy Sunday afternoon, a Halloween party, or just a Tuesday that needs a little warmth, these cookies fit the bill. They also make incredible gifts—if you can bear to share them.
- Crowd-Pleaser Approved: I brought a batch to my book club last month, and three people asked for the recipe before I’d even sat down. One of them texted me the next day saying her kids finished the entire container before breakfast. (No judgment here.)
What makes these different from every other pumpkin cookie recipe out there? It’s the technique. Most pumpkin cookies turn out like little cakes because the puree adds too much moisture. But I figured out how to balance it—using just the right amount of pumpkin, letting the dough rest briefly, and rolling them in cinnamon sugar the way you would a classic snickerdoodle. The result is a cookie that tastes indulgent but somehow still feels light. It’s comfort food, sure, but it’s comfort food that won’t weigh you down. And honestly, isn’t that what fall baking should be?
What Ingredients You Will Need
This recipe uses simple, wholesome ingredients to deliver that soft, chewy texture and warm spiced flavor without any fuss. Most of these are pantry staples, which means you’re probably already halfway there.
For the Cookie Dough
- Unsalted butter, softened (1/2 cup, 1 stick) — Make sure it’s at room temperature, not melted. Softened butter creams better with the sugar and gives the cookies their tender crumb. I like using Kerrygold for the richness, but any good-quality butter works.
- Granulated sugar (3/4 cup, 150g) — This is the main sweetener. It also helps with that slight crispiness on the edges.
- Light brown sugar, packed (1/4 cup, 50g) — Adds moisture and a hint of molasses flavor that pairs beautifully with pumpkin and cinnamon. Don’t skip it—dark brown sugar works too if that’s what you have.
- Pumpkin puree (1/3 cup, 80g) — Not pumpkin pie filling! Make sure you grab 100% pure pumpkin puree. I usually go with Libby’s because it’s consistent and not too watery. If your puree looks thin, pat it dry with a paper towel before using.
- Large egg (1, room temperature) — Helps bind everything together. A cold egg can seize the butter, so let it sit out for 15 minutes first.
- Vanilla extract (1 teaspoon) — Pure vanilla is best, but imitation works in a pinch. It rounds out the spices beautifully.
- All-purpose flour (1 and 3/4 cups, 220g) — Spoon and level it into your measuring cup. Scooping directly can pack in too much flour and make the cookies dry.
- Baking soda (1/2 teaspoon) — Helps the cookies spread just enough without puffing up too much.
- Cream of tartar (1/2 teaspoon) — This is the secret to that classic snickerdoodle tang. Don’t skip it—it’s what makes a snickerdoodle a snickerdoodle.
- Salt (1/4 teaspoon) — Balances the sweetness and enhances the spices.
- Ground cinnamon (1 teaspoon) — The backbone of the flavor. I use Saigon cinnamon when I want something extra warm and bold.
- Ground nutmeg (1/4 teaspoon) — Adds that subtle, nutty warmth. Freshly grated is amazing if you have it.
- Ground ginger (1/4 teaspoon) — Just a pinch for a little kick. It’s optional, but I love the depth it adds.
- Ground cloves (1/8 teaspoon) — A tiny amount goes a long way. It ties all the fall spices together.
For the Cinnamon Sugar Coating
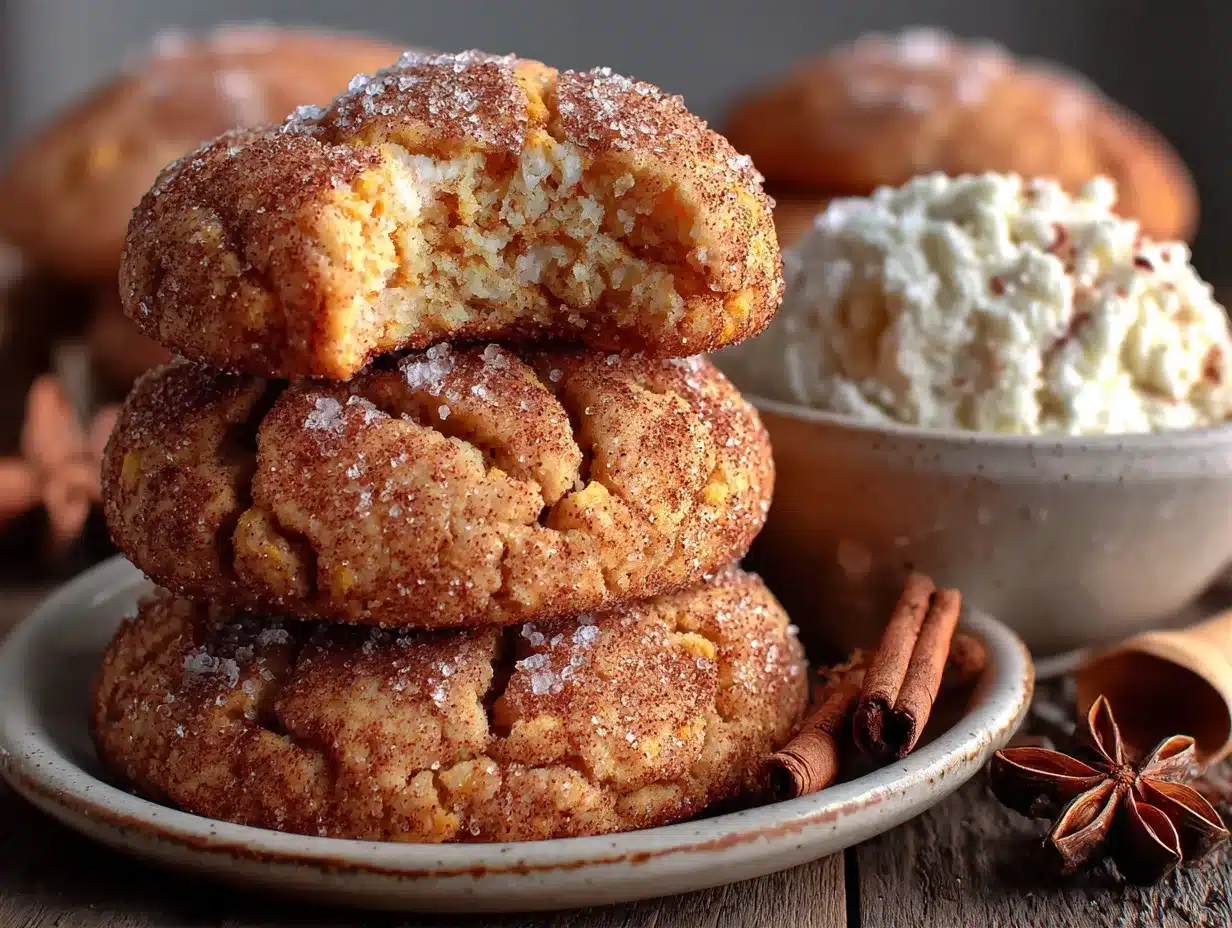
- Granulated sugar (1/4 cup, 50g) — For that crackly, sparkly exterior.
- Ground cinnamon (1 tablespoon) — Be generous here. This is the first thing you taste when you bite into the cookie.
Equipment Needed
You don’t need a fancy kitchen to make these cookies. Here’s what I used, along with a few alternatives if you’re working with what you’ve got:
- Large mixing bowl — Glass, ceramic, or stainless steel. I use a big Pyrex bowl because I can see if everything’s mixed evenly.
- Wooden spoon or silicone spatula — A sturdy spatula works best for creaming the butter and sugar by hand. If you’re using a hand mixer, that works too—just don’t overmix once the flour goes in.
- Measuring cups and spoons — For dry ingredients, spoon the flour into the cup and level it off with a knife. For the pumpkin puree, pack it into the measuring cup firmly.
- Baking sheets — I use two light-colored aluminum sheets. Dark sheets can cause the bottoms to brown too quickly.
- Parchment paper or silicone baking mat — Parchment paper is my go-to. It prevents sticking and makes cleanup a breeze. Silicone mats work great too, but they can sometimes reduce spreading slightly.
- Cooling rack — Essential for getting those perfectly set cookies. If you don’t have one, let the cookies cool on the baking sheet for a few extra minutes before transferring them to a plate.
- Small bowl for cinnamon sugar — Any shallow bowl works. I use a small cereal bowl.
- Cookie scoop (optional but helpful) — A 1.5-tablespoon scoop gives you consistent cookies every time. If you don’t have one, use two spoons to portion the dough.
Honestly, the first time I made these, I forgot I didn’t own a hand mixer. I creamed the butter and sugar with a fork for what felt like forever. It worked, but my arm was sore the next day. So trust me—a spatula is fine, but a mixer saves you some effort.
Preparation Method
Alright, let’s get baking. This whole process takes about 20 minutes of active work, plus 10-12 minutes per batch in the oven. Here’s how it goes:
- Preheat your oven to 350°F (175°C). Line two baking sheets with parchment paper or silicone mats. This ensures the cookies don’t stick and helps them spread evenly.
- Cream the butter and sugars. In your large mixing bowl, combine the softened butter, granulated sugar, and brown sugar. Beat them together with a spatula or hand mixer until the mixture is light, fluffy, and pale in color—about 2 minutes by hand or 1 minute with a mixer. You’ll see the texture change from grainy to smooth and creamy. That’s the sign you’re on the right track.
- Add the wet ingredients. Mix in the pumpkin puree, egg, and vanilla extract. Stir until everything is fully combined. The batter will look slightly curdled at this point—don’t panic. That’s normal. The pumpkin and egg aren’t fully emulsified yet, but they will be once the flour goes in.
- Combine the dry ingredients. In a separate small bowl (yes, I know I said one bowl—this is the exception), whisk together the flour, baking soda, cream of tartar, salt, cinnamon, nutmeg, ginger, and cloves. If you really want to keep it to one bowl, you can whisk the dry ingredients in a separate cup and then add them to the wet mixture. I won’t tell anyone.
- Mix the dry into the wet. Gradually add the dry ingredients to the wet mixture, stirring gently with your spatula. Stop as soon as the flour disappears. Overmixing at this stage develops gluten, which can make the cookies tough. A few streaks of flour are fine—they’ll disappear as you scoop.
- Chill the dough (optional but recommended). Cover the bowl with plastic wrap and refrigerate for 20-30 minutes. This step isn’t strictly necessary, but it firms up the dough so the cookies don’t spread too much. If you’re in a hurry, you can skip it—just expect slightly flatter cookies.
- Prepare the cinnamon sugar coating. In a small bowl, mix together the 1/4 cup granulated sugar and 1 tablespoon cinnamon. Stir until evenly combined.
- Scoop and roll. Using a cookie scoop or two spoons, portion out rounded tablespoons of dough (about 1.5 tablespoons each). Roll each portion into a ball between your palms, then roll it generously in the cinnamon sugar mixture. Place the coated dough balls on the prepared baking sheets, spacing them about 2 inches apart. You should get about 18-20 cookies total.
- Bake. Bake one sheet at a time for 10-12 minutes. The cookies will look puffy and slightly underdone in the center when you pull them out. That’s exactly what you want. The edges should be set and lightly golden, but the centers will still look soft and slightly cracked. Don’t overbake—they continue cooking on the hot sheet as they cool.
- Cool on the baking sheet. Let the cookies rest on the baking sheet for 5 minutes. This allows them to set without breaking. After 5 minutes, transfer them to a wire rack to cool completely. If you try to move them too soon, they’ll fall apart. Trust me, I learned this the hard way.
Cooking Tips & Techniques
I’ve made these cookies more times than I can count, and I’ve picked up a few tricks along the way. Here’s what I wish someone had told me before I started:
- Don’t overmix the dough. This is the number one mistake I see. Once the flour goes in, mix just until it disappears. Overmixing develops gluten, which makes cookies tough instead of tender. You want them soft and chewy, not like little hockey pucks.
- Use room temperature ingredients. Cold butter won’t cream properly with the sugar, and a cold egg can cause the butter to seize. Let everything sit out for 15-20 minutes before you start. It makes a real difference in the texture.
- Check your pumpkin puree. Some brands are more watery than others. If your puree looks thin or has liquid pooling on top, blot it with a paper towel before measuring. Too much moisture = flat, sad cookies.
- Space them out. These cookies spread more than you think. I learned this when my first batch merged into one giant cookie rectangle. Leave at least 2 inches between each dough ball.
- Rotate the baking sheet halfway through. About 5-6 minutes in, turn the sheet 180 degrees. This ensures even baking, especially if your oven has hot spots. My oven runs hot on the left side, so this step saved my cookies more than once.
- Let them cool on the sheet. I know it’s tempting to move them immediately, but those 5 minutes of resting time are crucial. The cookies are fragile when hot—they need that time to set up. If you rush it, you’ll end up with crumbled cookies and a broken heart.
Variations & Adaptations
One of the best things about this recipe is how flexible it is. Here are some ways to make it your own:
- Gluten-Free Version: Swap the all-purpose flour for a 1:1 gluten-free baking flour blend. I’ve used Bob’s Red Mill with great results. The texture will be slightly more delicate, but the flavor is still spot on.
- Dairy-Free Version: Use vegan butter or coconut oil (solid, not melted) in place of the butter. I’ve tried both, and coconut oil gives a slightly firmer texture but still delicious. Just make sure your vegan butter is softened to room temperature.
- Extra Spiced: Add 1/4 teaspoon of cardamom or allspice to the dough for a more complex flavor profile. I did this by accident once when I grabbed the wrong jar, and it turned out amazing.
- Chocolate Chip Addition: Fold in 1/2 cup of white chocolate chips or semi-sweet chocolate chips after mixing the dough. The sweetness of white chocolate pairs beautifully with the pumpkin and cinnamon.
- Pumpkin Seed Topping: After rolling the dough balls in cinnamon sugar, press a few pepitas (pumpkin seeds) onto the top of each cookie before baking. It adds a nice crunch and looks pretty too.
- Lower Sugar Option: Reduce the granulated sugar to 1/2 cup and the brown sugar to 2 tablespoons. The cookies will be less sweet but still flavorful. The texture might be slightly less tender, so don’t reduce it too much.
Serving & Storage Suggestions
These cookies are best served slightly warm, when the edges are still a little crisp and the center is soft and chewy. I like to pair them with a cold glass of milk or a hot cup of chai tea. They also make a fantastic dessert for Thanksgiving—just arrange them on a platter with some fresh apple slices and a dusting of cinnamon.
For storage, keep the cookies in an airtight container at room temperature for up to 5 days. Place a slice of bread in the container to help maintain moisture—the cookies will absorb the bread’s moisture and stay soft. Just replace the bread slice every couple of days. If you live in a humid climate, skip the bread trick and store them with a paper towel to absorb excess moisture.
You can also freeze the baked cookies for up to 3 months. Layer them between sheets of parchment paper in a freezer-safe container. To thaw, let them sit at room temperature for about 30 minutes. If you want that fresh-from-the-oven warmth, pop them in a 300°F oven for 5 minutes.
For freezing the dough, scoop the dough balls and place them on a baking sheet lined with parchment. Freeze until solid, then transfer to a freezer bag. You can bake them straight from frozen—just add 2-3 minutes to the baking time. This is my favorite trick for having fresh cookies on demand without the mess.
Nutritional Information & Benefits
Here’s the estimated nutritional breakdown per cookie (based on 20 cookies):
- Calories: 145
- Total Fat: 6g
- Saturated Fat: 3.5g
- Cholesterol: 25mg
- Sodium: 95mg
- Total Carbohydrates: 22g
- Dietary Fiber: 1g
- Sugars: 13g
- Protein: 2g
These numbers are estimates and will vary based on the exact brands and measurements you use. But here’s the good news: pumpkin is packed with vitamin A and fiber, which means you’re getting a little nutritional boost with every bite. The cinnamon also has anti-inflammatory properties, so consider these cookies a wellness treat. (Okay, maybe that’s a stretch, but it makes me feel better about eating three in one sitting.)
If you’re watching your sugar intake, you can reduce the sugar slightly or use a sugar substitute like monk fruit sweetener. Just note that the texture might change slightly. These cookies are also naturally nut-free, making them a safe option for school bake sales or parties.
Conclusion
These soft & chewy pumpkin snickerdoodle cookies have become my go-to fall recipe for a reason. They’re simple enough for a weekday baking project but impressive enough to bring to any gathering. The combination of warm spices, tender pumpkin, and that signature cinnamon-sugar coating is just irresistible. Honestly, every time I make them, I’m transported back to that grocery store aisle—but now I don’t have to chase a memory. I can recreate it in my own kitchen, one batch at a time.
I’d love to hear how these turn out for you. Did you add any twists? Did your family devour them as fast as mine does? Leave a comment below and let me know—I read every single one. And if you share a photo on social media, tag me so I can see your beautiful cookies. Happy baking, friends. May your cookies be soft, your kitchen smell like cinnamon, and your heart feel a little fuller with every bite.
Frequently Asked Questions
Can I use pumpkin pie filling instead of pumpkin puree?
No, please don’t. Pumpkin pie filling is already sweetened and spiced, which will throw off the balance of this recipe. Stick with 100% pure pumpkin puree for the best results. If you accidentally bought pie filling, save it for a pie and grab a can of puree for these cookies.
Why did my cookies turn out cakey instead of chewy?
This usually happens when there’s too much pumpkin or the dough is overmixed. Make sure you’re using exactly 1/3 cup of pumpkin puree and mix the dough just until the flour disappears. Also, check that your baking soda is fresh—old baking soda can cause cookies to puff up too much.
Can I make these cookies ahead of time?
Absolutely. You can prepare the dough up to 2 days in advance and keep it covered in the refrigerator. When you’re ready to bake, let the dough sit at room temperature for 10 minutes to soften slightly, then scoop and roll as directed. You can also freeze the baked cookies for up to 3 months.
Do I really need cream of tartar?
Yes, for the authentic snickerdoodle flavor. Cream of tartar gives these cookies their signature tang and helps with the texture. If you don’t have it, you can substitute with 1 teaspoon of lemon juice or white vinegar, but the flavor will be slightly different. I recommend picking up a jar—it lasts forever and you’ll use it for other recipes too.
How do I know when the cookies are done baking?
Look for edges that are set and lightly golden, with centers that still look soft and slightly underdone. The cookies will continue to bake on the hot sheet as they cool. If you wait until the centers look fully set, they’ll be overbaked and dry. When in doubt, pull them out a minute early rather than a minute late.
PrintOne Bowl Soft & Chewy Pumpkin Snickerdoodle Cookies
These soft and chewy pumpkin snickerdoodle cookies combine the classic tang of snickerdoodles with warm pumpkin spice. Made in one bowl with simple pantry ingredients, they feature crispy edges, soft centers, and a crackly cinnamon-sugar coating.
- Prep Time: 20 minutes
- Cook Time: 12 minutes
- Total Time: 32 minutes
- Yield: 18-20 cookies 1x
- Category: Dessert
- Cuisine: American
Ingredients
- 1/2 cup (1 stick) unsalted butter, softened
- 3/4 cup (150g) granulated sugar
- 1/4 cup (50g) light brown sugar, packed
- 1/3 cup (80g) pumpkin puree (not pumpkin pie filling)
- 1 large egg, room temperature
- 1 teaspoon vanilla extract
- 1 and 3/4 cups (220g) all-purpose flour
- 1/2 teaspoon baking soda
- 1/2 teaspoon cream of tartar
- 1/4 teaspoon salt
- 1 teaspoon ground cinnamon
- 1/4 teaspoon ground nutmeg
- 1/4 teaspoon ground ginger
- 1/8 teaspoon ground cloves
- 1/4 cup (50g) granulated sugar (for coating)
- 1 tablespoon ground cinnamon (for coating)
Instructions
- Preheat oven to 350°F (175°C). Line two baking sheets with parchment paper or silicone mats.
- In a large mixing bowl, cream together softened butter, granulated sugar, and brown sugar until light, fluffy, and pale (about 2 minutes by hand or 1 minute with a mixer).
- Mix in pumpkin puree, egg, and vanilla extract until fully combined. Batter may look slightly curdled.
- In a separate small bowl, whisk together flour, baking soda, cream of tartar, salt, cinnamon, nutmeg, ginger, and cloves.
- Gradually add dry ingredients to wet mixture, stirring gently with a spatula just until flour disappears. Do not overmix.
- Cover bowl with plastic wrap and refrigerate dough for 20-30 minutes (optional but recommended).
- In a small bowl, mix together 1/4 cup granulated sugar and 1 tablespoon cinnamon for coating.
- Using a cookie scoop or two spoons, portion dough into rounded tablespoons (about 1.5 tablespoons each). Roll each into a ball, then roll generously in cinnamon sugar mixture. Place on prepared baking sheets, spacing 2 inches apart.
- Bake one sheet at a time for 10-12 minutes. Cookies should look puffy and slightly underdone in the center with set, lightly golden edges.
- Let cookies rest on baking sheet for 5 minutes, then transfer to a wire rack to cool completely.
Notes
For best results, use room temperature ingredients. If pumpkin puree is watery, blot with a paper towel before measuring. Do not overmix dough. Cookies continue to bake on hot sheet after removal. For storage, keep in an airtight container at room temperature for up to 5 days; place a slice of bread in container to maintain moisture. Baked cookies can be frozen for up to 3 months. Dough can be frozen in scooped balls and baked directly from frozen, adding 2-3 minutes to baking time.
Nutrition
- Serving Size: 1 cookie
- Calories: 145
- Sugar: 13
- Sodium: 95
- Fat: 6
- Saturated Fat: 3.5
- Carbohydrates: 22
- Fiber: 1
- Protein: 2
Keywords: pumpkin snickerdoodle cookies, soft and chewy cookies, fall baking, one bowl cookies, pumpkin cookies, snickerdoodle recipe


