My neighbor, Mrs. Gable, watched me fumbling with a wobbly gelatin mold on my front porch one cool October afternoon. I was trying to get a pumpkin dessert to set for a potluck, and frankly, it was a disaster waiting to happen. She didn’t say anything at first. Then, she just shook her head with a little smile and walked back inside, returning a few minutes later with a small, square dish wrapped in a tea towel. “Try this,” she said. “It doesn’t need the oven, and it won’t give you any sass.”
That was my first introduction to these no-bake pumpkin cheesecake bars. Mrs. Gable had been making them for decades, a recipe she picked up from a friend who ran a small bed-and-breakfast upstate. She wasn’t a fancy cook—honestly, she used store-bought graham crackers and canned pumpkin without a second thought. But the way the creamy, spiced filling sat on that buttery crust? It was pure magic. I stood there on the porch, fork in hand, and let me tell you, I forgot all about my gelatin disaster. This was the fall dessert I had been searching for.
I’ve tweaked her version just a little over the years—adding a touch more cinnamon, a pinch of cloves, and a secret ingredient that makes the texture impossibly smooth. But the heart of this recipe is still hers. It’s the kind of dessert that says “fall is here” without making you sweat over a hot stove. Maybe you’ve been there, staring at a pile of pumpkins and wondering how to turn them into something special without a lot of fuss. These bars are your answer. They are cozy, no-bake, and honestly, the best fall dessert you’ll make this season.
Why You’ll Love This Recipe
These no-bake pumpkin cheesecake bars aren’t just another pumpkin dessert. They are the result of many, many test batches in my kitchen, and I can say with confidence that they hit every single mark. Here’s why they are a keeper:
- Quick & Easy: Comes together in about 20 minutes of active prep time. No oven required, which means no preheating and no waiting. Just mix, press, pour, and chill.
- Simple Ingredients: You likely have most of these in your pantry already. Canned pumpkin, cream cheese, and basic spices—no fancy grocery trips needed.
- Perfect for Fall Gatherings: Whether it’s a Thanksgiving potluck, a cozy Friendsgiving, or just a Tuesday night craving for something seasonal, these bars fit right in.
- Crowd-Pleaser: I have brought these to family dinners, office parties, and neighbor get-togethers. They disappear fast. Kids love the creamy texture, and adults appreciate the warm spice profile.
- Unbelievably Delicious: The flavor combo is next-level comfort food. The tangy cream cheese, the earthy pumpkin, and that perfect blend of cinnamon, nutmeg, and ginger—it’s fall in every bite.
What makes this recipe different from the rest? It’s the texture. I use a little trick—a bit of cold water mixed with the gelatin—that gives the filling a silky, almost mousse-like consistency. It’s not too dense and not too jiggly. It’s just right. This isn’t just another version of pumpkin cheesecake bars. It’s my best version, tested until it was absolutely perfect.
This recipe is the kind that makes you close your eyes after the first bite. It’s comfort food reimagined—faster, easier, but with the same soul-soothing satisfaction. Perfect for impressing guests without stress, or turning a simple fall evening into something a little more memorable.
What Ingredients You Will Need
This recipe uses simple, wholesome ingredients to deliver bold flavor and a satisfying texture. Most of these are pantry staples, especially if you are a fall baking enthusiast. Here’s what you need:
For the Crust
- 1 ½ cups graham cracker crumbs (about 12 full sheets, crushed finely. I prefer using a food processor for the best texture)
- ¼ cup granulated sugar
- 6 tablespoons unsalted butter, melted (adds richness and helps the crust hold together)
- ¼ teaspoon ground cinnamon (a little extra warmth in the base)
For the Pumpkin Cheesecake Filling
- 16 ounces (two 8-ounce blocks) cream cheese, softened to room temperature (I recommend Philadelphia for the smoothest, creamiest result)
- 1 cup canned pumpkin puree (not pumpkin pie filling—make sure it’s 100% pure pumpkin)
- ¾ cup granulated sugar
- 1 teaspoon vanilla extract
- 1 teaspoon ground cinnamon
- ½ teaspoon ground nutmeg
- ½ teaspoon ground ginger
- ¼ teaspoon ground cloves
- ¼ teaspoon salt (to balance the sweetness and enhance the spices)
- 1 packet (about 2 ¼ teaspoons) unflavored gelatin powder
- 3 tablespoons cold water (for blooming the gelatin)
- 1 cup heavy whipping cream, cold
For the Topping (Optional but Recommended)
- ½ cup heavy whipping cream, cold
- 2 tablespoons powdered sugar
- ¼ teaspoon vanilla extract
- Ground cinnamon or nutmeg for dusting
Ingredient Tips: Make sure your cream cheese is truly at room temperature. If it’s too cold, your filling will be lumpy. For the pumpkin, I always use Libby’s canned pumpkin—it has the best consistency and flavor. If you want to use fresh pumpkin puree, make sure you roast and drain it well to remove excess moisture. Otherwise, the bars might not set properly.
Substitution Guidance: For a gluten-free crust, use gluten-free graham crackers or crushed gluten-free shortbread cookies. For a dairy-free version, use dairy-free cream cheese and a coconut cream-based whipped topping, though the texture will be slightly different. You can also skip the gelatin and use an extra ½ cup of cold heavy cream whipped to stiff peaks, but the bars will be a bit softer.
Equipment Needed
You don’t need a lot of fancy tools for these no-bake pumpkin cheesecake bars. Here’s what I use:
- 9×9-inch square baking pan (An 8×8-inch pan also works, but the bars will be a little taller. You may need to adjust chilling time slightly.)
- Parchment paper (To line the pan for easy removal. I always leave an overhang on two sides for lifting.)
- Food processor or a sturdy zip-top bag and rolling pin (For crushing graham crackers. The food processor is faster and gives a finer crumb.)
- Medium mixing bowl (For the crust)
- Large mixing bowl (For the cheesecake filling)
- Hand mixer or stand mixer (A hand mixer works perfectly. A stand mixer is also great, but not necessary.)
- Small microwave-safe bowl (For melting butter and blooming the gelatin)
- Rubber spatula (For folding and scraping the bowl)
- Measuring cups and spoons
- Plastic wrap (For covering the pan while chilling)
Budget-Friendly Options: If you don’t have a food processor, place the graham crackers in a zip-top bag and crush them with a rolling pin. It’s a little more work, but it gets the job done. A hand mixer is a worthwhile investment if you bake often, but you can also whisk the filling vigorously by hand—just be prepared for a bit of an arm workout.
Maintenance Tip: If you use a hand mixer, make sure the beaters are clean and dry before starting. Any residual grease can affect how the cream cheese whips up.
Preparation Method
Let’s get started. This is a straightforward process, but a few key steps make all the difference. Take your time, and you’ll be rewarded with perfect bars.
- Prepare the pan. Line a 9×9-inch baking pan with parchment paper, leaving an overhang on two opposite sides. This will act as handles to lift the bars out later. Set aside.
- Make the crust. In a medium bowl, combine the graham cracker crumbs, ¼ cup sugar, and ¼ teaspoon cinnamon. Pour in the melted butter and stir with a fork until the mixture looks like wet sand and holds together when pressed. Transfer the mixture to your prepared pan. Press it firmly and evenly into the bottom. I use the bottom of a flat measuring cup to get it really compact. Place the pan in the refrigerator while you make the filling.
- Bloom the gelatin. In a small microwave-safe bowl, sprinkle the gelatin powder over the 3 tablespoons of cold water. Let it sit for 5-10 minutes. It will become thick and spongy. This is called blooming, and it’s essential for a smooth texture.
- Whip the cream. In a large mixing bowl, pour the 1 cup of cold heavy whipping cream. Using a hand mixer or stand mixer with the whisk attachment, beat the cream on medium-high speed until stiff peaks form. This takes about 2-3 minutes. Be careful not to over-whip, or you’ll end up with butter. Set the whipped cream aside in the refrigerator.
- Melt the gelatin. Microwave the bloomed gelatin for 10-15 seconds, or until it becomes a clear, liquid. Stir it and set it aside to cool slightly while you make the filling. It should be liquid but not hot.
- Make the cheesecake filling. In another large mixing bowl, beat the softened cream cheese with an electric mixer on medium speed until smooth and creamy, about 1 minute. Add the pumpkin puree, ¾ cup sugar, vanilla extract, cinnamon, nutmeg, ginger, cloves, and salt. Beat until everything is well combined and smooth. Scrape down the sides of the bowl as needed.
- Incorporate the gelatin. With the mixer running on low speed, slowly pour in the melted gelatin. Mix just until it’s fully incorporated. The mixture will thicken slightly.
- Fold in the whipped cream. Remove the whipped cream from the refrigerator. Using a rubber spatula, gently fold the whipped cream into the pumpkin mixture. Do this in two additions. Fold until no white streaks remain. The filling will be light, airy, and beautifully orange.
- Assemble the bars. Remove the crust from the refrigerator. Pour the filling over the crust and spread it into an even layer with your spatula. Give the pan a gentle tap on the counter to release any air bubbles.
- Chill. Cover the pan with plastic wrap and refrigerate for at least 6 hours, but preferably overnight. This allows the gelatin to set fully and the flavors to meld. Do not rush this step!
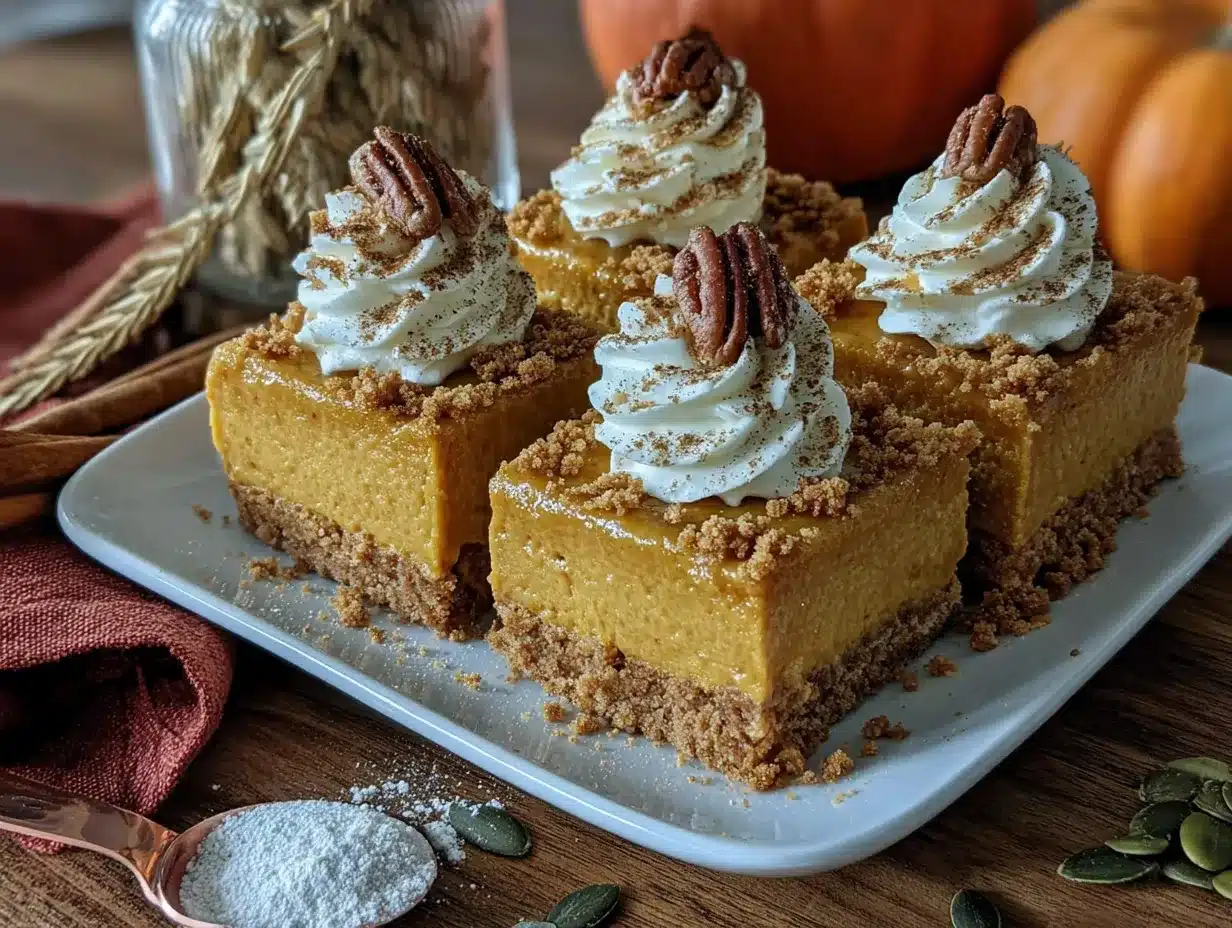
- Make the topping (optional). When ready to serve, make the whipped cream topping. In a medium bowl, beat the ½ cup cold heavy cream, 2 tablespoons powdered sugar, and ¼ teaspoon vanilla extract until soft peaks form. Spread or pipe it over the set cheesecake bars. Dust with a little cinnamon or nutmeg.
- Slice and serve. Lift the bars out of the pan using the parchment overhang. Place them on a cutting board. Use a sharp knife to slice them into 9 or 16 squares. For clean slices, wipe the knife clean between cuts.
Sensory Cues: When you press the crust, it should feel compact and hold its shape. The filling, after folding, should be thick, fluffy, and a rich pumpkin-orange color. When you slice the chilled bars, the knife should glide through cleanly, and the filling should be firm but creamy.
Cooking Tips & Techniques
I’ve made these no-bake pumpkin cheesecake bars more times than I can count, and I’ve learned a few things along the way. Here are my best tips to ensure success:
- Room temperature cream cheese is non-negotiable. I learned this the hard way. If your cream cheese is cold, it won’t blend smoothly, and you’ll end up with tiny lumps in your filling. Let it sit on the counter for at least 30-60 minutes before you start. If you’re in a hurry, cut it into cubes and let it sit for 15 minutes.
- Don’t skip blooming the gelatin. This step is crucial. If you add dry gelatin directly to the filling, it won’t dissolve properly and you’ll get gritty, unset bars. Let it sit in the cold water until it’s firm, then melt it gently.
- Fold, don’t stir. When incorporating the whipped cream, use a gentle folding motion. Stirring vigorously will deflate the air you just whipped into the cream, making your bars dense instead of light and mousse-like.
- Chill time is not a suggestion. These bars need a solid 6 hours to set, but overnight is truly best. I once tried to rush them after 4 hours, and the slices were a bit messy. Patience pays off here.
- Use a sharp knife for clean slices. A dull knife will drag through the filling and ruin the presentation. Run the knife under hot water, wipe it dry, and then slice. Repeat between cuts for perfect squares.
- If your crust is too crumbly, add a little more melted butter. The texture should be like wet sand that holds together when you squeeze it. If it falls apart, drizzle in another tablespoon of melted butter and mix again.
Common Mistake to Avoid: Over-whipping the cream. If you whip it too long, it will separate and become grainy. Stop as soon as you have stiff peaks that stand up straight. If you accidentally over-whip, you can try to salvage it by adding a tablespoon of cold cream and gently folding it in, but it’s better to start fresh.
Variations & Adaptations
One of the best things about this recipe is how easily it adapts. Here are a few ways I like to change it up:
- Gingersnap Crust: Swap the graham crackers for crushed gingersnap cookies. The spicy, molasses flavor of the cookies pairs beautifully with the pumpkin filling. Use the same amount—about 1 ½ cups of crumbs.
- Chocolate Drizzle: After the bars are set and topped with whipped cream, drizzle them with melted dark chocolate. The slight bitterness of the chocolate cuts through the sweetness and adds a lovely richness. I do this for holiday parties, and it’s always a hit.
- Maple Pecan Twist: Add ¼ cup of pure maple syrup to the filling along with the sugar (reduce the sugar by ¼ cup to balance). Then, sprinkle a handful of toasted, chopped pecans over the top before chilling. The maple flavor is so cozy for fall.
- Dairy-Free Version: Use dairy-free cream cheese (like Kite Hill or Tofutti) and a can of full-fat coconut cream (chilled and whipped) instead of heavy cream. The texture will be a little less firm, but still delicious. Make sure your graham crackers are also dairy-free.
- Pumpkin Spice Latte Bars: Add 1-2 teaspoons of instant espresso powder to the filling along with the spices. The coffee flavor enhances the pumpkin and makes these taste like your favorite fall drink in dessert form.
Personal Variation: My personal favorite is the gingersnap crust with a pinch of cayenne pepper in the filling. It gives a tiny, unexpected warmth at the end that keeps people guessing. I tried it on a whim one year, and now I can’t go back.
Serving & Storage Suggestions
These no-bake pumpkin cheesecake bars are best served cold, straight from the refrigerator. The texture is perfectly creamy and firm at this temperature. Here’s how to serve and store them:
Serving: Place the sliced bars on a chilled plate or a decorative serving tray. Top each square with a dollop of the whipped cream and a light dusting of cinnamon or nutmeg. For an extra special touch, add a few candied pecans or a drizzle of caramel sauce. These bars are wonderful on their own, but they also pair beautifully with a hot cup of coffee, a spiced chai latte, or a glass of cold milk.
Storage: Store any leftover bars in an airtight container in the refrigerator. They will keep well for up to 5 days. The flavors actually deepen and meld together after a day or two, so leftovers are often even better than the fresh bars. I usually keep them in the pan I baked them in, covered tightly with plastic wrap.
Freezing: These bars freeze beautifully. Once the bars are fully set, lift them out of the pan and place them on a baking sheet lined with parchment paper. Freeze them for 1-2 hours, or until they are solid. Then, wrap each bar individually in plastic wrap and place them in a freezer-safe bag or container. They will keep for up to 3 months. To serve, thaw them in the refrigerator overnight. The texture remains creamy and delicious.
Reheating: There is no need to reheat these bars. In fact, they are best enjoyed cold. If you prefer a slightly softer texture, let them sit at room temperature for 10-15 minutes before serving.
Flavor Development: I find that these bars taste even better on the second day. The spices have time to fully infuse the filling, and the crust sets up perfectly. If you can, make them a day ahead of when you plan to serve them.
Nutritional Information & Benefits
While these no-bake pumpkin cheesecake bars are a treat, they do offer some nutritional benefits, especially compared to traditional baked cheesecakes. Here’s a rough estimate per bar (based on 9 servings):
Estimated Nutritional Values (per bar):
- Calories: 410
- Fat: 28g
- Saturated Fat: 17g
- Carbohydrates: 36g
- Sugar: 26g
- Fiber: 2g
- Protein: 6g
- Sodium: 310mg
Health Benefits of Key Ingredients: Pumpkin is packed with vitamin A, which is great for eye health and immune function. It’s also a good source of fiber. The cinnamon and ginger in the filling have anti-inflammatory properties and can aid in digestion. The cream cheese provides a small amount of calcium and protein.
Dietary Considerations: This recipe is vegetarian. As mentioned, it can be adapted to be gluten-free and dairy-free. It is not vegan in its original form, but with substitutions, it can be made vegan-friendly. Please note that this recipe contains dairy and gluten (in the graham crackers).
Personal Wellness Perspective: I believe in balance. These bars are a wonderful way to enjoy the flavors of fall without feeling overly indulgent. They are lighter than a traditional baked cheesecake and use simple, real ingredients. Enjoy them as a special treat, and don’t stress about the numbers. A little sweetness now and then is good for the soul.
Conclusion
These easy no-bake pumpkin cheesecake bars are the fall dessert you’ve been waiting for. They are creamy, spiced, and completely fuss-free. No oven, no water bath, no stress. Just a beautiful, delicious dessert that comes together in minutes and tastes like a cozy autumn afternoon.
I encourage you to make this recipe your own. Swap the crust, add a drizzle, or experiment with the spices. That’s the beauty of a good base recipe—it welcomes your personal touch. Whether you serve them at a Thanksgiving dinner or just because it’s a crisp Tuesday in October, these bars never disappoint.
I love this recipe because it reminds me of Mrs. Gable and that first bite on my front porch. It’s a reminder that the best recipes often come from the simplest exchanges. So, go ahead, give these bars a try. I have a feeling they’ll become a fall tradition in your home, too.
I’d love to hear how yours turn out! Leave a comment below and let me know if you tried any variations. Did you use the gingersnap crust? Add a chocolate drizzle? Share your creation with me—I’m always inspired by your kitchen adventures. Happy fall baking!
Frequently Asked Questions
Can I use fresh pumpkin instead of canned?
Yes, you can, but you need to prepare it correctly. Roast a small sugar pumpkin until tender, then puree the flesh in a food processor. The key is to drain the puree. Place it in a cheesecloth-lined sieve over a bowl for at least an hour to remove excess moisture. If the puree is too wet, your bars may not set properly.
Why did my cheesecake bars not set?
This usually happens for a few reasons. The most common is that the gelatin wasn’t bloomed properly, or the mixture wasn’t chilled long enough. Make sure you let the gelatin sit in the cold water for a full 5-10 minutes, and then heat it until it’s completely liquid. Also, be patient with the chilling time—at least 6 hours, but overnight is best.
Can I make these bars without gelatin?
Absolutely. You can omit the gelatin entirely. The bars will be softer and more like a mousse or a no-bake pie filling, but they will still be delicious. To compensate, whip the heavy cream to very stiff peaks and fold it in gently. The bars will need a full 8 hours or overnight to set up enough for slicing.
How do I get clean, neat slices?
Use a sharp, non-serrated knife. Run it under hot water, wipe it dry with a clean towel, and then make your cut. Wipe the blade clean between each slice. For the first cut, press straight down without sawing back and forth. This technique gives you those beautiful, Instagram-worthy squares.
Can I double this recipe for a larger crowd?
Yes! To double this recipe, use a 9×13-inch baking pan instead of a 9×9-inch. Double all the ingredients. You may need to increase the chilling time slightly—give it at least 8 hours or overnight to ensure the center is fully set. The bars will be a little thinner, but they will still be perfect for a crowd.
PrintEasy No-Bake Pumpkin Cheesecake Bars: Best Fall Dessert
These no-bake pumpkin cheesecake bars are creamy, spiced, and completely fuss-free. No oven required, just mix, press, pour, and chill for a perfect fall dessert.
- Prep Time: 20 minutes
- Cook Time: 0 minutes
- Total Time: 6 hours 20 minutes (includes chilling)
- Yield: 9 servings 1x
- Category: Dessert
- Cuisine: American
Ingredients
- 1 ½ cups graham cracker crumbs (about 12 full sheets, crushed finely)
- ¼ cup granulated sugar
- 6 tablespoons unsalted butter, melted
- ¼ teaspoon ground cinnamon
- 16 ounces (two 8-ounce blocks) cream cheese, softened to room temperature
- 1 cup canned pumpkin puree (not pumpkin pie filling)
- ¾ cup granulated sugar
- 1 teaspoon vanilla extract
- 1 teaspoon ground cinnamon
- ½ teaspoon ground nutmeg
- ½ teaspoon ground ginger
- ¼ teaspoon ground cloves
- ¼ teaspoon salt
- 1 packet (about 2 ¼ teaspoons) unflavored gelatin powder
- 3 tablespoons cold water
- 1 cup heavy whipping cream, cold
- ½ cup heavy whipping cream, cold (for topping)
- 2 tablespoons powdered sugar (for topping)
- ¼ teaspoon vanilla extract (for topping)
- Ground cinnamon or nutmeg for dusting (for topping)
Instructions
- Prepare the pan. Line a 9×9-inch baking pan with parchment paper, leaving an overhang on two opposite sides. Set aside.
- Make the crust. In a medium bowl, combine graham cracker crumbs, ¼ cup sugar, and ¼ teaspoon cinnamon. Pour in melted butter and stir until mixture looks like wet sand. Press firmly into the bottom of the prepared pan. Refrigerate while making filling.
- Bloom the gelatin. In a small microwave-safe bowl, sprinkle gelatin over 3 tablespoons cold water. Let sit for 5-10 minutes until thick and spongy.
- Whip the cream. In a large mixing bowl, beat 1 cup cold heavy whipping cream on medium-high speed until stiff peaks form. Refrigerate.
- Melt the gelatin. Microwave bloomed gelatin for 10-15 seconds until liquid. Set aside to cool slightly.
- Make the cheesecake filling. In another large bowl, beat softened cream cheese until smooth. Add pumpkin puree, ¾ cup sugar, vanilla, cinnamon, nutmeg, ginger, cloves, and salt. Beat until well combined and smooth.
- Incorporate the gelatin. With mixer on low, slowly pour in melted gelatin. Mix until fully incorporated.
- Fold in the whipped cream. Gently fold whipped cream into pumpkin mixture in two additions until no white streaks remain.
- Assemble the bars. Remove crust from refrigerator. Pour filling over crust and spread evenly. Tap pan gently to release air bubbles.
- Chill. Cover with plastic wrap and refrigerate for at least 6 hours, preferably overnight.
- Make the topping (optional). When ready to serve, beat ½ cup cold heavy cream, 2 tablespoons powdered sugar, and ¼ teaspoon vanilla until soft peaks form. Spread or pipe over set bars. Dust with cinnamon or nutmeg.
- Slice and serve. Lift bars out using parchment overhang. Slice into 9 or 16 squares using a sharp knife, wiping clean between cuts.
Notes
Make sure cream cheese is at room temperature to avoid lumps. Do not skip blooming the gelatin. Fold whipped cream gently to keep filling light. Chill for at least 6 hours, preferably overnight. For clean slices, use a sharp knife and wipe between cuts.
Nutrition
- Serving Size: 1 bar
- Calories: 410
- Sugar: 26
- Sodium: 310
- Fat: 28
- Saturated Fat: 17
- Carbohydrates: 36
- Fiber: 2
- Protein: 6
Keywords: no-bake pumpkin cheesecake bars, fall dessert, pumpkin dessert, no-bake dessert, cheesecake bars


