I was at the hardware store last October, not for anything Halloween-related, just buying a new paintbrush for the trim in the living room. The man behind the counter, who I’d only ever exchanged polite nods with about the weather, started telling me about how his grandmother used to make cookies for the neighborhood kids every year. I wasn’t expecting cooking advice from a hardware store clerk named Bob, but there I was, standing in the aisle with the paint samples, listening to him describe exactly how to make ghost-shaped sugar cookies that didn’t puff up and lose their shape.
Honestly, I almost didn’t write it down. I mean, who takes baking advice from the guy who sells you duct tape? But there was something about the way he talked about those cookies, how serious he was about the chilling time, that made me grab a scrap piece of receipt paper from my pocket. He even drew a little ghost on the corner. Let me tell you, that scrap of paper is now dog-eared and stained with vanilla extract because I’ve used it so many times.
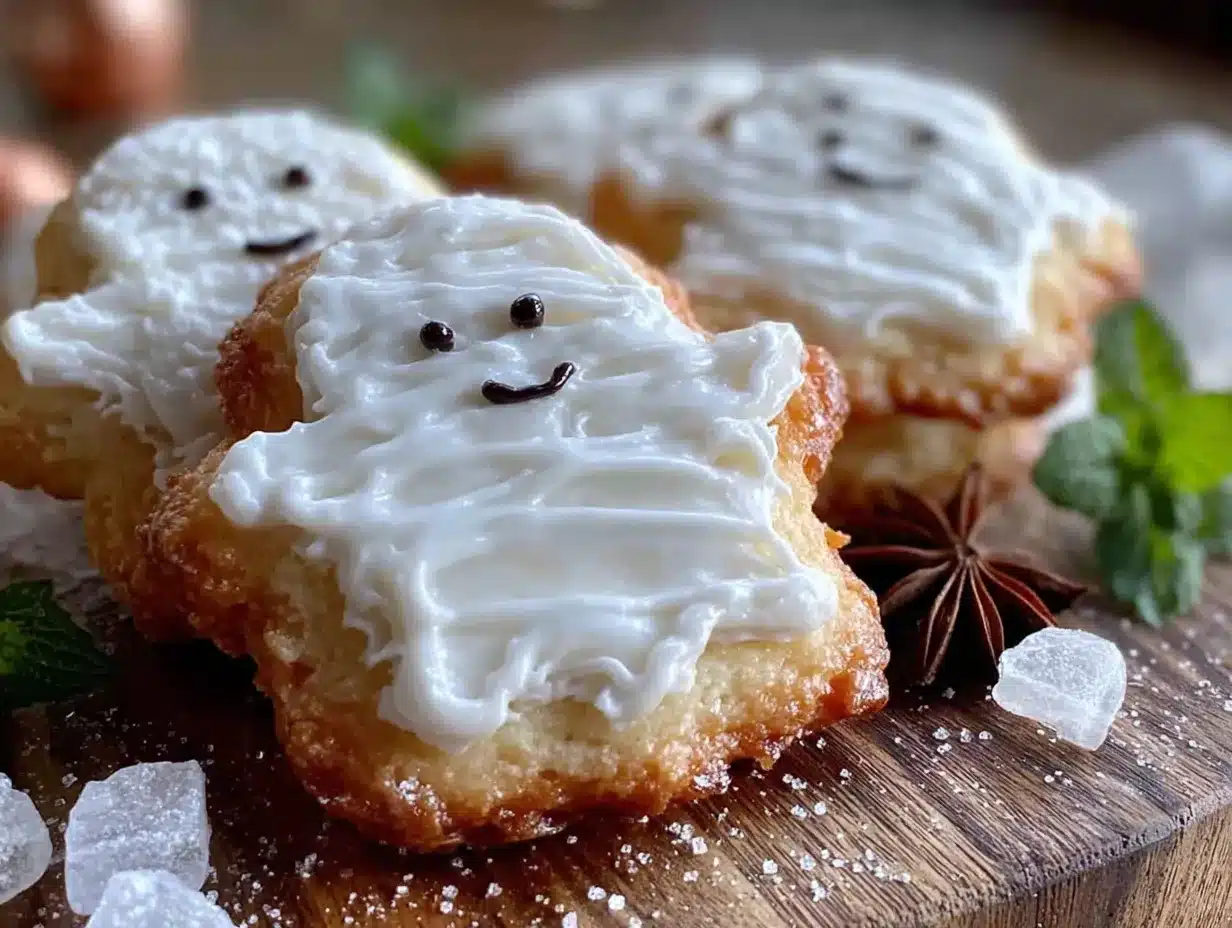
These cozy ghost-shaped sugar cookies with royal icing have become my go-to for October baking. They’re not too sweet, they hold their shape like little champions, and they have this soft, buttery texture that just melts. Maybe you’ve been there, scrolling through Pinterest for the perfect Halloween cookie, only to end up with a tray of blobby ghosts that look more like potatoes. That was me, year after year, until Bob at the hardware store saved my Halloween baking game. These cookies are the ones that finally made me feel like I could actually do this whole decorated cookie thing without wanting to throw my rolling pin across the kitchen.
Why You’ll Love This Recipe
I’ve tested this recipe more times than I care to count, and I can tell you with complete confidence that these are the best ghost-shaped sugar cookies you’ll ever make. The secret is in the technique, and I’ve learned every trick through trial and error so you don’t have to.
- Perfect Shape Retention : No more ghost blobs! The chilling method here is foolproof, and your cookies will come out looking exactly like the cutter you used.
- Simple Pantry Ingredients : You probably have everything in your kitchen right now. Butter, sugar, flour, eggs, vanilla. No weird specialty items that cost a fortune.
- Perfect for a Cozy Night In : This is the recipe for those cold October evenings when you just want to bake something comforting while the wind howls outside.
- Crowd-Pleaser for All Ages : Kids love decorating them, adults love eating them, and everyone loves how cute they look on a plate.
- Unbelievably Delicious : The flavor is that classic sugar cookie taste but better. The edges are slightly crisp, the centers are soft, and the royal icing sets up perfectly glossy.
What makes this recipe different from all the others I’ve tried is the resting time in the fridge. I know, I know, waiting is the worst part. But trust me on this one. That extra chill time is what keeps the ghosts from spreading into each other and losing their cute little shapes. It’s the kind of recipe that makes you close your eyes after the first bite because it just tastes like October should taste.
What Ingredients You Will Need
This recipe uses simple, wholesome ingredients to deliver that perfect sugar cookie flavor and texture without any fuss. Most of these are pantry staples you probably already have, which makes this perfect for spontaneous baking sessions.
For the Cookies
- 1 cup (226g) unsalted butter, softened to room temperature (I use Kerrygold for the best flavor, but any good butter works)
- 1 cup (200g) granulated sugar
- 1 large egg, room temperature
- 1 teaspoon vanilla extract (use pure, not imitation, it really does make a difference)
- ½ teaspoon almond extract (this is my secret weapon for that bakery taste)
- 2 ½ cups (312g) all-purpose flour, spooned and leveled
- ½ teaspoon baking powder
- ¼ teaspoon salt
For the Royal Icing
- 3 cups (360g) powdered sugar, sifted
- 2 large egg whites or ¼ cup pasteurized egg whites (I use the carton kind to avoid any salmonella worries)
- 1 teaspoon lemon juice (fresh is best, it helps stabilize the icing)
- ½ teaspoon vanilla extract
- Black gel food coloring for the ghost faces
- Optional: White gel food coloring if you want your ghosts extra bright white
When it comes to the flour, I really recommend spooning it into your measuring cup and leveling it off with a knife. Scooping directly from the bag can pack in too much flour and make your cookies dry. I learned this the hard way, trust me. For the butter, make sure it’s truly softened, not melted. You want it to give slightly when you press it, but still hold its shape. If it’s too soft, your cookies will spread more.
For the royal icing, if you’re worried about using raw egg whites, the pasteurized carton whites work perfectly. I’ve also used meringue powder with water following the package directions, and that works great too. Just don’t skip the lemon juice, it helps the icing dry hard and glossy instead of staying tacky.
Equipment Needed
You don’t need a ton of fancy equipment for these cookies, which is part of why I love making them. Here’s what you’ll need:
- Ghost-shaped cookie cutter (I got mine on Amazon for like five bucks, but any shape works)
- Electric stand mixer or hand mixer (I’ve made these with both, the hand mixer actually works fine)
- Rolling pin (I prefer a French rolling pin, but any kind works)
- Baking sheets (I use Nordic Ware, they don’t warp in the oven)
- Parchment paper or silicone baking mats (parchment is cheaper and works just as well)
- Cooling racks
- Piping bags or small zip-top bags for the icing
- Small round piping tip (like a Wilton #2 or #3)
- Plastic wrap
- Sharp knife or bench scraper
If you don’t have a ghost cutter, you can actually use a small paring knife to freehand cut ghost shapes from a circle of dough. I did that one year when I couldn’t find my cutter, and honestly, they looked charmingly homemade. For piping bags, the cheap disposable ones from the grocery store work totally fine. Just snip a tiny corner off if you don’t have a tip.
Preparation Method
Let me walk you through this step by step. I’ve included all the little details that make the difference between good cookies and great cookies.
Step 1: Make the Cookie Dough
In your mixer bowl, cream together the softened butter and granulated sugar on medium speed until light and fluffy, about 3 minutes. You want it to look pale and almost like whipped cream. Scrape down the sides of the bowl halfway through. Add the egg, vanilla extract, and almond extract, then beat until combined. It might look a little curdled at this point, that’s totally normal.
Step 2: Add the Dry Ingredients
In a separate bowl, whisk together the flour, baking powder, and salt. With the mixer on low speed, gradually add the dry ingredients to the wet mixture. Mix just until the dough comes together. You should see streaks of flour still, stop mixing when it’s just combined. Overmixing will make your cookies tough.
Step 3: Chill the Dough
Divide the dough into two discs, wrap each tightly in plastic wrap, and flatten them into discs about 1 inch thick. Refrigerate for at least 2 hours, but overnight is even better. I know it’s tempting to skip this, but don’t. This is the step that Bob from the hardware store insisted on, and he was absolutely right. The dough needs to be firm so the cookies hold their shape.
Step 4: Roll and Cut
Preheat your oven to 350°F (175°C). Line your baking sheets with parchment paper. Lightly flour your work surface and rolling pin. Roll one disc of dough to about ¼ inch thickness. Here’s a trick I learned: roll the dough between two sheets of parchment paper. It prevents sticking and makes cleanup so much easier. Cut out your ghost shapes and place them about 2 inches apart on the prepared baking sheets.
Step 5: Chill Again
Here’s the non-negotiable part. Place the baking sheets with the cut-out cookies back in the refrigerator for at least 15 minutes before baking. This re-chills the butter and prevents spreading. I usually do this while the oven is preheating. If you skip this step, your ghosts will look more like melted snowmen.
Step 6: Bake
Bake for 8-10 minutes, or until the edges are just barely starting to turn golden. The centers should still look soft and pale. Rotate the baking sheet halfway through for even baking. Let the cookies cool on the baking sheet for 5 minutes, then transfer to a wire rack to cool completely. They will continue to set as they cool.
Step 7: Make the Royal Icing
While the cookies cool, make the icing. In a clean mixer bowl, beat the egg whites and lemon juice until frothy. Gradually add the sifted powdered sugar, beating on low speed until combined. Then beat on medium-high speed for about 5 minutes until the icing is glossy and forms stiff peaks. You want it to be thick enough that it holds its shape but thin enough to pipe. Add water a few drops at a time if it’s too thick, or more powdered sugar if it’s too thin.
Step 8: Decorate
Transfer about ¾ of the icing to a piping bag fitted with a small round tip. Use this to outline and flood the ghost shapes. The remaining ¼ of the icing, add black gel food coloring to make the ghost faces. Pipe little eyes and mouths onto the wet white icing. Let the cookies dry completely, about 4-6 hours or overnight. The icing should be hard to the touch before you stack them.
Cooking Tips & Techniques
I’ve made every mistake in the book with these cookies, so let me save you some trouble. The biggest issue people have is cookie spread. If your ghosts are turning into blobs, the dough was too warm. That second chill in the fridge before baking is absolutely critical. I once tried to rush it and only chilled for 5 minutes, and my ghosts looked like they’d been in a boxing match.
Another thing I learned the hard way: don’t overbake. Sugar cookies continue to cook on the hot baking sheet after you pull them out of the oven. Pull them when the edges are just barely golden, even if the centers look slightly underdone. They’ll set up perfectly as they cool. Overbaked sugar cookies are dry and crumbly, and nobody wants that.
For the royal icing, consistency is everything. You want it to be like thick honey. If you lift the spoon, the icing should ribbon back into the bowl and smooth out within about 10 seconds. If it’s too thin, it will run off the cookies. If it’s too thick, it won’t spread smoothly. I test it on a spare cookie first before decorating the whole batch.
One more tip: use a toothpick to pop any air bubbles that form in the icing right after you flood the cookie. It makes the surface perfectly smooth and gives that professional bakery look. Also, keep a damp paper towel over your piping bag when you’re not using it, royal icing dries out fast.
Variations & Adaptations
These ghost cookies are super versatile, and I’ve tried a bunch of different versions over the years. Here are some of my favorites:
- Gluten-Free Version : Substitute the all-purpose flour with a 1:1 gluten-free baking flour blend. I’ve used Bob’s Red Mill with great results. Just add an extra tablespoon of flour to account for the different absorption rate.
- Vegan Adaptation : Use vegan butter sticks (not the spreadable kind) and replace the egg with a flax egg (1 tablespoon ground flaxseed mixed with 3 tablespoons water, let sit for 5 minutes). For the royal icing, use aquafaba (the liquid from a can of chickpeas) instead of egg whites. It whips up exactly the same.
- Flavor Variations : Add 1 teaspoon of lemon zest to the dough for a bright, citrusy ghost. Or try ½ teaspoon of peppermint extract for a holiday twist. I made a batch with orange zest last year and they were amazing with the vanilla.
- Color Variations : Instead of just white ghosts, try tinting some of the icing pale pink or light purple for a whimsical Halloween look. You can also add edible glitter on top of the wet icing for sparkly ghosts.
- Different Shapes : The dough works great with any cookie cutter. I’ve used pumpkins, bats, and even cat faces with the same recipe. Just adjust the baking time slightly for smaller or larger shapes.
My personal favorite variation is adding a pinch of cinnamon to the dough. It gives the cookies this warm, cozy flavor that’s perfect for fall. I accidentally did it one year when I grabbed the wrong jar, and now I do it on purpose every time.
Serving & Storage Suggestions
These ghost cookies are best served at room temperature. I like to arrange them on a white platter with a few orange and purple napkins underneath for a pop of color. They look adorable on a Halloween dessert table alongside some pumpkin cupcakes or caramel apples.
For storage, keep the decorated cookies in an airtight container at room temperature. They’ll stay fresh for up to 2 weeks, though honestly, they never last that long in my house. Layer them between sheets of parchment paper to protect the icing. Don’t refrigerate them, the humidity can make the icing get sticky and soft.
You can also freeze the undecorated cookies for up to 3 months. Just bake and cool them completely, then place them in a freezer-safe container with parchment between layers. When you’re ready to decorate, let them thaw at room temperature for about an hour, then ice as usual. The icing will stick perfectly to thawed cookies.
If you’re making these for a party, I recommend baking the cookies a few days ahead and decorating them the day before. The icing needs a good 6-8 hours to dry completely hard, so give yourself plenty of time. The flavor actually gets better after a day or two, the cookies soften slightly and the flavors meld together beautifully.
Nutritional Information & Benefits
Let’s be real, these are cookies, so they’re not health food. But I do appreciate that this recipe uses real butter and pure extracts instead of artificial flavors and preservatives. Each cookie (based on 24 cookies) contains approximately:
- Calories : 180
- Fat : 8g
- Carbohydrates : 26g
- Sugar : 18g
- Protein : 2g
The butter provides a good source of Vitamin A, and if you use almond extract, you get a tiny bit of vitamin E. The egg whites in the royal icing are pure protein, though there’s not enough to make a significant difference. These cookies are vegetarian, and with the substitutions mentioned above, can easily be made vegan and gluten-free.
I always tell myself that the joy these cookies bring is worth the sugar. There’s something about making them that feels like self-care, and sharing them with loved ones is even better. Everything in moderation, right?
Conclusion
These cozy ghost-shaped sugar cookies with royal icing have become an October tradition in my house, and I honestly can’t imagine fall without them. They’re the kind of recipe that makes you feel like a baking pro, even if you’ve never decorated a cookie in your life. The dough is forgiving, the icing is manageable, and the end result is so ridiculously cute that you’ll want to take pictures from every angle.
I hope you give these a try, and I hope they bring you the same cozy joy they bring me. Don’t be afraid to make them your own, add sprinkles, change the colors, or just eat them plain without any icing at all. There are no rules in your own kitchen.
If you make these cookies, I would absolutely love to hear about it. Leave a comment below and tell me how they turned out, or tag me in your photos on social media. Did your kids help decorate? Did you try a fun variation? I want to hear all about it. Happy baking, and happy Halloween!
Frequently Asked Questions
Why did my ghost cookies spread and lose their shape?
This is the most common issue, and it almost always comes down to the dough being too warm. Make sure you chill the dough for at least 2 hours before rolling, and then chill the cut-out cookies on the baking sheet for another 15 minutes before baking. If your kitchen is warm, pop them in the freezer for 10 minutes instead.
Can I use store-bought royal icing instead of making it from scratch?
You can, but I don’t recommend it. Store-bought royal icing in a can doesn’t dry as hard and has a weird artificial taste. Homemade is so much better and really not that hard to make. If you’re short on time, you can use a simple powdered sugar glaze instead, just know it won’t be as glossy.
How far in advance can I make these cookies?
You can bake the cookies up to a week ahead and store them undecorated in an airtight container. Decorate them up to 3 days before serving. The fully decorated cookies will stay fresh for up to 2 weeks if stored properly at room temperature.
Can I freeze the cookie dough?
Absolutely! The dough freezes beautifully for up to 3 months. Wrap it tightly in plastic wrap and then in foil, or place it in a freezer bag. Thaw overnight in the refrigerator before rolling and cutting. You can also freeze the baked, undecorated cookies for up to 3 months.
How do I get the royal icing perfectly smooth?
The key is the right consistency and a steady hand. After you flood the cookie with icing, gently tap the baking sheet on the counter a few times to help the icing settle. Use a toothpick to spread the icing into any corners and to pop any air bubbles. Let the cookies dry completely undisturbed for at least 6 hours.
PrintCozy Ghost-Shaped Sugar Cookies with Royal Icing
These ghost-shaped sugar cookies hold their shape perfectly and have a soft, buttery texture. Topped with glossy royal icing, they are the perfect Halloween treat for a cozy night in.
- Prep Time: 30 minutes
- Cook Time: 10 minutes
- Total Time: 2 hours 40 minutes (includes chilling)
- Yield: 24 servings 1x
- Category: Dessert
- Cuisine: American
Ingredients
- 1 cup (226g) unsalted butter, softened to room temperature
- 1 cup (200g) granulated sugar
- 1 large egg, room temperature
- 1 teaspoon vanilla extract
- ½ teaspoon almond extract
- 2 ½ cups (312g) all-purpose flour, spooned and leveled
- ½ teaspoon baking powder
- ¼ teaspoon salt
- 3 cups (360g) powdered sugar, sifted
- 2 large egg whites or ¼ cup pasteurized egg whites
- 1 teaspoon lemon juice
- ½ teaspoon vanilla extract
- Black gel food coloring
- Optional: White gel food coloring
Instructions
- In a mixer bowl, cream together the softened butter and granulated sugar on medium speed until light and fluffy, about 3 minutes. Scrape down the sides halfway through. Add the egg, vanilla extract, and almond extract; beat until combined.
- In a separate bowl, whisk together the flour, baking powder, and salt. With the mixer on low speed, gradually add the dry ingredients to the wet mixture. Mix just until the dough comes together.
- Divide the dough into two discs, wrap each tightly in plastic wrap, and flatten into discs about 1 inch thick. Refrigerate for at least 2 hours, or overnight.
- Preheat oven to 350°F (175°C). Line baking sheets with parchment paper. Lightly flour your work surface and rolling pin. Roll one disc of dough to about ¼ inch thickness. Cut out ghost shapes and place them about 2 inches apart on the prepared baking sheets.
- Place the baking sheets with the cut-out cookies back in the refrigerator for at least 15 minutes before baking.
- Bake for 8-10 minutes, or until the edges are just barely starting to turn golden. Rotate the baking sheet halfway through. Let cookies cool on the baking sheet for 5 minutes, then transfer to a wire rack to cool completely.
- While the cookies cool, make the icing. In a clean mixer bowl, beat the egg whites and lemon juice until frothy. Gradually add the sifted powdered sugar, beating on low speed until combined. Then beat on medium-high speed for about 5 minutes until the icing is glossy and forms stiff peaks. Add water a few drops at a time if too thick, or more powdered sugar if too thin.
- Transfer about ¾ of the icing to a piping bag fitted with a small round tip. Use to outline and flood the ghost shapes. Add black gel food coloring to the remaining ¼ icing to make ghost faces. Pipe eyes and mouths onto the wet white icing. Let cookies dry completely, about 4-6 hours or overnight.
Notes
Chilling the dough and cut-out cookies is essential to prevent spreading. For royal icing, consistency should be like thick honey. Use a toothpick to pop air bubbles. Keep a damp paper towel over the piping bag to prevent drying. Cookies can be stored in an airtight container at room temperature for up to 2 weeks. Undecorated cookies can be frozen for up to 3 months.
Nutrition
- Serving Size: 1 cookie
- Calories: 180
- Sugar: 18
- Sodium: 60
- Fat: 8
- Saturated Fat: 5
- Carbohydrates: 26
- Protein: 2
Keywords: ghost cookies, sugar cookies, Halloween cookies, royal icing, ghost-shaped cookies, Halloween baking, decorated cookies


