I burned the first batch of wild huckleberry hand pies not once, but three times before realizing my oven’s temperature was off by a good 25 degrees. Honestly, it felt like those tiny bursts of wild huckleberries were mocking me, oozing out at the wrong moment and turning the crust into something closer to charcoal than the golden, flaky pockets I had imagined. I didn’t even grow up loving hand pies — they always seemed a bit fiddly — but something about the fresh wild huckleberries and the sweet vanilla bean glaze made me stubbornly keep trying. You know that feeling when you chase a recipe because it just *feels* worth the effort? This was it.
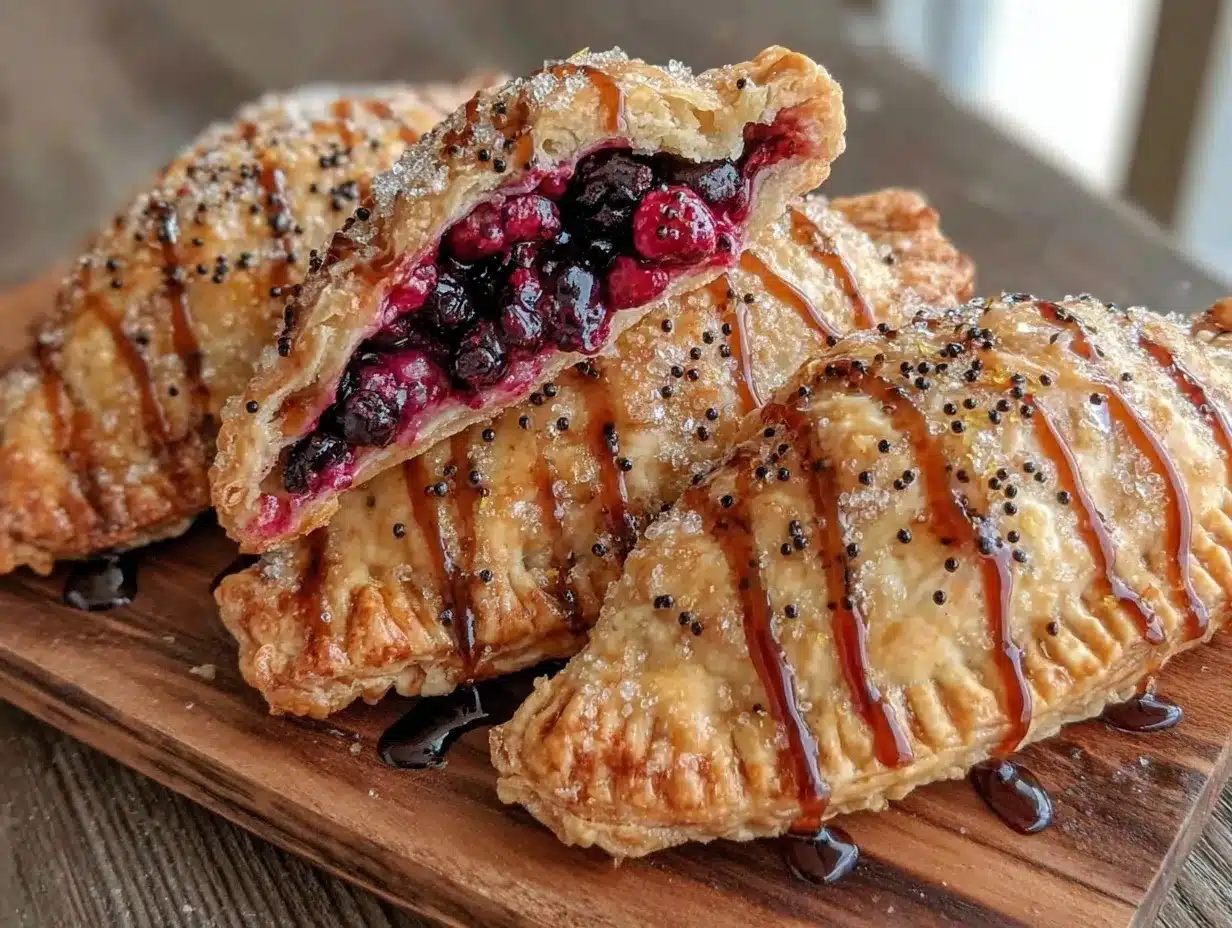
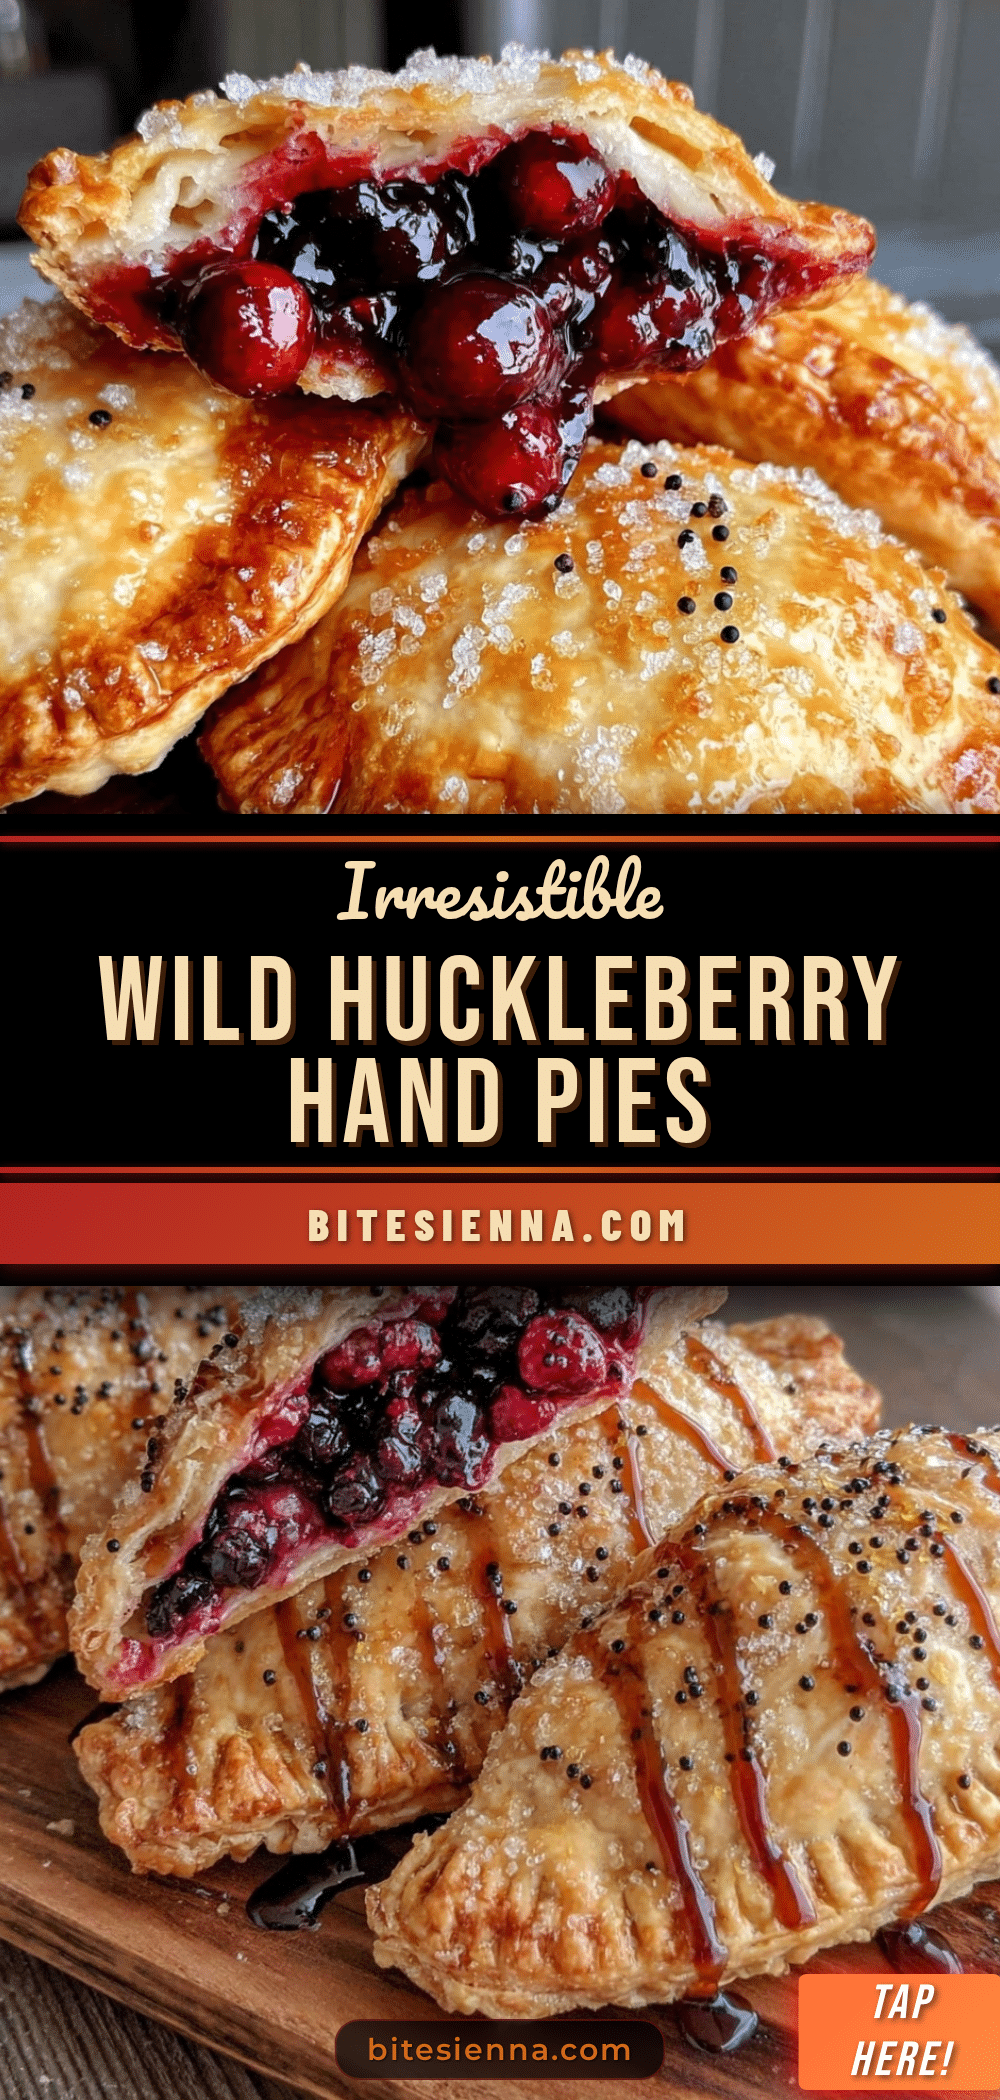
The moment those pies came out perfectly crisp and warm, dripping with a lightly sweet glaze, I realized this recipe wasn’t just about dessert; it was about capturing a rare summer moment. Wild huckleberries are not your everyday berry, and their tangy-sweet punch combined with that creamy vanilla bean glaze gives the whole thing a rustic charm that’s hard to resist. Plus, they’re perfect for holding in your hand, which means no forks, no plates — just pure, simple joy. It’s the kind of treat that sticks with you, the sort you pull out of the oven when you need a little pick-me-up or want to surprise someone with something homemade yet effortless.
What’s funny is that after all those early burns, I started noticing things—the way the berry juices bubble just right, the slight crackle of the crust, the scent of vanilla bean wafting through the kitchen—that made me trust the process. That’s why this recipe stuck around. It’s the one I reach for when I want a dessert that feels both special and, honestly, a little wild.
Why You’ll Love This Recipe
- Quick & Easy: These hand pies come together in about 45 minutes, making them perfect for a spontaneous treat or a last-minute dessert for guests.
- Simple Ingredients: No need for fancy pantry items — if you have basic baking staples and fresh or frozen wild huckleberries, you’re good to go.
- Perfect for Summer Gatherings: Whether you’re hosting a backyard barbecue or enjoying a peaceful afternoon, these pies fit right in with the season’s vibes.
- Crowd-Pleaser: Kids love the handheld size, and adults appreciate the balance of tart berries and sweet glaze.
- Unbelievably Delicious: The flaky crust paired with juicy huckleberry filling and that creamy vanilla bean glaze creates a satisfying flavor and texture combo that feels like a hug in dessert form.
This isn’t just another berry hand pie recipe. The difference is in the glaze — made from real vanilla bean specks and just enough powdered sugar to keep it silky without being overpowering. Plus, the wild huckleberry filling isn’t cooked to death; it’s gently simmered to keep that fresh, tangy brightness alive. I love how this recipe manages to feel both rustic and refined, without needing any special equipment or hard-to-find ingredients.
Honestly, after making these, it’s hard to settle for plain fruit pies again. The little extra step of the vanilla bean glaze turns something simple into a memorable dessert that’s as beautiful as it is tasty. And if you’re into easy summer recipes, this one’s a keeper — much like the sparkling red, white, and blue vodka lemonade punch that pairs perfectly for outdoor parties!
What Ingredients You Will Need
This recipe uses straightforward ingredients that come together to create bold flavor and a satisfying texture without fuss or fancy shopping. Most are pantry staples, and the wild huckleberries can be fresh or frozen depending on the season.
- For the Pie Dough:
- All-purpose flour, 2 ½ cups (300 g) — I prefer King Arthur for consistent results
- Unsalted butter, 1 cup (227 g), cold and cubed (adds richness and flakiness)
- Granulated sugar, 2 tablespoons (for slight sweetness)
- Salt, ½ teaspoon
- Ice water, 6–8 tablespoons (keep cold to prevent melting butter)
- For the Wild Huckleberry Filling:
- Wild huckleberries, 2 cups fresh or frozen (about 300 g) — if unavailable, substitute with wild blueberries or blackberries
- Granulated sugar, ½ cup (100 g) — adjust to taste depending on berry tartness
- Lemon juice, 1 tablespoon (freshly squeezed to brighten flavors)
- Cornstarch, 1 tablespoon (to thicken filling)
- Vanilla extract, ½ teaspoon (optional, adds depth)
- For the Vanilla Bean Glaze:
- Powdered sugar, 1 cup (120 g), sifted
- Whole milk or half-and-half, 2–3 tablespoons (for desired glaze consistency)
- Vanilla bean paste, 1 teaspoon (or scrape seeds from ½ vanilla bean pod for authentic specks)
- Pinch of salt (balances sweetness)
If you’re looking for a gluten-free twist, I’ve swapped the all-purpose flour with almond flour before — it changes the texture but still tastes great. And if you want to make the glaze dairy-free, use coconut milk or almond milk; just keep an eye on the consistency since those can be thinner.
Equipment Needed
- Mixing bowls — a large one for dough and a smaller one for the filling
- Pastry cutter or food processor — makes cutting the butter into the flour easier, but you can use two knives if needed
- Rolling pin — essential for rolling out the dough evenly
- Baking sheet lined with parchment paper — to keep hand pies from sticking and for easy cleanup
- Pastry brush — for brushing the tops with egg wash or milk to get a golden finish
- Small saucepan — to cook the filling gently
- Mixing spoon or spatula — to stir filling and glaze
- Cooling rack — to let the pies cool and the glaze set without sogginess
If you don’t have a pastry cutter, your fingers work fine, just keep butter cold and work quickly. For rolling, a silicone baking mat can help with less sticking. I started using a silicone brush years ago and honestly, it’s the little things like that which make baking hand pies less messy and more fun.
Preparation Method
- Make the Pie Dough: In a large bowl, whisk together 2 ½ cups (300 g) of flour, 2 tablespoons sugar, and ½ teaspoon salt. Add 1 cup (227 g) of cold, cubed unsalted butter. Using a pastry cutter or food processor, cut the butter into the flour until the mixture resembles coarse crumbs with some pea-sized pieces. Slowly add 6–8 tablespoons of ice water, one tablespoon at a time, mixing gently until the dough just holds together. Don’t overwork it — it should be slightly crumbly but stick when pressed. Wrap the dough in plastic wrap and chill for at least 30 minutes.
- Prepare the Filling: While the dough chills, combine 2 cups (300 g) of wild huckleberries (fresh or frozen), ½ cup (100 g) sugar, 1 tablespoon lemon juice, and 1 tablespoon cornstarch in a small saucepan. Cook over medium heat, stirring frequently, until the mixture thickens and the berries burst slightly, about 5–7 minutes. Remove from heat and stir in ½ teaspoon vanilla extract if using. Let cool to room temperature.
- Roll and Cut the Dough: On a lightly floured surface, roll out the dough to about ⅛ inch (3 mm) thickness. Using a 4-inch (10 cm) round cutter, cut circles out of the dough. Gather scraps, re-roll once, and cut more circles. You should get about 12–14 rounds.
- Assemble the Hand Pies: Place a heaping tablespoon of the cooled huckleberry filling in the center of each dough circle, leaving about a ½ inch (1.3 cm) border. Brush the edges with a little water to help seal. Fold the dough over to create a half-moon shape. Press edges firmly with a fork to seal completely. Place pies on a parchment-lined baking sheet.
- Brush and Bake: Preheat your oven to 375°F (190°C). Brush the tops of the pies with milk or beaten egg for a shiny, golden crust. Cut small slits on top to let steam escape. Bake for 20–25 minutes until golden brown and crisp. Keep an eye on them around the 20-minute mark because ovens vary.
- Make the Vanilla Bean Glaze: While pies bake, whisk together 1 cup (120 g) powdered sugar, 2–3 tablespoons of milk or half-and-half, 1 teaspoon vanilla bean paste, and a pinch of salt until smooth and glossy. Adjust milk to get the desired drizzle consistency.
- Cool and Glaze: Once pies are out of the oven, transfer to a cooling rack. When they’re just warm (not hot), drizzle the vanilla bean glaze generously over each hand pie. Let glaze set for about 10 minutes before serving.
If you notice your filling bubbling out, it usually means the cornstarch didn’t thicken enough or the pie was overfilled. Next time, reduce filling by a tablespoon or cook it a bit longer on the stove. The little slits on top help the steam escape and keep the crust from sogging.
Cooking Tips & Techniques
One lesson I learned the hard way is that cold butter is your best friend when making pie dough. If the butter melts too soon, you lose that flaky texture everyone loves. That’s why I keep a bowl of ice water nearby and chill the dough before rolling. Honestly, it’s worth the extra wait.
When sealing hand pies, brushing the edges with water is a simple trick but makes a huge difference. It acts like glue, helping to prevent those annoying leaks. If you skip this step, you’ll probably end up with a berry river running across your baking sheet.
Don’t overload your pies with filling. It’s tempting to stuff them full of berries, but too much filling means more juice that can burst through the crust. I stick to about a tablespoon per pie — just enough to get that juicy burst without the mess.
Timing is key when glazing. If the pies are too hot, the glaze melts right off; too cool, and the glaze won’t spread nicely. I wait until they’re just warm to the touch before drizzling. This way, the glaze sets up with a lovely sheen without pooling.
If you want to multitask, start the filling first since it needs to cool, then make the dough while it chills. This keeps your workflow smooth and kitchen less chaotic.
Variations & Adaptations
- Berry Mix: Swap wild huckleberries for a mix of wild blueberries and blackberries if you can’t find huckleberries. The flavor changes but stays wonderfully tangy.
- Gluten-Free Option: Replace all-purpose flour with a gluten-free baking blend. The texture shifts slightly but the flavor remains delightful.
- Spiced Filling: Add a pinch of cinnamon or cardamom to the filling for warm spice notes that pair beautifully with the vanilla glaze.
- Vegan Version: Use dairy-free butter and plant-based milk for the dough and glaze. Aquafaba (chickpea water) makes a great egg wash substitute for brushing the crust.
- Alternative Glaze: Try a lemon glaze by mixing powdered sugar with fresh lemon juice instead of vanilla bean for a bright twist.
I once made these pies with a handful of chopped pecans mixed into the filling — added a nice crunch and nutty flavor that surprised everyone. It’s a fun way to customize if you like a bit more texture.
Serving & Storage Suggestions
These hand pies are best served warm, fresh out of the oven or reheated gently. They make a perfect handheld dessert for picnics, brunches, or casual gatherings. Pair them with a cup of strong coffee or a refreshing cucumber mint sparkler for a light, summery combo.
To store, keep the pies in an airtight container at room temperature for up to 2 days. For longer storage, freeze the unglazed pies in a single layer on a baking sheet, then transfer to a freezer bag. Bake from frozen, adding 5–7 extra minutes. Glaze after baking for the best texture.
When reheating, gently warm in a 325°F (160°C) oven for 8–10 minutes to bring back the flaky crust without drying out the filling. The flavors tend to deepen overnight, so these pies are surprisingly good the next day too.
Nutritional Information & Benefits
Each wild huckleberry hand pie contains roughly 250–300 calories, depending on size and amount of glaze used. They offer a good source of antioxidants from the wild huckleberries, which are known for their high vitamin C and anthocyanin content — great for immune support and skin health.
The homemade dough uses real butter and minimal sugar, keeping it free from preservatives and additives common in store-bought pastries. For those watching carbs, reducing the glaze amount lowers sugar intake without sacrificing flavor.
This recipe is naturally gluten-containing but can be adapted for gluten-free diets. It’s a wholesome treat made from scratch that feels indulgent but isn’t overloaded with processed ingredients — a nice balance for those mindful of wellness.
Conclusion
Making these wild huckleberry hand pies with vanilla bean glaze is genuinely one of those recipes that grew on me after a few tries — mostly because I wasn’t willing to give up after the initial flops. Now, they’re a go-to for summer desserts that feel like a little celebration of the season’s best wild flavors.
Feel free to tweak the filling sweetness or try one of the variations to make it your own. I love how this recipe lets you play with simple ingredients and still deliver a dessert that’s both comforting and a bit unexpected.
When you bake these, you’re not just making hand pies; you’re making memories — ones that come with a little wildness and a sweet vanilla finish, just like life should be.
If you give them a try, I’d love to hear how they turn out and what twists you add. There’s something special about sharing homemade recipes that bring a little joy and surprise to the table.
FAQs
Can I use frozen wild huckleberries for this recipe?
Yes, frozen wild huckleberries work well. Just thaw and drain excess liquid before cooking the filling to avoid sogginess.
How do I prevent the hand pies from leaking during baking?
Make sure to brush the edges with water before sealing and avoid overfilling. Also, creating small slits on top allows steam to escape, reducing leaks.
Can I prepare the dough in advance?
Absolutely. You can make the dough a day ahead, wrap it well, and keep it refrigerated. Bring it to room temperature before rolling.
What’s the best way to store leftover hand pies?
Store them in an airtight container at room temperature for up to 2 days or freeze unbaked pies for longer storage.
Can I substitute the vanilla bean glaze with something else?
Yes, a simple powdered sugar glaze with lemon juice or almond extract works nicely if you want a different flavor.
Pin This Recipe!
Wild Huckleberry Hand Pies with Vanilla Bean Glaze

These wild huckleberry hand pies feature a flaky crust filled with tangy-sweet wild huckleberries and are topped with a creamy vanilla bean glaze. Perfect for a quick, handheld summer dessert that combines rustic charm with refined flavor.
- Prep Time: 15 minutes
- Cook Time: 30 minutes
- Total Time: 45 minutes
- Yield: 12-14 hand pies 1x
- Category: Dessert
- Cuisine: American
Ingredients
- 2 ½ cups all-purpose flour (300 g)
- 1 cup unsalted butter, cold and cubed (227 g)
- 2 tablespoons granulated sugar (for dough)
- ½ teaspoon salt (for dough)
- 6–8 tablespoons ice water
- 2 cups wild huckleberries, fresh or frozen (about 300 g)
- ½ cup granulated sugar (100 g) for filling
- 1 tablespoon lemon juice, freshly squeezed
- 1 tablespoon cornstarch
- ½ teaspoon vanilla extract (optional)
- 1 cup powdered sugar, sifted (120 g)
- 2–3 tablespoons whole milk or half-and-half
- 1 teaspoon vanilla bean paste or seeds from ½ vanilla bean pod
- Pinch of salt (for glaze)
Instructions
- Make the Pie Dough: In a large bowl, whisk together flour, sugar, and salt. Add cold, cubed butter and cut into the flour using a pastry cutter or food processor until mixture resembles coarse crumbs with some pea-sized pieces. Slowly add ice water, one tablespoon at a time, mixing gently until dough just holds together. Wrap in plastic wrap and chill for at least 30 minutes.
- Prepare the Filling: Combine wild huckleberries, sugar, lemon juice, and cornstarch in a small saucepan. Cook over medium heat, stirring frequently, until thickened and berries burst, about 5–7 minutes. Remove from heat and stir in vanilla extract if using. Let cool to room temperature.
- Roll and Cut the Dough: On a lightly floured surface, roll dough to about ⅛ inch (3 mm) thickness. Cut 4-inch (10 cm) circles using a round cutter. Gather scraps, re-roll once, and cut more circles to yield about 12–14 rounds.
- Assemble the Hand Pies: Place a heaping tablespoon of cooled filling in the center of each dough circle, leaving a ½ inch (1.3 cm) border. Brush edges with water to seal. Fold dough over to form half-moon shape and press edges firmly with a fork. Place pies on parchment-lined baking sheet.
- Brush and Bake: Preheat oven to 375°F (190°C). Brush tops with milk or beaten egg for a golden crust. Cut small slits on top to vent steam. Bake 20–25 minutes until golden brown and crisp, watching closely near 20 minutes.
- Make the Vanilla Bean Glaze: Whisk powdered sugar, milk or half-and-half, vanilla bean paste, and pinch of salt until smooth and glossy. Adjust milk to desired drizzle consistency.
- Cool and Glaze: Transfer baked pies to a cooling rack. When warm (not hot), drizzle glaze generously over each pie. Let glaze set about 10 minutes before serving.
Notes
Keep butter cold to ensure flaky crust. Brush edges with water to prevent leaks. Do not overfill pies to avoid bursting filling. Wait until pies are warm before glazing to prevent glaze from melting off. Frozen wild huckleberries can be used but should be thawed and drained before cooking filling. Dough can be made a day ahead and refrigerated. For gluten-free, substitute flour with almond or gluten-free baking blend. For vegan, use dairy-free butter and plant-based milk; aquafaba can replace egg wash.
Nutrition
- Serving Size: 1 hand pie
- Calories: 275
- Sugar: 15
- Sodium: 150
- Fat: 14
- Saturated Fat: 8
- Carbohydrates: 34
- Fiber: 2
- Protein: 3
Keywords: wild huckleberry hand pies, vanilla bean glaze, summer dessert, handheld pies, berry hand pies, easy dessert, homemade pies