My neighbor Karen wasn’t trying to impress anyone. I’d stopped by to drop off a package that got delivered to my house by mistake, and the sight of these little black spiders sitting on her kitchen counter hit me before I even got through the doorway. There they were—a whole platter of deviled eggs with olive spiders perched on top, looking like they’d crawled right out of a Halloween decoration box. And Karen? She was standing there in her worn-out slippers, casually wiping her hands on her jeans, acting like she’d just thrown together a snack. “Oh, those,” she said when she caught me staring. “My kids wanted something fun for their class party.”
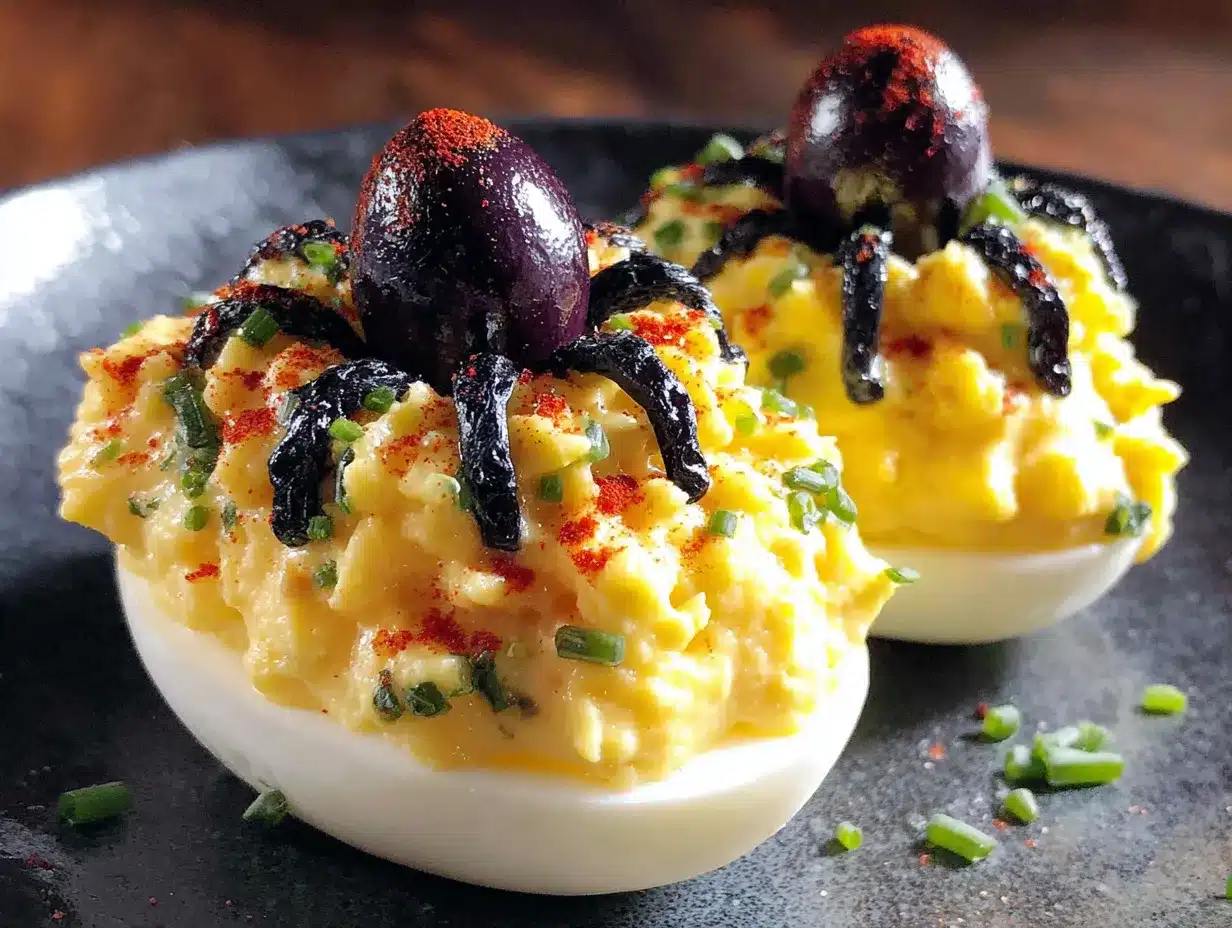
Honestly, I think I stood there for a solid minute just looking at them. The way the black olive legs curved just so, the little red pepper eyes staring back at me—it was the perfect mix of creepy and cute. I mean, I’d seen fancy Halloween treats before, but these felt different. They felt doable. Like something I could actually pull off without spending hours in the kitchen or buying a bunch of specialty ingredients. Karen let me take one home, and let me tell you, my kids lost their minds over it. “Mom, can you make these?” they asked, and I knew right then I’d be learning how to make spider deviled eggs before Halloween even arrived.
That was three years ago, and these spider deviled eggs have become our family’s official Halloween tradition. Maybe you’ve been there—scrolling through Pinterest looking for something that’s actually achievable with a regular grocery run and a reasonable amount of energy after work. These are that recipe. They look like you tried way harder than you actually did, and honestly, that’s the best kind of Halloween food. Let me show you how to make them.
Why You’ll Love This Recipe
I’ve made these spider deviled eggs for school parties, neighborhood gatherings, and our own Halloween movie nights, and they never fail to get the exact reaction I’m hoping for. Here’s why they work so well for real families:
- Budget-Friendly Ingredients : You probably already have most of what you need in your fridge right now. Eggs, mayo, mustard, olives—this isn’t one of those recipes that requires a special trip to a fancy grocery store. I love that about it.
- Kid-Approved Fun : My kids actually help me make these now. They place the olive spiders on top and add the little pepper eyes. It’s become our pre-Halloween tradition, and they’re so proud when they bring their creations to school.
- Surprisingly Quick : Once your eggs are hard-boiled and cooled, the actual assembly takes maybe 15 minutes. I’ve timed myself. The olive spiders come together fast once you get the hang of slicing them.
- Picky Eater Approved : Let’s face it—getting kids to eat protein-rich snacks can be a battle. But put a spider on top of something and suddenly it’s the most exciting thing on the table. My niece won’t touch regular deviled eggs, but she’ll eat three of these.
- Reheats Beautifully : Okay, you don’t reheat deviled eggs. But you can make the components ahead of time and assemble them right before serving. The filling keeps in the fridge for two days, and the olive spiders can be made a day ahead.
What makes these spider deviled eggs different from other Halloween recipes I’ve tried is the simplicity. I’ve seen versions that use food coloring to turn the filling green or purple, or that pipe the filling into fancy shapes. And those are great if you have the time and patience. But these? These rely on one clever trick—the olive spider—to do all the heavy lifting. The deviled egg filling itself is a classic, creamy recipe that my grandmother would approve of. It’s comforting and familiar, which is exactly what you want when you’re serving something that looks like creepy crawlies.
This is the kind of recipe that makes you feel like a Halloween hero without the stress. Perfect for impressing other parents at the school party or turning a regular dinner into something memorable for your kids.
What Ingredients You Will Need
This recipe uses simple, everyday ingredients to create something that looks far more complicated than it actually is. I’ve tested this with different brands and variations, so I’ll share what works best.
For the Deviled Eggs
- 12 large eggs – I prefer organic or pasture-raised for the richer yolk color, but any large eggs work fine. Make sure they’re not too fresh for easier peeling (eggs that are a week or two old peel more cleanly).
- 1/3 cup mayonnaise – Duke’s is my go-to for its tangy flavor, but Hellmann’s works beautifully too. Avoid Miracle Whip here—it’s too sweet and throws off the classic deviled egg taste.
- 1 tablespoon yellow mustard – Just regular yellow mustard, nothing fancy. It gives that classic deviled egg color and tang.
- 1 teaspoon white vinegar – This brightens up the filling without adding extra moisture. Apple cider vinegar works in a pinch.
- 1/4 teaspoon salt – Fine sea salt dissolves better than kosher salt here.
- 1/8 teaspoon black pepper – Freshly ground if you have it, but pre-ground is fine.
- 1/4 teaspoon paprika – For garnish and a little smoky warmth. I use sweet paprika, but smoked paprika adds a nice depth if you’re feeling adventurous.
For the Spider Decorations
- 1 can (6 ounces) large black olives – You need the large ones, not the jumbo or the small ones. I’ve tried both, and the regular large olives are the perfect size for spider bodies. Look for pitted olives to save yourself a headache.
- 1 small jar roasted red peppers – Or you can use fresh red bell pepper. The roasted ones are softer and easier to cut into tiny shapes. I’ve used both and slightly prefer the roasted for texture.
Ingredient Tips from My Kitchen
I learned the hard way that not all black olives are created equal for this recipe. The first time I made these spider deviled eggs, I bought jumbo olives thinking bigger would be better. They were too large and looked more like tarantulas than the cute little spiders I was going for. Stick with the regular large size.
For the roasted red peppers, I’ve found that the jarred ones in oil work perfectly. Just pat them dry with a paper towel before cutting so they don’t make the olive spiders slippery. If you’re using fresh bell pepper, cut a small piece and remove the skin—the bright red color shows up better against the black olives.
One more thing about the mayonnaise—please don’t use the reduced-fat version. I tried that once thinking I was being healthy, and the filling turned out grainy and flat. Full-fat mayonnaise gives you that silky, luxurious texture that makes deviled eggs so satisfying. Your kids won’t thank you for the calorie savings anyway.
Equipment Needed
You don’t need anything fancy to make these spider deviled eggs, which is part of the beauty. Here’s what you’ll need:
- Medium saucepan – For boiling the eggs. Any size works as long as the eggs fit in a single layer.
- Large bowl of ice water – This stops the cooking process and makes peeling easier. I use my biggest mixing bowl filled with ice cubes and cold water.
- Sharp knife and cutting board – You’ll be slicing olives lengthwise, so a sharp knife makes a big difference. Dull knives squish the olives.
- Small spoon or piping bag – I usually just use a spoon because I’m lazy, but a piping bag with a star tip makes prettier filling. A zip-top bag with the corner snipped off works too.
- Small paring knife – For cutting the olive legs and red pepper eyes. A regular knife works, but a paring knife gives you more control.
- Serving platter – A white or black platter makes the spiders pop. I use a white one because it contrasts nicely with the black olives.
If you don’t have a piping bag, don’t run out and buy one. I’ve used a plastic sandwich bag with the tip cut off for years, and it works perfectly. Just fill the bag, twist the top, and snip off a small corner. You can even practice on a plate before piping into the egg whites.
Preparation Method
Let me walk you through this step by step. I’ve made these spider deviled eggs more times than I can count, so I’ll share all the little tricks I’ve picked up along the way.
Step 1: Hard-Boil the Eggs Perfectly
Place your 12 eggs in a single layer in your saucepan. Cover them with cold water by about an inch. Bring the water to a rolling boil over high heat—you’ll see big bubbles breaking the surface. Once it’s boiling, turn off the heat, cover the pot, and let it sit for exactly 12 minutes. I set a timer every single time because I’ve forgotten and ended up with green-ringed yolks more than I’d like to admit.
While the eggs are sitting, prepare your ice water bath. After 12 minutes, use a slotted spoon to transfer the eggs to the ice water. Let them cool completely—about 10 minutes. This shock stops the cooking and makes peeling so much easier.
Step 2: Peel and Halve the Eggs
Here’s where patience pays off. Gently tap each egg on the counter to crack the shell all over, then roll it between your palms to loosen the shell. Start peeling from the wider end where the air pocket is—that’s the easiest spot to get under the shell. Run the egg under cold water as you peel to help remove stubborn bits.
Once all eggs are peeled, slice each one in half lengthwise. Carefully pop out the yolks into a medium bowl. Place the white halves on your serving platter, cut side up. I arrange mine in a circle pattern so the spiders look like they’re crawling around together.
Step 3: Make the Filling
Add the mayonnaise, yellow mustard, white vinegar, salt, and pepper to the bowl with the yolks. Mash everything together with a fork until it’s smooth and creamy. I start by breaking up the yolks, then stir in the other ingredients until there are no lumps. Taste it and adjust the seasoning—sometimes I add a little more mustard if I want more tang.
If you’re using a piping bag, spoon the filling into the bag now. If you’re just using a spoon, that’s fine too. The filling should be thick enough to hold its shape but soft enough to pipe easily.
Step 4: Fill the Egg Whites
Spoon or pipe the filling into each egg white half, mounding it slightly. I usually fill them so the filling rises just above the edge of the white. If you’re piping, use a star tip for a pretty ruffled look. If you’re using a spoon, a small offset spatula helps smooth the top. Don’t worry about making them perfect—the spiders will cover any imperfections.
Step 5: Create the Olive Spiders
This is the fun part. Take your black olives and slice each one in half lengthwise. You’ll use one half for the spider body and the other half for the legs. Set the body halves aside.
For the legs, take the remaining olive halves and slice them lengthwise into thin strips—you want about 4 strips per spider. Each strip becomes one leg. I usually get 3-4 strips from each half, depending on how thick I cut them.
Now, arrange 4 olive strips on each deviled egg to form the spider legs. Place them so they curve outward from the center, like the spider is crawling. Then place one olive half (cut side down) in the center on top of the legs. This is the spider body. Press down gently so it stays in place.
Step 6: Add the Eyes
Cut tiny triangles or small squares from your roasted red peppers. I use my paring knife and cut pieces about the size of a small lentil. Place two red pepper pieces on top of each olive body to look like spider eyes. You can position them close together for a cute look or farther apart for a more creepy effect. My kids always put them close together because they think it looks friendlier.
Sprinkle a little paprika over the finished spider deviled eggs for color. The red pepper eyes against the black olive body with the paprika-dusted yellow filling—it’s such a striking combination.
Cooking Tips & Techniques
I’ve made plenty of mistakes with these spider deviled eggs over the years, so let me save you the trouble.
The biggest mistake I made my first time was using olives that were too small. I grabbed the first can I saw without checking the size, and the “spiders” looked more like tiny bugs. The large olives are crucial—they give you enough surface area for the eyes and enough olive to slice into decent legs. Trust me on this one.
About peeling eggs—if you’re struggling with shells that won’t come off cleanly, try this trick I learned from a cooking blog years ago. Add a teaspoon of baking soda to the water before boiling. It raises the pH of the water and makes the shells slide off more easily. I do this every time now and it’s a game-changer.
For the filling texture, don’t overmix it. I used to beat the filling until it was super smooth, but I found it gets a little gluey that way. You want it creamy but with a slight texture from the yolks. Stop mixing as soon as everything comes together.
Timing strategy for parties: Boil and peel the eggs the night before. Make the filling and store it in a piping bag in the fridge. Slice the olives and cut the red pepper pieces. Then all you have to do the day of the party is assemble everything. It takes maybe 10 minutes and you look like a superhero.
One thing I wish someone had told me: Don’t put the olive legs on too far in advance. If you assemble the spiders more than 2 hours before serving, the olive strips can dry out and curl up. They still look fine, but they lose that fresh, plump appearance. Assemble them as close to serving time as possible for the best look.
Variations & Adaptations
These spider deviled eggs are pretty perfect as-is, but I’ve played around with different versions over the years. Here are some ideas if you want to mix things up:
Dietary Variations
- Dairy-Free : This recipe is naturally dairy-free since there’s no cheese or milk in the filling. Just make sure your mayonnaise doesn’t contain dairy (most don’t).
- Gluten-Free : Deviled eggs are naturally gluten-free, so no changes needed here. Double-check your mustard and mayonnaise labels if you’re serving someone with celiac disease.
- Lower-Fat Option : You can swap half the mayonnaise for plain Greek yogurt. The texture will be slightly less rich, but it’s still creamy and delicious. My sister does this and her kids don’t notice the difference.
Flavor Twists
- Spicy Spider Eggs : Add a dash of hot sauce or a pinch of cayenne pepper to the filling. The heat contrasts nicely with the cool, creamy texture.
- Bacon Spider Eggs : Sprinkle crumbled bacon over the filling before adding the olive spider. Because everything is better with bacon, right?
- Herb-Infused : Mix in some finely chopped fresh dill or chives into the filling. It adds a fresh, garden flavor that works surprisingly well with the olives.
Different Spider Designs
If black olives aren’t your thing, try using canned black beans for the spider bodies (just slice them in half) or even pitted dates for a sweeter version. I’ve seen people use raisins for the eyes instead of red peppers. Get creative with whatever you have in your pantry.
Serving & Storage Suggestions
These spider deviled eggs are best served at a slight chill—not straight from the fridge, but not room temperature either. Take them out of the refrigerator about 15 minutes before serving. This takes the edge off the cold and lets the flavors come through better.
For presentation, I arrange mine on a round white platter in a spiral pattern. The contrast between the white eggs, yellow filling, and black olives is really striking. Sometimes I sprinkle a little extra paprika around the edges of the platter for a spooky effect. You could also arrange them on a black platter to make the spiders pop even more.
What to serve alongside: These pair perfectly with other Halloween finger foods. I usually serve them with veggie sticks, cheese cubes, and maybe some warm pretzel bites. For drinks, apple cider or a simple punch works great.
Storage instructions: Leftover spider deviled eggs (if you have any!) should be stored in an airtight container in the refrigerator. They’ll keep for up to 2 days, but the olive legs might start to dry out after the first day. I usually don’t make more than we’ll eat in one sitting because they really are best fresh.
Don’t freeze them. I know someone’s going to ask, so let me save you the trouble. Deviled eggs do not freeze well. The texture of the filling changes completely and becomes watery and grainy. Just make what you need and enjoy them fresh.
Nutritional Information & Benefits
Here’s the rough nutritional breakdown for one spider deviled egg (based on 24 servings from 12 eggs):
- Calories : Approximately 70-80 per piece
- Protein : About 6 grams
- Fat : 5-6 grams (mostly from the yolk and mayonnaise)
- Carbohydrates : Less than 1 gram
Deviled eggs are actually a pretty smart snack choice. Eggs are packed with high-quality protein, which keeps kids full and satisfied between meals. The yolks contain choline, which is important for brain development—perfect for growing kids. Plus, olives provide healthy monounsaturated fats and antioxidants.
If you’re watching sodium, you can use low-sodium olives and reduce the added salt in the filling. The olives and mustard already contribute plenty of flavor, so you might not miss the extra salt at all.
These spider deviled eggs are naturally low-carb and keto-friendly, so they work for adults watching their carbs while kids enjoy them for the fun factor. It’s a win-win situation.
Conclusion
These spider deviled eggs have become our family’s most-requested Halloween recipe, and I think they’ll become yours too. They’re proof that you don’t need fancy ingredients or complicated techniques to create something that feels special. Just eggs, olives, and a little creativity—that’s all it takes to turn a classic appetizer into something that makes kids’ eyes light up.
What I love most about this recipe is how it brings people together. My kids and I spend time in the kitchen arranging olive legs and placing tiny red pepper eyes, and every time we do, I think about Karen in her slippers that first day. She wasn’t trying to be impressive. She was just being a mom making something fun for her kids. And honestly, that’s the best kind of cooking there is.
I’d love to hear how your spider deviled eggs turn out! Drop a comment below and let me know if your kids helped make them, or if you came up with your own variation. And if you’re looking for more easy Halloween treats, check out my Halloween pumpkin poop bark for another crowd-pleaser. Happy Halloween, and happy cooking!
Frequently Asked Questions
How far in advance can I make spider deviled eggs?
You can boil and peel the eggs up to 2 days ahead. Make the filling and store it in a piping bag in the fridge. Slice the olives and cut the red pepper pieces the day before. Assemble everything no more than 2 hours before serving for the best appearance.
Can I use different colored olives?
Sure! Green olives with pimentos work too, though they give a different look. The black olives create the spookiest spider effect, but feel free to experiment with whatever you have.
My eggs are hard to peel. What am I doing wrong?
Fresh eggs are harder to peel than older ones. Try using eggs that are at least a week old. Also, adding baking soda to the boiling water and shocking the eggs in ice water both help the shells come off more easily.
Can I make these spider deviled eggs without mayonnaise?
Yes! You can substitute the mayonnaise with mashed avocado for a healthier twist, or use plain Greek yogurt for a tangier flavor. The texture will be slightly different, but they’ll still taste great.
How many spider deviled eggs does this recipe make?
This recipe uses 12 large eggs, which yields 24 deviled egg halves. Each half gets one olive spider, so you’ll have 24 spider deviled eggs total. Perfect for a Halloween party or school celebration!
Pin This Recipe!

Best Spider Deviled Eggs Recipe for Halloween Fun
These spider deviled eggs are a fun and easy Halloween treat that looks impressive but uses simple ingredients. Perfect for parties, school events, or family movie nights, they combine classic deviled eggs with clever olive spiders.
- Prep Time: 15 minutes
- Cook Time: 12 minutes
- Total Time: 37 minutes
- Yield: 24 servings 1x
- Category: Appetizer
- Cuisine: American
Ingredients
- 12 large eggs
- 1/3 cup mayonnaise
- 1 tablespoon yellow mustard
- 1 teaspoon white vinegar
- 1/4 teaspoon salt
- 1/8 teaspoon black pepper
- 1/4 teaspoon paprika
- 1 can (6 ounces) large black olives, pitted
- 1 small jar roasted red peppers (or fresh red bell pepper)
Instructions
- Place eggs in a single layer in a saucepan and cover with cold water by about an inch. Bring to a rolling boil over high heat, then turn off the heat, cover, and let sit for exactly 12 minutes.
- Prepare a large bowl of ice water. Transfer eggs to the ice water and let cool completely, about 10 minutes.
- Peel the eggs, then slice each in half lengthwise. Remove yolks to a medium bowl and place whites on a serving platter cut side up.
- Add mayonnaise, yellow mustard, white vinegar, salt, and pepper to the yolks. Mash with a fork until smooth and creamy. Adjust seasoning to taste.
- Spoon or pipe the filling into each egg white half, mounding slightly.
- Slice black olives in half lengthwise. Set aside one half for the spider body. Slice the other half lengthwise into thin strips (about 4 strips per spider) for legs.
- Arrange 4 olive strips on each deviled egg to form spider legs, curving outward. Place one olive half (cut side down) in the center on top of the legs.
- Cut tiny triangles or small squares from roasted red peppers. Place two on each olive body for eyes.
- Sprinkle paprika over the finished spider deviled eggs for color.
Notes
For easier peeling, use eggs that are at least a week old and add a teaspoon of baking soda to the boiling water. Assemble spiders no more than 2 hours before serving to prevent olive legs from drying out. Leftovers can be stored in an airtight container in the refrigerator for up to 2 days, but are best fresh. Do not freeze.
Nutrition
- Serving Size: 1 spider deviled egg
- Calories: 75
- Sodium: 180
- Fat: 5.5
- Saturated Fat: 1.5
- Carbohydrates: 0.5
- Protein: 6
Keywords: spider deviled eggs, Halloween appetizer, deviled eggs, Halloween snack, easy Halloween recipe, kid-friendly Halloween


