My sister claimed she hated hot chocolate for fifteen years. Fifteen years! Every winter, every snowy day, every holiday gathering — she’d wave it away with this little smirk, like she was too sophisticated for a mug of melted chocolate. I believed her, honestly. I mean, people have preferences, right? Some folks just aren’t hot chocolate people.
Then last December, I caught her. I was testing these Cozy Peppermint Bark Hot Chocolate Bombs in my kitchen — you know, the kind where you pour warm milk over a chocolate sphere and it explodes into a masterpiece? She walked in, pretended to grab a glass of water, and I saw her eyes land on the counter. By the time I turned back from the fridge, she was holding one of the finished bombs, studying it like it was a rare artifact. “What’s this?” she asked, trying to sound casual. I told her. She shrugged. Put it down. Left the room.
I found her ten minutes later, standing at the stove with steam rising from a mug, my last peppermint bark bomb dissolving in a pool of frothy milk. She didn’t even look guilty. Just took a sip, closed her eyes for a second too long, and said, “Okay. This is different.” That was the crack in the armor. Now she texts me every December asking when I’m making another batch.
Look, I get it. Not everyone loves the idea of dropping a chocolate ball into hot milk and watching it bloom into something magical. It sounds fussy. It sounds like something you’d see on a Pinterest board and scroll past because who has the time? But honestly? These Cozy Peppermint Bark Hot Chocolate Bombs are the kind of recipe that changes your mind without you even realizing it happened. They’re warm, they’re nostalgic, and they have this way of making a cold evening feel like a celebration. Maybe you’ve been there — skeptical of something until the first sip proved you wrong. That’s exactly what this recipe does.
Why You’ll Love This Recipe
Let me tell you why these hot chocolate bombs are worth every bit of effort. I’ve tested this recipe about seven times — yes, seven — to get the chocolate shell thin enough to crack open easily but sturdy enough to hold its shape. The first batch? Disaster. The chocolate was too thick, and the bombs wouldn’t melt properly. The second batch? Better, but the peppermint flavor was overwhelming. By batch four, I had it dialed in. This is the version I keep coming back to, and here’s why it works:
- Quick & Easy: These come together in about 30 minutes of active time. The hardest part is waiting for the chocolate to set, and even that only takes 15 minutes in the fridge.
- Simple Ingredients: You need chocolate chips, peppermint extract, candy canes, and hot cocoa mix. That’s it. No fancy grocery store trips required.
- Perfect for Cozy Evenings: Cold weather, a rough day, or just one of those nights when you need something warm and comforting — this is the recipe for that exact moment.
- Crowd-Pleaser: I’ve served these at holiday parties, to skeptical family members (looking at you, sis), and to kids who usually prefer store-bought cocoa. Every single person has asked for the recipe.
- Unbelievably Delicious: The combination of rich chocolate, cool peppermint, and the little crunch of crushed candy cane is next-level comfort food. It’s the kind of sip that makes you close your eyes.
What makes this recipe different from every other hot chocolate bomb out there is the peppermint bark treatment. Instead of just dropping a plain chocolate sphere into milk, these bombs have crushed candy cane pressed into the outside and a peppermint-infused cocoa mix inside. The result is a drink that tastes like you’re sipping a melted candy cane wrapped in chocolate. It’s not just another version — it’s my best version.
This recipe isn’t just good. It’s the kind that makes you forget about the cold, forget about the stress, and just sit there with both hands wrapped around a warm mug. Perfect for impressing guests without any stress, or turning a simple Tuesday night into something memorable.
What Ingredients You Will Need
This recipe uses simple, wholesome ingredients to deliver bold flavor and satisfying texture without any fuss. Most of these are pantry staples, especially during the holiday season, and I’ve included substitution notes for anyone who needs them.
- Chocolate melting wafers or high-quality chocolate chips (12 ounces) — I prefer Ghirardelli dark chocolate melting wafers for the best texture, but semi-sweet chips work great too. If you’re using chocolate chips, add a teaspoon of coconut oil to help them melt smoothly.
- White chocolate melting wafers or white chocolate chips (4 ounces) — Ghirardelli white chocolate wafers are my go-to. They melt evenly and don’t seize up like some white chocolate brands. For a dairy-free option, use Enjoy Life white chocolate chips.
- Peppermint extract (1/2 teaspoon, divided) — Look for pure peppermint extract, not peppermint flavoring. The pure stuff has a cleaner, more natural taste. I use Nielsen-Massey brand.
- Crushed candy canes or peppermint candies (1/2 cup, plus extra for garnish) — You can buy pre-crushed candy canes or crush your own by placing them in a zip-top bag and smashing with a rolling pin. Pro tip: crush them a little finer than you think you need so they stick better to the chocolate.
- Hot cocoa mix (1/2 cup) — Use your favorite brand. I like Swiss Miss for its classic flavor, but a gourmet mix like Williams Sonoma works beautifully too. For a richer drink, use a mix that includes milk powder.
- Mini marshmallows (1/2 cup) — Jet-Puffed mini marshmallows are my standard. They dissolve nicely in hot milk and add that classic hot chocolate texture.
- Optional: Coconut oil (1 teaspoon per batch) — This helps thin the chocolate for a smoother coating and gives the finished bombs a nice shine. Not strictly necessary, but it makes a difference.
- Optional: Sprinkles or edible glitter — For decoration. Completely optional, but they make the bombs look gorgeous on a gift plate.
For the milk, you’ll need about 1 cup of warm milk per bomb. Whole milk gives the creamiest results, but oat milk or almond milk work well too. I’ve tested this with oat milk, and honestly, the difference is minimal — the chocolate does most of the heavy lifting.
When selecting candy canes, look for ones that are bright red and white with a strong peppermint scent. Stale candy canes lose their flavor punch, so if yours have been sitting in the pantry since last Christmas, buy fresh ones.
Equipment Needed
You don’t need a ton of specialized equipment for these bombs, but a few specific tools make the process much smoother. Here’s what I use:
- Silicone hemisphere mold (1.5-inch diameter cavities) — This is the most important tool. I use a mold with 6 cavities, and it costs about $12 on Amazon. A metal muffin tin can work in a pinch, but silicone makes it so much easier to pop the chocolate spheres out without cracking them.
- Microwave-safe bowl — For melting the chocolate. Glass or ceramic works best.
- Small offset spatula or spoon — For spreading chocolate evenly inside the mold cavities. A teaspoon works fine if that’s all you have.
- Baking sheet — To hold the mold while it sets in the fridge. A flat surface is key to keeping the bombs level.
- Piping bag or small zip-top bag — For drizzling the white chocolate. You can also use a fork, but a piping bag gives you more control.
- Rolling pin or meat mallet — For crushing candy canes. Place the candy canes in a zip-top bag and go to town. Just don’t use your best rolling pin — the candy canes can scratch it.
- Small saucepan or milk frother — For warming the milk. A saucepan on the stove works perfectly, but an electric kettle with temperature control is even better.
If you don’t have a silicone mold, you can use a mini muffin tin lined with paper liners. The bombs won’t be perfectly round, but they’ll still taste amazing. I’ve done this before when my mold was in the dishwasher, and honestly, the imperfections just made them look more homemade.
Preparation Method
Let me walk you through this step by step. I’ve included all the little details I wish someone had told me the first time I made these.
- Melt the dark chocolate. Place 12 ounces of dark chocolate melting wafers in a microwave-safe bowl. Microwave in 30-second intervals, stirring after each, until completely smooth. This usually takes about 2 minutes total. Don’t rush this step — overheating the chocolate will make it seize up and become grainy. If you’re using chocolate chips, add 1 teaspoon of coconut oil to help them melt smoothly.
- Prepare the mold. Place your silicone hemisphere mold on a baking sheet. Using a small spoon or offset spatula, spoon about 1 tablespoon of melted dark chocolate into each cavity. Use the back of the spoon to spread the chocolate up the sides, making sure to coat the entire surface evenly. You want the chocolate layer to be about 1/8-inch thick — thick enough to hold its shape, but thin enough to crack open easily when hot milk is poured over it.
- Add the crushed candy canes. Before the chocolate sets, sprinkle a generous pinch of crushed candy canes into each chocolate-coated cavity. Gently press the candy pieces into the chocolate with your finger so they stick. This creates that peppermint bark effect on the outside of the bomb. Work quickly here — the chocolate starts setting fast.
- Chill the chocolate shells. Place the baking sheet with the mold in the refrigerator for 10-15 minutes, or until the chocolate is completely firm to the touch. Don’t skip this step. If the chocolate isn’t fully set, the shells will crack when you try to remove them from the mold.
- Remove the shells from the mold. Gently flex the silicone mold to release each chocolate hemisphere. If any shells crack, don’t panic — you can patch them with a little melted chocolate and re-chill for 5 minutes. This happened to me on my first try, and I almost threw the whole batch away. Don’t be like me. Just patch them.
- Fill the shells. Place 6 of the chocolate hemispheres on a clean work surface, dome-side down. Spoon about 1 tablespoon of hot cocoa mix into each shell, then add a small handful of mini marshmallows. Don’t overfill — you need room to seal the bomb closed.
- Seal the bombs. Warm a small plate in the microwave for 30 seconds. Take one of the empty chocolate hemispheres and gently press its flat edge against the warm plate for about 5 seconds to melt the edge slightly. Immediately place it on top of a filled shell, pressing gently to seal. Run your finger around the seam to smooth it out. Repeat with the remaining shells.
- Melt the white chocolate. Place 4 ounces of white chocolate wafers in a microwave-safe bowl. Microwave in 20-second intervals, stirring after each, until smooth. White chocolate is more delicate than dark chocolate, so go slow. Add 1/4 teaspoon of peppermint extract and stir to combine.
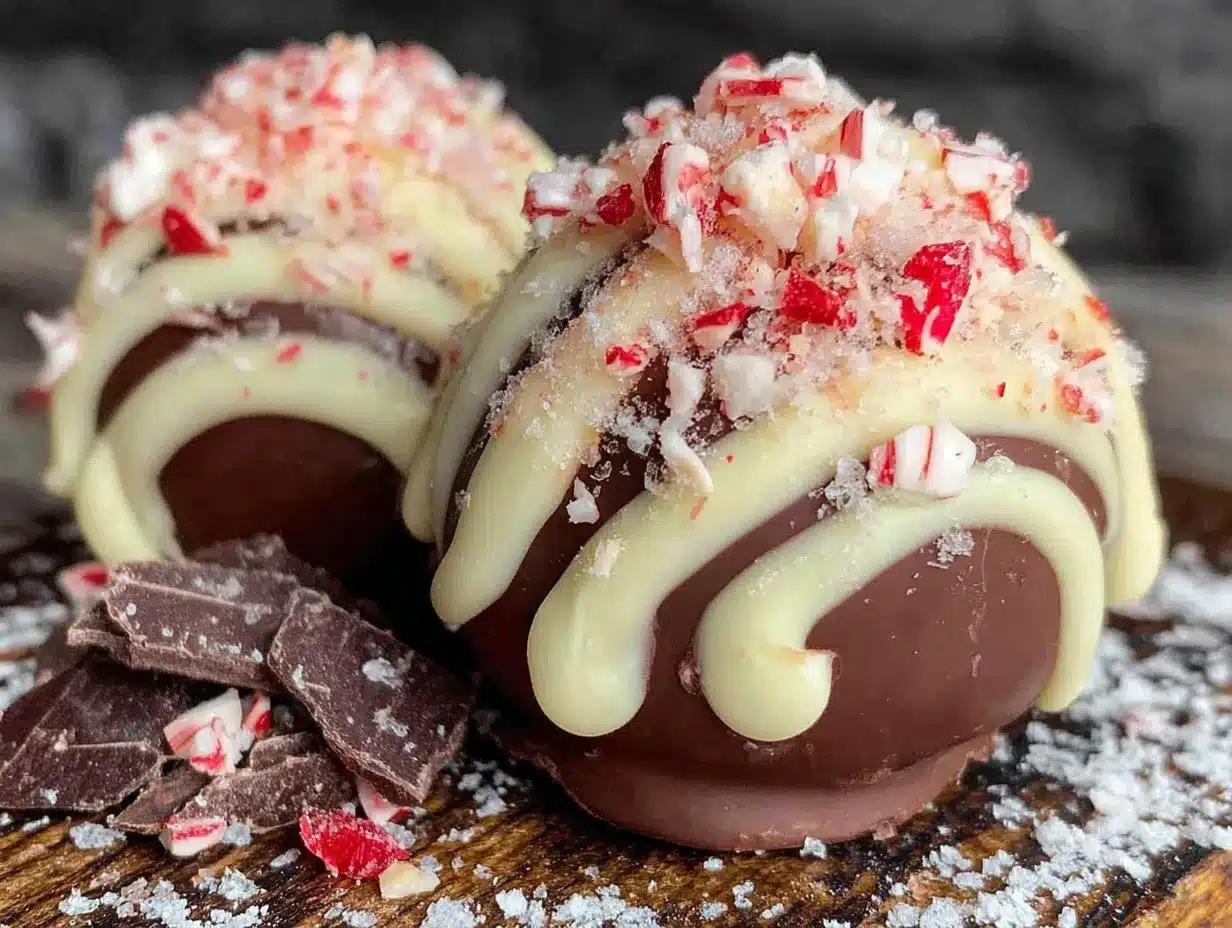
- Decorate the bombs. Transfer the melted white chocolate to a small piping bag or zip-top bag with the corner snipped off. Drizzle the white chocolate over each bomb in a zigzag pattern. While the white chocolate is still wet, sprinkle with additional crushed candy canes and a few sprinkles if you’re using them.
- Final chill. Place the decorated bombs back in the refrigerator for 10 minutes to set the white chocolate. Once firm, they’re ready to use or gift.
To serve, place one bomb in a mug and pour 1 cup of warm milk (not boiling — about 150°F is perfect) over the top. Watch the chocolate shell crack open and the marshmallows float to the surface. Stir gently until the cocoa mix is fully dissolved. The first sip is pure magic.
Cooking Tips & Techniques
I’ve made a lot of mistakes with these bombs so you don’t have to. Here are the things I learned the hard way:
Temper your chocolate properly. This is the biggest game-changer. If your chocolate is too hot when you pour it into the mold, it’ll be too thin and run right out. If it’s too cool, it’ll be thick and lumpy. The sweet spot is when the chocolate is smooth and flows off the spoon like thick cream. I test it by drizzling a little back into the bowl — if it ribbons on top for a second before sinking, it’s perfect.
Don’t skip the coconut oil. I know it seems like an unnecessary step, but adding a teaspoon of coconut oil to your dark chocolate makes the shells shinier and less likely to crack. It also helps the bombs melt more smoothly when you pour hot milk over them. I forgot it once, and the shells were dull and brittle.
Work in batches. Don’t try to fill all 12 cavities at once if you’re new to this. Start with 6, get comfortable with the process, then do the second batch. The chocolate sets quickly, and rushing leads to uneven shells and cracked bombs. Trust me on this one.
Use a warm plate to seal. This was the tip that changed everything for me. Instead of trying to melt the chocolate edge with a knife or your finger, just press the hemisphere against a warm plate for 5 seconds. It creates a perfectly even melted edge that seals cleanly every time.
Store them carefully. These bombs are delicate. Store them in a single layer in an airtight container in the refrigerator for up to 2 weeks. Don’t stack them, and don’t leave them at room temperature for more than a few hours — the chocolate can soften and lose its shape.
Variations & Adaptations
One of the best things about this recipe is how easy it is to customize. Here are some variations I’ve tried and loved:
Mint Chocolate Chip Version: Swap the peppermint extract for mint extract and add mini chocolate chips to the white chocolate drizzle. The combination of mint and dark chocolate is heavenly, and the mini chips add a nice little crunch.
Spiced Hot Chocolate Bombs: Add 1/4 teaspoon of cinnamon and a pinch of cayenne pepper to the cocoa mix before filling the shells. This gives the bombs a Mexican hot chocolate vibe that’s perfect for cold winter nights. I made these for a holiday party, and they were the first ones to disappear.
Vegan/Dairy-Free Option: Use dairy-free dark chocolate and white chocolate (Enjoy Life makes great options), and fill with a vegan hot cocoa mix. Use oat milk or almond milk for serving. I tested this with oat milk, and honestly, the flavor difference is barely noticeable.
Peppermint Mocha Bombs: Add 1 teaspoon of instant espresso powder to the cocoa mix before filling. The coffee flavor pairs beautifully with the peppermint and dark chocolate, giving you a grown-up twist on the classic. This is my personal favorite for weekend mornings.
White Chocolate Peppermint Bombs: Use white chocolate instead of dark for the shells, and fill with white hot chocolate mix. The result is a sweeter, creamier drink that tastes like a melted peppermint bark candy. My niece requests this version every single time she visits.
Serving & Storage Suggestions
These bombs are best served immediately after the white chocolate drizzle sets, but they keep beautifully in the refrigerator for up to 2 weeks. Here’s how I handle serving and storage:
Serving Temperature: Warm your milk to about 150°F — hot enough to melt the chocolate but not boiling. Boiling milk can scorch the chocolate and create a grainy texture. I use a small saucepan over medium heat and test the temperature by dipping my finger in — if it’s hot but not burning, it’s ready.
Presentation Ideas: Place each bomb in a clear mug so the recipient can watch it melt. Add a candy cane as a stirrer and a dollop of whipped cream on top for extra indulgence. If you’re gifting them, arrange the bombs in a decorative box with a note that says “Add warm milk and enjoy.”
Complementary Dishes: These pair beautifully with homemade sugar cookies for a cozy dessert spread. For a full holiday treat board, add cranberry orange scones on the side — the tartness balances the sweetness of the hot chocolate perfectly.
Storage Instructions: Place the bombs in a single layer in an airtight container. Separate layers with parchment paper if you need to stack them. Store in the refrigerator for up to 2 weeks. Do not freeze — the chocolate can develop condensation when thawed, which ruins the texture.
Reheating Tips: These are designed to be made fresh, but if you have leftover bombs that have been sitting for a few days, they still work beautifully. Just pour warm milk over them as usual. The flavor actually deepens after a day or two in the fridge — the peppermint infuses into the chocolate shell more fully.
Flavor Development: I’ve noticed that bombs stored for 3-4 days actually taste better than fresh ones. The peppermint extract has time to meld with the chocolate, creating a more rounded flavor. If you’re making these for a party, I recommend making them 2-3 days in advance.
Nutritional Information & Benefits
Let’s be real — these are a treat, not a health food. But here’s what you’re working with per bomb (using whole milk):
| Nutrient | Amount Per Serving |
|---|---|
| Calories | 320-380 |
| Total Fat | 18g |
| Saturated Fat | 11g |
| Carbohydrates | 42g |
| Sugar | 34g |
| Protein | 6g |
| Calcium | 15% DV |
| Iron | 10% DV |
Dark chocolate is actually a decent source of antioxidants and contains flavonoids that can support heart health in moderation. The peppermint in the candy canes and extract can aid digestion and provide a mild soothing effect — which is partly why hot peppermint tea is so comforting when you’re feeling under the weather.
For dietary considerations: This recipe contains dairy and gluten (from the cocoa mix, depending on brand). For a gluten-free version, use a certified gluten-free cocoa mix. For a lower-sugar option, use sugar-free chocolate and a sugar-free cocoa mix. The peppermint flavor is strong enough to carry the drink even with less sugar.
I personally love that these bombs make portion control easy. One bomb is one serving — no more, no less. It’s a small indulgence that feels luxurious without going overboard. And honestly, the ritual of making them is half the joy. There’s something meditative about spreading chocolate into those little molds and watching them transform.
Conclusion
These Cozy Peppermint Bark Hot Chocolate Bombs are the kind of recipe that makes winter feel special. They’re warm, they’re nostalgic, and they have this magical quality that turns a regular evening into something worth remembering. Whether you’re making them for yourself on a cold night, gifting them to friends, or serving them at a holiday gathering, they never fail to bring a smile.
I love that this recipe is forgiving enough for beginners but impressive enough to wow experienced bakers. The imperfections — a slightly lopsided bomb, a drizzle that went a little wild — just make them look more homemade and charming. Don’t stress about making them perfect. The beauty is in the process, and the reward is in that first sip.
If you try these, I’d love to hear how they turned out. Did you add your own twist? Did someone in your life who “doesn’t like hot chocolate” change their mind? Drop a comment below and let me know. And if you’re looking for more cozy winter recipes, check out my easy holiday dessert recipes for more inspiration. Happy sipping, friends!
Frequently Asked Questions
Can I use milk chocolate instead of dark chocolate?
Absolutely. Milk chocolate will make the bombs sweeter and creamier. Just note that milk chocolate is softer than dark chocolate, so the shells may be a bit more delicate. Add an extra 5 minutes of chilling time to help them firm up.
How far in advance can I make these?
You can make them up to 2 weeks ahead and store them in an airtight container in the refrigerator. The flavor actually improves after a few days as the peppermint infuses into the chocolate. Just keep them away from strong-smelling foods in the fridge — chocolate absorbs odors easily.
Why did my chocolate shells crack when I removed them from the mold?
This usually happens when the chocolate layer is too thin or wasn’t chilled long enough. Make sure your chocolate coating is at least 1/8-inch thick, and chill for a full 15 minutes. If they still crack, you can patch them with a little melted chocolate and re-chill for 5 minutes.
Can I make these without a silicone mold?
Yes! Use a mini muffin tin lined with paper liners. The bombs won’t be perfectly round, but they’ll taste just as good. You can also shape the chocolate by hand over the back of a small spoon, though this takes more practice.
What’s the best milk to use for serving?
Whole milk gives the creamiest, richest result. Oat milk is my favorite non-dairy option — it’s creamy enough to mimic whole milk. Avoid skim milk or watery plant-based milks, as they can make the drink taste thin. Warm the milk to about 150°F for the best melt.
Pin This Recipe!

Cozy Peppermint Bark Hot Chocolate Bombs

These hot chocolate bombs feature a dark chocolate shell studded with crushed candy canes and filled with peppermint-infused cocoa mix and mini marshmallows. When warm milk is poured over, the sphere cracks open to reveal a rich, minty hot chocolate that’s perfect for cozy evenings.
- Prep Time: 30 minutes
- Cook Time: 0 minutes
- Total Time: 45 minutes
- Yield: 6 servings 1x
- Category: Dessert
- Cuisine: American
Ingredients
- 12 ounces dark chocolate melting wafers or high-quality chocolate chips
- 4 ounces white chocolate melting wafers or white chocolate chips
- 1/2 teaspoon peppermint extract, divided
- 1/2 cup crushed candy canes or peppermint candies, plus extra for garnish
- 1/2 cup hot cocoa mix
- 1/2 cup mini marshmallows
- 1 teaspoon coconut oil (optional, for smoother chocolate)
- Sprinkles or edible glitter (optional, for decoration)
- 1 cup warm milk per serving (whole milk recommended)
Instructions
- Melt the dark chocolate: Place 12 ounces of dark chocolate melting wafers in a microwave-safe bowl. Microwave in 30-second intervals, stirring after each, until completely smooth (about 2 minutes total). If using chocolate chips, add 1 teaspoon of coconut oil.
- Prepare the mold: Place a silicone hemisphere mold on a baking sheet. Spoon about 1 tablespoon of melted dark chocolate into each cavity. Use the back of a spoon to spread the chocolate up the sides, coating evenly to about 1/8-inch thick.
- Add the crushed candy canes: Before the chocolate sets, sprinkle a generous pinch of crushed candy canes into each cavity. Gently press the candy pieces into the chocolate so they stick.
- Chill the chocolate shells: Place the baking sheet with the mold in the refrigerator for 10-15 minutes, or until the chocolate is completely firm.
- Remove the shells from the mold: Gently flex the silicone mold to release each chocolate hemisphere. If any shells crack, patch them with a little melted chocolate and re-chill for 5 minutes.
- Fill the shells: Place 6 of the chocolate hemispheres on a clean work surface, dome-side down. Spoon about 1 tablespoon of hot cocoa mix into each shell, then add a small handful of mini marshmallows.
- Seal the bombs: Warm a small plate in the microwave for 30 seconds. Take one of the empty chocolate hemispheres and gently press its flat edge against the warm plate for about 5 seconds to melt the edge slightly. Immediately place it on top of a filled shell, pressing gently to seal. Run your finger around the seam to smooth it out. Repeat with the remaining shells.
- Melt the white chocolate: Place 4 ounces of white chocolate wafers in a microwave-safe bowl. Microwave in 20-second intervals, stirring after each, until smooth. Add 1/4 teaspoon of peppermint extract and stir to combine.
- Decorate the bombs: Transfer the melted white chocolate to a small piping bag or zip-top bag with the corner snipped off. Drizzle the white chocolate over each bomb in a zigzag pattern. While the white chocolate is still wet, sprinkle with additional crushed candy canes and sprinkles if using.
- Final chill: Place the decorated bombs back in the refrigerator for 10 minutes to set the white chocolate. Once firm, they’re ready to use or gift. To serve, place one bomb in a mug and pour 1 cup of warm milk (about 150°F) over the top. Stir gently until the cocoa mix is fully dissolved.
Notes
For best results, use pure peppermint extract and fresh candy canes. The bombs can be stored in an airtight container in the refrigerator for up to 2 weeks. The flavor improves after a few days as the peppermint infuses into the chocolate. Do not freeze.
Nutrition
- Serving Size: 1 bomb with 1 cup wh
- Calories: 350
- Sugar: 34
- Sodium: 150
- Fat: 18
- Saturated Fat: 11
- Carbohydrates: 42
- Fiber: 2
- Protein: 6
Keywords: hot chocolate bombs, peppermint bark, hot cocoa, Christmas, holiday, chocolate spheres, easy dessert


