I had this long-standing position about pumpkin desserts. For years, I claimed to hate them. Not in a polite, “oh, no thank you” way either. I mean full-on, dramatic declarations every autumn when the pumpkin spice tidal wave hit. “Pumpkin pie is a texture nightmare,” I’d announce to anyone who’d listen. “Pumpkin bread is just orange-tinted disappointment.” My family learned to stop offering me anything with that orange squash in it. They’d make their pumpkin rolls and their pumpkin muffins, and I’d sit there smugly with my apple crisp, feeling superior.
Then last October, my neighbor Maria showed up at my door holding a small baking dish. “Just try one bite,” she said. “I promise it’s different.” I almost said no. Honestly, I had a whole speech ready about how I didn’t need converting. But she looked so hopeful, and I’d just watched her carry in my packages when I was at work, so I couldn’t exactly be rude. I took a bar, mostly to be polite, and took the tiniest, most skeptical bite imaginable.
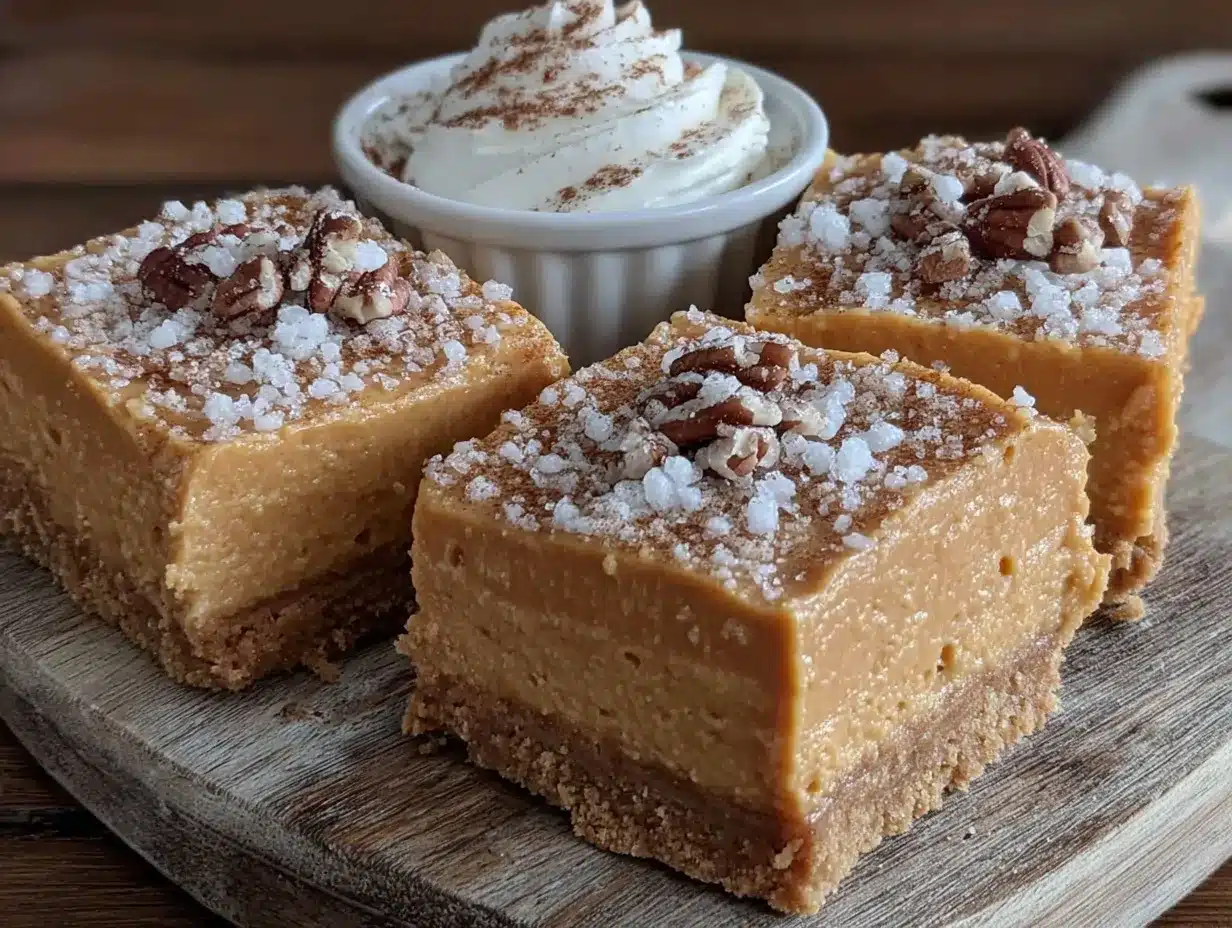
And that’s when everything changed. I caught myself mid-chew, making a sound I’m not proud of. A little hum of surprise. Maria just smiled. “Told you.” The texture was nothing like the slimy, wobbling pie filling I’d built my whole identity around hating. It was creamy but firm, with this incredible gingersnap crust that crunched in all the right ways. The pumpkin flavor was there, sure, but it was balanced by tangy cream cheese and a whisper of warm spices that didn’t hit you over the head. I took another bite, then another, and by the time Maria left, I was googling “no-bake pumpkin cheesecake bars recipe” on my phone. Let me tell you, when you spend years being the person who hates something, it’s humbling to be caught red-handed eating it with genuine enthusiasm. But here we are. I’ve made these bars at least six times since that day, and I’m not looking back.
Why You’ll Love This Recipe
These cozy no-bake pumpkin cheesecake bars are the kind of dessert that makes people close their eyes after the first bite. I’ve tested this recipe more times than I care to admit, tweaking the ratios until everything landed exactly right. Here’s what makes them special:
- No Oven Required: Seriously, zero baking. The crust sets in the fridge, and the filling firms up beautifully without ever seeing heat. Perfect for those days when your kitchen feels like a sauna or you just don’t want to deal with preheating.
- Just 9 Simple Ingredients: You probably have most of these in your pantry right now. No weird specialty items or expensive extracts. I’m all about keeping things accessible.
- Perfect for Fall Gatherings: Whether it’s a cozy Friendsgiving, a Halloween party, or just a Tuesday night when you need something comforting, these bars fit right in. They travel well, too, which is huge for potlucks.
- Crowd-Pleasing Texture: The combination of that crunchy gingersnap crust with the silky, mousse-like filling is honestly next-level. Even people who claim they “don’t like cheesecake” (I used to be one of them, remember?) end up going back for seconds.
- Make-Ahead Friendly: You can prep these a day or two in advance, which makes entertaining so much less stressful. The flavors actually get better after they’ve hung out in the fridge overnight.
What sets this recipe apart from the dozens of pumpkin cheesecake bars out there is the texture. I spent a lot of time figuring out how to get that perfect no-bake consistency without using gelatin or any weird stabilizers. The trick is in how you whip the cream cheese and the timing of adding the pumpkin puree. It’s not just another version—it’s the version that actually works every single time.
Ingredients Needed
This recipe uses simple, wholesome ingredients to deliver that cozy fall flavor without any fuss. Most of these are pantry staples, especially if you’re someone who keeps basic baking supplies around during pumpkin season.
For the Crust
- 2 cups (200g) gingersnap cookie crumbs – I prefer Nabisco’s brand for consistent crunch, but any brand works. You can also use graham crackers if that’s what you have, though the flavor will be milder.
- 6 tablespoons (85g) unsalted butter, melted – Salted butter works too, just reduce any added salt elsewhere. Let it cool slightly after melting so it doesn’t make the crumbs soggy.
- 2 tablespoons (25g) granulated sugar – This helps the crust hold together. Brown sugar adds a deeper flavor if you want to experiment.
For the Pumpkin Cheesecake Filling
- 16 ounces (454g) cream cheese, softened to room temperature – Full-fat is non-negotiable here for that luscious texture. Philadelphia is my go-to brand. Let it sit out for at least an hour before starting.
- 1 cup (200g) granulated sugar – Regular white sugar keeps the filling light and fluffy. You could try coconut sugar, but it’ll be darker and slightly grainier.
- 1 cup (245g) pumpkin puree – Make sure it’s pure pumpkin, not pumpkin pie filling. Libby’s is reliable, but store brands work fine. Pat it with paper towels if it looks watery.
- 1 teaspoon vanilla extract – Pure vanilla makes a difference, but imitation works in a pinch.
- 1 teaspoon pumpkin pie spice – Or make your own blend: ½ teaspoon cinnamon, ¼ teaspoon ginger, ¼ teaspoon nutmeg, and a pinch of cloves.
- ¼ teaspoon salt – Just a pinch to balance the sweetness and enhance the spices.
For the Whipped Cream Topping (Optional but Recommended)
- 1 cup (240ml) heavy whipping cream – Cold from the fridge. You can use coconut cream for a dairy-free option, but whip it well.
- 2 tablespoons (15g) powdered sugar – Helps stabilize the cream. Granulated sugar works but can leave a gritty texture.
- ½ teaspoon vanilla extract – For flavor.
Equipment Needed
You don’t need a fancy kitchen to pull these off. Here’s what I use every time:
- 8×8-inch baking pan – Glass or metal both work. Line it with parchment paper for easy removal. I’ve used a 9×9 before, but the bars come out thinner.
- Food processor or zip-top bag and rolling pin – For crushing the cookies. The food processor is faster, but honestly, I’ve smashed cookies with a wine bottle before and it worked fine.
- Electric hand mixer or stand mixer – You need something to whip the cream cheese and cream. A whisk and some serious arm strength could work, but I wouldn’t recommend it.
- Medium mixing bowls – One for the crust, one for the filling, and one for the whipped cream if you’re making it.
- Spatula – For spreading the filling evenly. A rubber spatula works best.
- Measuring cups and spoons – Precision matters for the crust ratio.
- Parchment paper – Makes lifting the bars out so much easier. I learned this the hard way after a stuck-bar disaster.
Preparation Method
Let me walk you through this step by step. I’ve made this recipe enough times to know where things can go wrong, so I’ll flag those spots.
- Prepare the pan: Line your 8×8-inch baking pan with parchment paper, leaving some overhang on two opposite sides. This creates handles for lifting the bars out later. Spray the paper lightly with non-stick spray if you’re nervous about sticking.
- Make the crust: Pulse the gingersnap cookies in a food processor until you get fine crumbs. You need about 2 cups. If you don’t have a food processor, put the cookies in a zip-top bag and smash them with a rolling pin. It’s therapeutic, honestly. Transfer the crumbs to a medium bowl, add the melted butter and sugar, and stir until everything looks like wet sand. Press this mixture firmly into the bottom of your prepared pan. I use the bottom of a measuring cup to really pack it down. Pop it in the fridge while you make the filling.
- Whip the cream cheese: In a large bowl, beat the softened cream cheese with an electric mixer on medium speed until it’s smooth and fluffy. This takes about 2 minutes. Scrape down the sides and the bottom of the bowl—cream cheese loves to hide there. Don’t rush this step. Lumpy cream cheese means lumpy filling.
- Add the sugar and spices: Add the granulated sugar, pumpkin pie spice, and salt to the cream cheese. Beat on medium until everything is combined and smooth, about 1 minute. Scrape the bowl again.
- Incorporate the pumpkin and vanilla: Add the pumpkin puree and vanilla extract. Beat on low speed at first so the pumpkin doesn’t splatter everywhere, then increase to medium. Mix until the filling is completely uniform and a beautiful orange color. This takes about 1-2 minutes. The mixture should look thick and creamy, not runny.
- Whip the cream: In a separate cold bowl (pop it in the freezer for 5 minutes if you want), beat the heavy whipping cream, powdered sugar, and vanilla on medium-high speed until stiff peaks form. You’re looking for peaks that hold their shape when you lift the beaters. Be careful not to over-whip, or you’ll end up with butter. It happens to the best of us.
- Fold it together: Take about a third of the whipped cream and stir it into the pumpkin mixture. This lightens things up. Then gently fold in the remaining whipped cream using a spatula. Fold until you don’t see any white streaks, but don’t overmix. You want to keep that airy texture.
- Assemble and chill: Pour the filling over the chilled crust and spread it evenly with your spatula. Give the pan a few gentle taps on the counter to release any air bubbles. Cover with plastic wrap and refrigerate for at least 6 hours, but overnight is better. I know the waiting is hard, but trust me on this. The bars need that time to set properly.
- Slice and serve: When the bars are fully set, use the parchment overhang to lift them out of the pan. Place on a cutting board and use a sharp knife to slice into squares. Wipe the knife clean between cuts for neat edges. Top with whipped cream, a sprinkle of cinnamon, or some candied pecans if you’re feeling fancy.
Cooking Tips & Techniques
I’ve made every mistake in the book so you don’t have to. Here’s what I’ve learned:
- Room temperature cream cheese is crucial: Cold cream cheese creates lumps that no amount of beating will fully fix. Let it sit on the counter for at least an hour. If you’re in a hurry, cut it into small cubes and microwave for 10-second intervals, but be careful not to melt it.
- Don’t skip the parchment paper: I once thought I could just grease the pan and call it a day. I spent 20 minutes trying to pry the first bar out without destroying it. The parchment handles make life so much easier.
- Pat your pumpkin puree dry: If your pumpkin puree looks watery (some brands are wetter than others), spread it on a paper towel-lined plate and pat it dry before adding it to the filling. Too much moisture can prevent the bars from setting properly.
- Be patient with chilling time: I know it’s tempting to rush this, but 6 hours is the minimum. Overnight is ideal. The bars need that time to firm up so you get clean slices. I once tried to cut them after 4 hours and ended up with a delicious but ugly mess.
- Use a hot knife for clean cuts: Run your knife under hot water, dry it off, then slice. Wipe and repeat between cuts. This gives you those beautiful, bakery-style edges.
Variations & Adaptations
This recipe is pretty forgiving, so feel free to play around. Here are some variations I’ve tried and loved:
- Gluten-Free Version: Use gluten-free gingersnap cookies or gluten-free graham crackers for the crust. I’ve tested this with Schär’s brand, and it works perfectly. The filling is naturally gluten-free, so you’re just swapping the crust.
- Vegan Adaptation: Use vegan cream cheese (I like Kite Hill’s plain version) and coconut cream instead of heavy cream. The texture will be slightly different, but still delicious. Make sure your cookies are vegan too.
- Chocolate Swirl: Melt ¼ cup of dark chocolate chips and drizzle it over the filling before chilling. Use a knife to swirl it around for a marbled effect. This is my personal favorite variation—the chocolate and pumpkin combo is underrated.
- Spiced Pecan Topping: Toast some pecans with a little butter, brown sugar, and cinnamon, then sprinkle them over the top before serving. Adds a nice crunch.
- Pumpkin Pie Spice Substitute: If you don’t have pumpkin pie spice, use ½ teaspoon cinnamon, ¼ teaspoon ginger, ¼ teaspoon nutmeg, and a pinch of cloves. It’s actually fresher tasting this way.
Serving & Storage Suggestions
These bars are best served cold, straight from the fridge. The texture is firm but creamy, and the flavors are more pronounced when they’re chilled. Here’s how to handle leftovers:
- Serving: Let the bars sit at room temperature for about 5 minutes before slicing. This takes the chill off without making them too soft. Top with a dollop of whipped cream, a dusting of cinnamon, or some caramel drizzle. They pair beautifully with a hot cup of coffee or spiced apple cider.
- Refrigerator Storage: Keep the bars in an airtight container in the fridge for up to 5 days. Place a layer of wax paper between stacked bars to prevent sticking. The crust stays crunchy for about 3 days, then softens slightly—still delicious, just different.
- Freezer Storage: These freeze like a dream. Wrap individual bars in plastic wrap, then place them in a freezer-safe bag or container. They’ll keep for up to 3 months. Thaw in the fridge overnight before serving. I always keep a stash for unexpected guests or late-night cravings.
- Flavor Development: Honestly, these bars taste even better on day two. The spices meld together, and the texture becomes perfectly cohesive. So don’t worry about making them ahead—it’s actually the smart move.
Nutritional Information & Benefits
While these are definitely a treat, there are a few redeeming qualities worth noting:
- Estimated per bar (based on 9 servings): Approximately 380 calories, 24g fat, 38g carbohydrates, 5g protein, and 2g fiber. These numbers vary based on your specific ingredients and toppings.
- Pumpkin is a nutritional powerhouse: It’s loaded with vitamin A, fiber, and antioxidants. So you’re getting some good stuff in there between the cream cheese and sugar.
- Dietary considerations: This recipe contains dairy and gluten. For a gluten-free version, swap the crust cookies. For a dairy-free version, use vegan cream cheese and coconut cream. It’s not low-carb, but you could experiment with a sugar substitute like monk fruit in the filling.
- Potential allergens: Contains dairy and gluten. The gingersnaps may also contain soy or other allergens depending on the brand.
I’m not here to pretend these are health food, but I do believe in balance. A little indulgence now and then is good for the soul, and at least you’re getting some vitamin A with your dessert.
Conclusion
These cozy no-bake pumpkin cheesecake bars have officially converted me from a pumpkin dessert skeptic to a full-on believer. They’re everything I never knew I wanted in a fall dessert—creamy, crunchy, spiced just right, and so easy to throw together that there’s really no excuse not to make them. Whether you’re already a pumpkin fan or you’re sitting on the fence like I was, I promise these bars are worth your time.
Feel free to tweak the crust, play with the spices, or pile on your favorite toppings. That’s the beauty of a recipe like this—it’s a base for your own creativity. I’d love to hear how yours turn out. Drop a comment below and let me know what variations you tried, or tag me in your photos if you share them online. Happy fall baking, friends. Or, you know, no-baking.
Frequently Asked Questions
Can I use pumpkin pie filling instead of pumpkin puree?
No, I wouldn’t recommend that. Pumpkin pie filling already has sugar and spices added, which will throw off the sweetness and texture of your bars. Stick with pure pumpkin puree for the best results. If that’s all you have, reduce the sugar in the recipe by about half, but honestly, it’s easier to just use the right thing.
How do I know when the bars are fully set?
The bars should feel firm to the touch, not jiggly, when you gently shake the pan. The edges will set faster than the center. If you’re unsure, give them the full overnight chill. They’ll be perfectly sliceable by morning. I’ve left them for up to 24 hours with no issues.
Can I use a different cookie for the crust?
Absolutely. Graham crackers are the classic swap, and they work great. Speculoos or biscoff cookies add a nice caramelized flavor. Even vanilla wafers would work in a pinch. Just keep the ratio of crumbs to butter the same, and you’re good to go.
Why did my filling turn out runny?
This usually happens for one of three reasons: your cream cheese wasn’t fully softened, your pumpkin puree was too watery, or you didn’t chill the bars long enough. Make sure to pat your pumpkin puree dry if it looks wet, and give the bars at least 6 hours in the fridge. If you’re still having trouble, try adding an extra tablespoon of powdered sugar to the filling to help stabilize it.
Can I make these bars in a different pan size?
You can, but the thickness and setting time will change. A 9×9 pan will give you thinner bars that set a little faster, maybe 4-5 hours. A 9×13 pan will make very thin bars that might be harder to slice cleanly. I recommend sticking with the 8×8 for the best texture and presentation. If you double the recipe, use a 9×13 and expect longer chilling time.
Pin This Recipe!
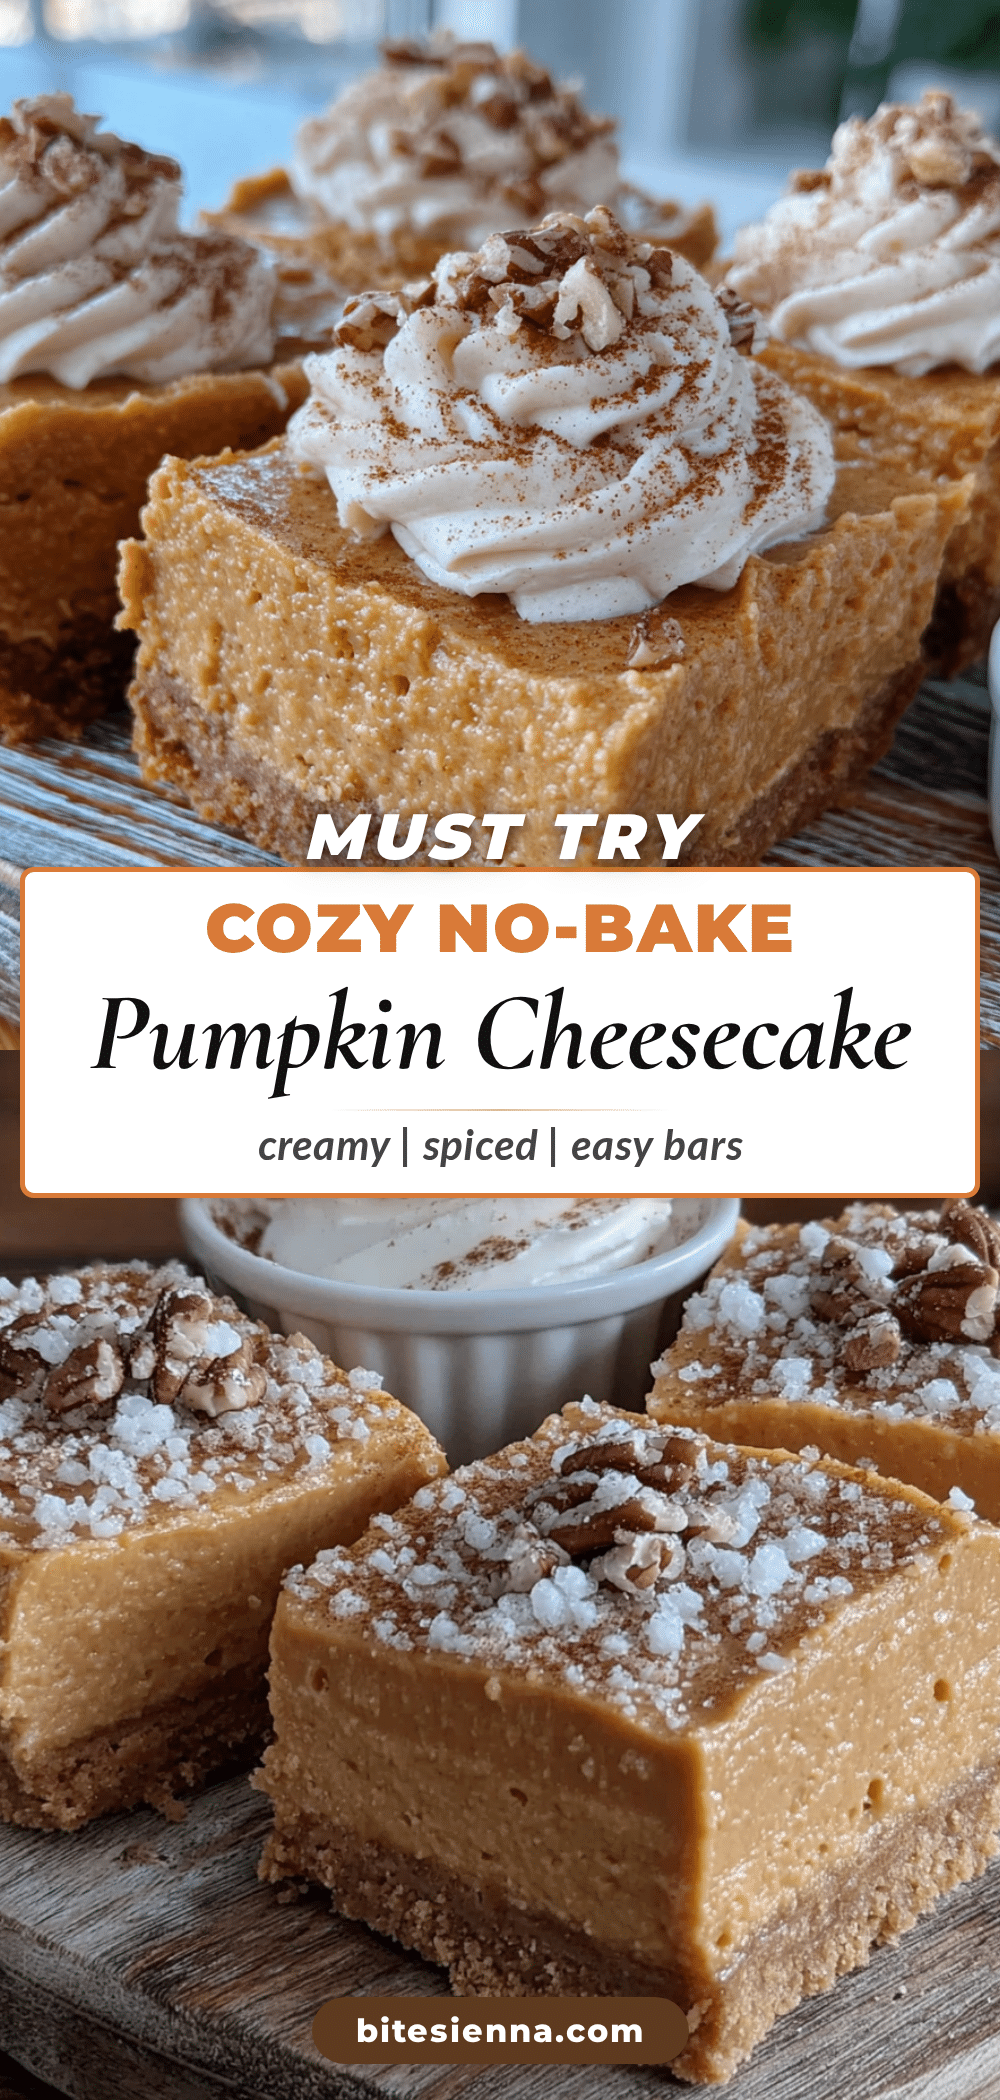
Cozy No-Bake Pumpkin Cheesecake Bars: Easy 9-Ingredient Dessert
These creamy, crunchy no-bake pumpkin cheesecake bars feature a gingersnap crust and a silky mousse-like filling. Made with just 9 simple ingredients, they’re the perfect make-ahead fall dessert that even pumpkin skeptics will love.
- Prep Time: 20 minutes
- Cook Time: 0 minutes
- Total Time: 6 hours 20 minutes (includes chilling)
- Yield: 9 servings 1x
- Category: Dessert
- Cuisine: American
Ingredients
- 2 cups (200g) gingersnap cookie crumbs
- 6 tablespoons (85g) unsalted butter, melted
- 2 tablespoons (25g) granulated sugar
- 16 ounces (454g) cream cheese, softened to room temperature
- 1 cup (200g) granulated sugar
- 1 cup (245g) pumpkin puree
- 1 teaspoon vanilla extract
- 1 teaspoon pumpkin pie spice
- ¼ teaspoon salt
- 1 cup (240ml) heavy whipping cream (for topping, optional)
- 2 tablespoons (15g) powdered sugar (for topping, optional)
- ½ teaspoon vanilla extract (for topping, optional)
Instructions
- Line an 8×8-inch baking pan with parchment paper, leaving overhang on two opposite sides. Lightly spray with non-stick spray if desired.
- Pulse gingersnap cookies in a food processor until fine crumbs form. Transfer to a medium bowl, add melted butter and 2 tablespoons sugar, and stir until mixture resembles wet sand. Press firmly into the bottom of the prepared pan using the bottom of a measuring cup. Refrigerate while making the filling.
- In a large bowl, beat softened cream cheese with an electric mixer on medium speed until smooth and fluffy, about 2 minutes. Scrape down sides and bottom of bowl.
- Add 1 cup granulated sugar, pumpkin pie spice, and salt to the cream cheese. Beat on medium until combined and smooth, about 1 minute. Scrape bowl again.
- Add pumpkin puree and 1 teaspoon vanilla extract. Beat on low speed to prevent splattering, then increase to medium and mix until filling is uniform and thick, about 1-2 minutes.
- In a separate cold bowl, beat heavy whipping cream, powdered sugar, and ½ teaspoon vanilla extract on medium-high speed until stiff peaks form. Be careful not to over-whip.
- Stir about one-third of the whipped cream into the pumpkin mixture to lighten it. Gently fold in the remaining whipped cream with a spatula until no white streaks remain, being careful not to overmix.
- Pour the filling over the chilled crust and spread evenly. Tap the pan gently on the counter to release air bubbles. Cover with plastic wrap and refrigerate for at least 6 hours, preferably overnight.
- When fully set, use the parchment overhang to lift the bars out of the pan. Place on a cutting board and slice into squares with a sharp knife, wiping the knife clean between cuts. Serve cold, optionally topped with whipped cream, cinnamon, or candied pecans.
Notes
Room temperature cream cheese is crucial for a smooth filling. Pat pumpkin puree dry if it looks watery to prevent runny bars. Chilling for at least 6 hours (preferably overnight) is essential for clean slices. Use a hot knife for neat cuts. Bars can be stored in the refrigerator for up to 5 days or frozen for up to 3 months.
Nutrition
- Serving Size: 1 bar
- Calories: 380
- Sugar: 28
- Sodium: 280
- Fat: 24
- Saturated Fat: 14
- Carbohydrates: 38
- Fiber: 2
- Protein: 5
Keywords: no-bake pumpkin cheesecake bars, pumpkin dessert, fall dessert, easy pumpkin recipe, no-bake dessert, gingersnap crust, pumpkin cheesecake