The kindergarten Thanksgiving feast was in two days and I’d completely forgotten. My daughter had announced it that morning with the casual confidence of a kid who assumed her mom had everything under control. “I need twenty-five turkey treats for the party, Mommy. By tomorrow.” She’d said it while eating her cereal, milk dripping down her chin, completely oblivious to the panic rising in my chest.
Everyone else would be bringing those elaborate Pinterest-perfect creations—you know the ones. Fondant-covered cupcakes with hand-piped feathers, cookies iced to look like pilgrims, the whole nine yards. I had a box of cake mix, some candy melts I’d bought on a whim last Halloween, and approximately zero experience making anything that resembled a turkey. Honestly, I almost called my mom to ask if she could whip something up, but she lives three states away.
So there I was, at 10 PM, covered in melted candy coating and questioning every life choice that had led me to this moment. The first few cake pops looked more like sad, deformed chickens than turkeys. But somewhere around the sixth attempt, something clicked. Maybe it was the desperation talking, or maybe I’d finally figured out the right consistency for the cake mixture. Whatever it was, those little turkey cake pops ended up being the hit of the feast. I mean, the teachers asked me for the recipe, and one mom actually offered to trade her elaborate pumpkin cupcakes for my leftovers. I kept making them every year since—they’re just too fun not to share.
Why You’ll Love This Recipe
These turkey cake pops are more than just cute—they’re genuinely foolproof once you know a few tricks. I’ve tested this recipe at least a dozen times, tweaking the cake-to-frosting ratio and the candy melting technique until it worked for absolute beginners. Here’s what makes them special:
- Surprisingly Simple : Despite looking like something from a bakery, these come together in about an hour of active time. The cake mix does most of the heavy lifting.
- Kid-Friendly Activity : My daughter and her friends help decorate these every Thanksgiving now. The mess is worth the memories, let me tell you.
- Perfect for Parties : Whether it’s a classroom celebration, Friendsgiving, or your family’s big dinner, these little turkeys bring the fun.
- Completely Customizable : You can switch up the cake flavor, the candy colors, or even make them gluten-free without losing the adorable factor.
- Make-Ahead Magic : They freeze beautifully, which means less stress on the big day.
What makes these different from every other turkey cake pop recipe out there? It’s the texture. I use a specific ratio of frosting to cake that keeps the pops moist without falling apart on the stick. Plus, I’ve figured out a trick for getting those candy feathers to stick perfectly every time—no more lopsided turkeys. And honestly, there’s something about biting into one of these that just feels like Thanksgiving. It’s comfort food in miniature form, the kind that makes you smile before you even taste it.
What Ingredients You Will Need
This recipe uses simple ingredients you can find at any grocery store. The beauty of cake pops is that they’re forgiving—you can swap things around based on what you have on hand.
For the Cake Pops
- 1 box yellow cake mix (I prefer Betty Crocker for consistent texture, but any brand works)
- 1 cup water
- 1/3 cup vegetable oil
- 3 large eggs, room temperature
- 1/2 cup cream cheese frosting (store-bought is fine, but homemade adds a lovely tang)
For Decorating the Turkeys
- 24 ounces candy melts in brown (for the turkey bodies)
- 8 ounces candy melts in orange (for the beaks and feet)
- 4 ounces candy melts in red (for the snoods—that’s the dangly red part on a turkey’s beak)
- Assorted candy melts in fall colors: orange, yellow, red, and brown (for the feathers)
- 1 tablespoon coconut oil or shortening (to thin the candy coating if needed)
- 24 lollipop sticks (I use 6-inch sticks for better handling)
- Candy eyes (the small round ones work best)
- Orange sprinkles or small orange candies (for the beak—alternatively, you can pipe orange candy melts)
Ingredient Tips and Substitutions
If you’re gluten-free, use a gluten-free cake mix and check your candy melts for any wheat additives. For a dairy-free version, use a dairy-free cake mix and vegan frosting—most candy melts are naturally dairy-free, but always check the label. I’ve also made these with chocolate cake mix, and honestly, the chocolate turkeys are adorable too. Just use brown candy melts for the body and the feathers will pop beautifully against the darker base.
One thing I’ve learned the hard way: don’t skip the cream cheese frosting. Regular buttercream works in a pinch, but the cream cheese gives the cake pops a richer flavor and better texture. It’s less sweet, which balances the candy coating perfectly. And if you’re using store-bought frosting, let it come to room temperature before mixing—cold frosting will make your cake mixture lumpy.
Equipment Needed
You don’t need a fancy kitchen to make these turkey cake pops, but having the right tools makes the process much smoother. Here’s what you’ll need:
- Baking Sheet : For baking the cake. A 9×13-inch pan works perfectly.
- Large Mixing Bowl : For crumbling the cake and mixing in the frosting.
- Electric Mixer or Whisk : For beating the cake batter. A hand mixer is fine.
- Cookie Scoop or Melon Baller : For portioning the cake mixture into even balls. A 1-inch scoop is ideal.
- Parchment Paper : Lining your baking sheet prevents sticking and makes cleanup easier.
- Microwave-Safe Bowls : For melting the candy coating. Glass or ceramic works best.
- Styrofoam Block or Cardboard Box : For holding the cake pops upright while they set. I’ve used a shoebox with holes poked in it in a pinch.
- Small Piping Bags or Zip-Top Bags : For piping the candy melts onto the pops. Snip a tiny corner off the bag.
- Toothpicks : For applying the eyes and small details. They give you more control than your fingers.
If you don’t have a Styrofoam block, you can use a cardboard box with holes punched in it. I’ve also used a colander turned upside down—just poke the sticks through the holes. Honestly, the first time I made these, I used a shoe box and it worked fine. You don’t need to buy special equipment for a one-time project.
Preparation Method
Step 1: Bake the Cake
Preheat your oven to 350°F (175°C). Grease a 9×13-inch baking pan with butter or non-stick spray. In a large bowl, combine the cake mix, water, oil, and eggs. Beat with an electric mixer on medium speed for 2 minutes until smooth. Pour the batter into the prepared pan and bake for 25 to 30 minutes, or until a toothpick inserted in the center comes out clean. Let the cake cool completely in the pan—this is crucial. If the cake is even slightly warm, the frosting will melt and you’ll end up with a sticky mess.
Step 2: Make the Cake Pop Mixture
Once the cake is completely cool, crumble it into a large bowl using your hands or a fork. You want fine crumbs with no big chunks. Add 1/2 cup of cream cheese frosting and mix with your hands until the mixture holds together when pressed. It should feel like slightly damp sand. If it’s too dry, add another tablespoon of frosting. If it’s too wet, add a bit more cake crumbs. I’ve learned that the texture should be similar to play-dough—firm enough to roll into balls without cracking.
Step 3: Form the Cake Pops
Scoop out about 1 tablespoon of the cake mixture and roll it into a smooth ball. Place the balls on a parchment-lined baking sheet. You should get about 24 balls. Refrigerate them for at least 30 minutes—this helps them hold their shape when you dip them in the candy coating. If you’re in a hurry, pop them in the freezer for 15 minutes, but don’t leave them longer or they’ll crack when you dip them.
Step 4: Melt the Candy Coating
Place the brown candy melts in a microwave-safe bowl. Microwave in 30-second intervals, stirring between each, until completely melted. Add 1 teaspoon of coconut oil if the coating is too thick—it should be thin enough to dip the cake pops smoothly. If you add too much oil, the coating won’t set properly, so go slow.
Step 5: Assemble the Turkey Bodies
Dip the tip of a lollipop stick into the melted candy coating, then insert it about halfway into a chilled cake ball. This acts like glue, keeping the pop secure on the stick. Dip the entire cake ball into the melted coating, tapping the stick gently on the edge of the bowl to remove excess. Don’t swirl the pop in the coating—that can cause cracks. Instead, dip straight in and pull straight out. Place the coated pop in your Styrofoam block to set. Repeat with all the pops.
Step 6: Add the Feathers
While the brown coating is still wet, you’ll add the feathers. This is the fun part. Melt your assorted fall-colored candy melts separately. Using a toothpick or a small piping bag, dot the back of each cake pop with small circles in different colors—these will look like tail feathers. You can also press small candy melts into the coating for a textured look. Work quickly before the brown coating sets. If it starts to harden, warm the pops briefly under a heat lamp or in a warm oven for a few seconds.
Step 7: Decorate the Faces
Once the brown coating is fully set (about 15 minutes), it’s time to give your turkeys some personality. Melt the orange candy melts and pipe a small triangle for the beak on the front of each pop. Use the red candy melts to pipe a small teardrop shape above the beak for the snood. Attach two candy eyes using a tiny dab of melted candy coating as glue. For the feet, pipe two small orange lines at the bottom of the pop. Let everything set completely before serving.
Cooking Tips & Techniques
I’ve made these turkey cake pops more times than I care to count, and I’ve learned a few things the hard way. Here are my best tips:
The Biggest Mistake: Crumbs in the Coating
If your cake balls aren’t chilled enough, they’ll shed crumbs into the melted candy coating, turning it into a speckled mess. Always refrigerate the balls for at least 30 minutes. And when you dip, don’t stir the pop around—just dip straight in and pull straight out. If you see crumbs in your coating, strain it through a fine-mesh sieve before continuing.
Getting the Right Texture
The cake-to-frosting ratio is everything. Too much frosting and your pops will be greasy and fall off the stick. Too little and they’ll crack when you dip them. Start with 1/2 cup of frosting and add more only if needed. The mixture should feel like soft cookie dough—firm enough to hold a shape but moist enough to press together without crumbling.
Timing is Everything
I like to bake the cake the day before and refrigerate it overnight. Cold cake crumbles more evenly and mixes better with the frosting. Then I form the balls in the morning and decorate them in the afternoon. Breaking the process into stages makes it feel less overwhelming. Plus, the pops taste better after they’ve set overnight—the flavors meld together beautifully.
Multitasking Tips
While the cake is baking, you can prep your decorating station. Line up your candy melts, sticks, and decorations. Have your Styrofoam block ready. The actual dipping and decorating goes quickly once you start, so having everything within arm’s reach saves you from frantic scrambling with sticky hands.
Variations & Adaptations
Flavor Variations
I’ve made these with chocolate cake mix and white chocolate coating for a completely different look. The chocolate turkeys are especially cute with orange feathers—they look like dark-feathered wild turkeys. You can also use red velvet cake mix for a richer color, or spice cake mix for that warm fall flavor. If you’re feeling adventurous, add a teaspoon of pumpkin pie spice to the cake mixture before baking—it gives the pops a subtle Thanksgiving flavor that pairs beautifully with the candy coating.
Dietary Adaptations
For gluten-free turkey cake pops, use a gluten-free cake mix and check that your candy melts are certified gluten-free. Most are, but it’s worth verifying. For a dairy-free version, use a dairy-free cake mix, vegan cream cheese frosting, and dairy-free candy melts. I’ve made these for friends with various dietary restrictions, and they’ve always been a hit. Just be careful with the candy eyes—some brands contain dairy or gluten.
Seasonal Twists
These aren’t just for Thanksgiving. Swap the fall-colored feathers for pastel ones and you’ve got Easter turkey chicks. Use red, white, and blue candy melts for Fourth of July turkeys. Or go all-out with Christmas colors—red and green feathers with a tiny Santa hat on each turkey. The basic technique stays the same; you’re just changing the color palette.
Serving & Storage Suggestions
These turkey cake pops are best served at room temperature. The candy coating should be firm but not brittle, and the cake inside should be soft and moist. I like to arrange them on a platter with the feathers facing outward, so they look like a flock of turkeys gathered together. You can also stand them in a small vase or mason jar for a festive centerpiece.
For storage, place the pops in an airtight container in the refrigerator for up to 5 days. Layer them between sheets of parchment paper so the decorations don’t smudge. Let them sit at room temperature for 15 minutes before serving—cold cake pops can be hard and less flavorful.
These freeze beautifully. Place the decorated pops in a single layer on a baking sheet and freeze until solid, then transfer them to a freezer-safe bag. They’ll keep for up to 3 months. To thaw, move them to the refrigerator overnight, then let them come to room temperature before serving. The flavors actually deepen after freezing, so don’t hesitate to make them well in advance.
If you’re transporting them, use a Styrofoam block or a cardboard box with holes to keep the sticks upright. I’ve driven two hours with a box of these on my passenger seat, and they arrived perfectly intact. Just avoid bumpy roads and sudden stops—these little turkeys are more fragile than they look.
Nutritional Information & Benefits
Each turkey cake pop contains approximately 180 calories, 8 grams of fat, 25 grams of carbohydrates, and 2 grams of protein. The exact values depend on your cake mix and frosting choices. If you’re watching your sugar intake, you can use a sugar-free cake mix and sugar-free candy melts—the taste is slightly different, but the texture holds up well.
The cream cheese frosting adds a small amount of calcium and protein, while the cake mix provides iron and B vitamins. Let’s be honest—these are a treat, not a health food. But there’s something to be said for the emotional benefits of making something cute and sharing it with people you love. The process itself is therapeutic, and the smiles they bring are worth every calorie.
If you have nut allergies, check your candy melts—some brands are processed in facilities that handle nuts. I recommend Wilton candy melts, which are nut-free and widely available. For egg allergies, use an egg substitute in the cake mix, like applesauce or flax eggs. The texture will be slightly denser, but the pops will still hold together.
Conclusion
These turkey cake pops have become a Thanksgiving tradition in my house, and I hope they become one in yours too. They’re proof that you don’t need fancy skills or expensive equipment to create something that brings people together. Whether you’re making them for a classroom party, a family gathering, or just because you want to smile, these little turkeys deliver every time.
Don’t be afraid to experiment with the decorations—let your kids help, try different color combinations, or add your own creative touches. The best part about these pops is that they’re forgiving. Even if your turkey looks a little lopsided or his feathers are uneven, he’ll still be adorable. And honestly, the imperfect ones are always the most loved.
I’d love to see your turkey cake pops! Tag me in your photos, leave a comment below with your favorite variation, or share your decorating tips with the community. Happy Thanksgiving, and may your kitchen be filled with laughter, melted chocolate, and the smell of something delicious baking.
Frequently Asked Questions
Can I use a different cake flavor?
Absolutely. Chocolate, red velvet, spice cake, or even lemon cake work beautifully. Just adjust the candy coating color to match—white or light brown coating works best for most flavors.
Why did my cake pops crack when I dipped them?
This usually happens when the cake balls are too cold or the candy coating is too hot. Make sure the balls are chilled but not frozen solid, and let the melted coating cool slightly before dipping. If they’re cracking, warm the balls at room temperature for 5 minutes before trying again.
Can I make these ahead of time?
Yes! You can make them up to 5 days ahead and store them in the refrigerator. Or freeze them for up to 3 months. Just let them come to room temperature before serving for the best texture.
How do I get the feathers to stick?
Press the candy melts or piped dots into the coating while it’s still wet. If the coating has set, you can dab a tiny bit of melted candy coating on the back of each feather and press it onto the pop. A toothpick helps with precision.
Can I use homemade frosting instead of store-bought?
Yes, but be careful with the consistency. Homemade buttercream or cream cheese frosting should be thick enough to hold its shape. If it’s too thin, the cake mixture will be greasy and hard to roll. Start with 1/3 cup and add more as needed.
Pin This Recipe!
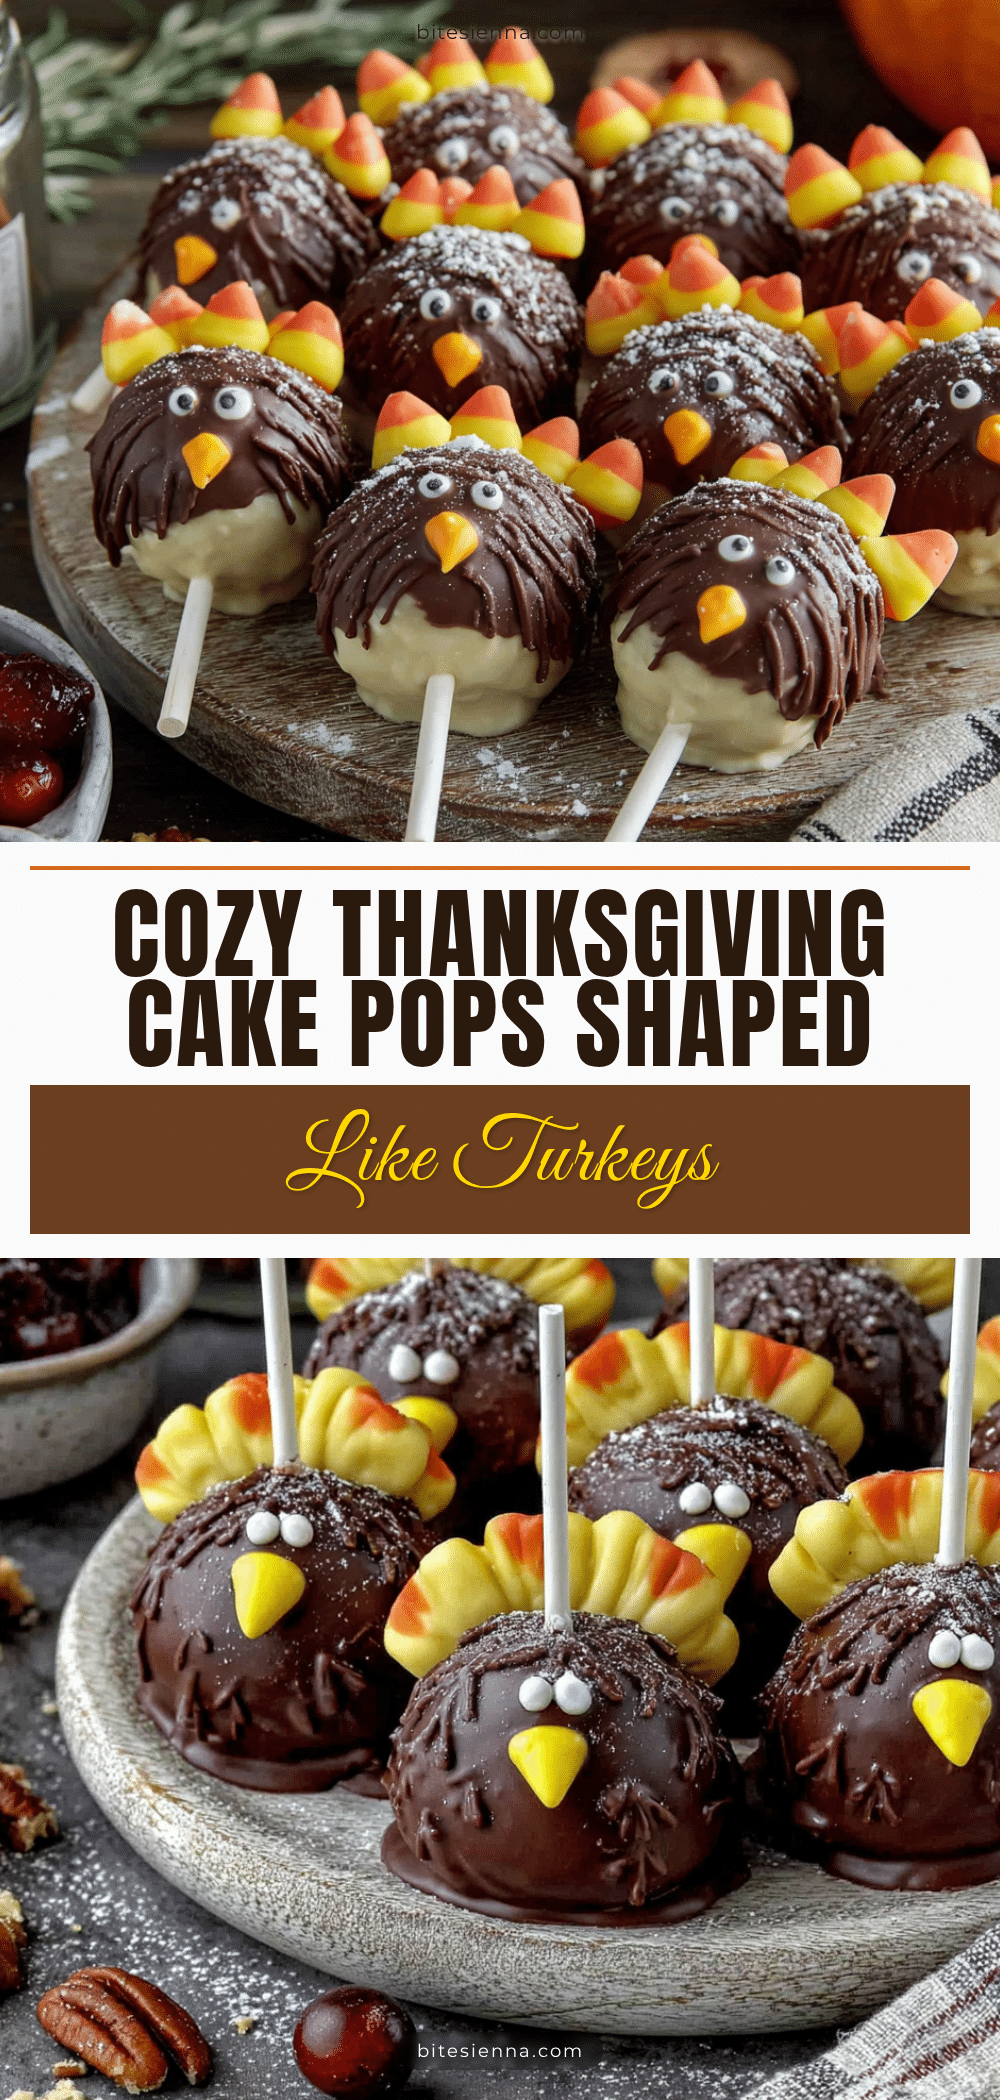
Easy Turkey Cake Pops for Thanksgiving
These adorable turkey cake pops are surprisingly simple to make and perfect for Thanksgiving parties. With a moist cake center and colorful candy feathers, they’re a hit with kids and adults alike.
- Prep Time: 30 minutes
- Cook Time: 30 minutes
- Total Time: 1 hour 30 minutes (plus chilling time)
- Yield: 24 servings 1x
- Category: Dessert
- Cuisine: American
Ingredients
- 1 box yellow cake mix (Betty Crocker recommended)
- 1 cup water
- 1/3 cup vegetable oil
- 3 large eggs, room temperature
- 1/2 cup cream cheese frosting (store-bought or homemade)
- 24 ounces candy melts in brown (for turkey bodies)
- 8 ounces candy melts in orange (for beaks and feet)
- 4 ounces candy melts in red (for snoods)
- Assorted candy melts in fall colors: orange, yellow, red, brown (for feathers)
- 1 tablespoon coconut oil or shortening (to thin candy coating if needed)
- 24 lollipop sticks (6-inch)
- Candy eyes (small round)
- Orange sprinkles or small orange candies (for beak, or pipe orange candy melts)
Instructions
- Preheat oven to 350°F (175°C). Grease a 9×13-inch baking pan.
- In a large bowl, combine cake mix, water, oil, and eggs. Beat with electric mixer on medium speed for 2 minutes until smooth.
- Pour batter into prepared pan and bake for 25-30 minutes, until a toothpick inserted in center comes out clean. Cool completely.
- Crumble cooled cake into a large bowl into fine crumbs. Add 1/2 cup cream cheese frosting and mix with hands until mixture holds together when pressed (like damp sand).
- Scoop about 1 tablespoon of mixture and roll into smooth balls. Place on parchment-lined baking sheet. Refrigerate for at least 30 minutes.
- Melt brown candy melts in microwave-safe bowl in 30-second intervals, stirring between each, until smooth. Add 1 teaspoon coconut oil if too thick.
- Dip tip of lollipop stick into melted coating, then insert halfway into a chilled cake ball. Dip entire ball into coating, tap gently to remove excess. Place in Styrofoam block to set.
- While coating is still wet, melt assorted fall-colored candy melts separately. Using toothpick or piping bag, dot back of each pop with small circles for tail feathers.
- Once brown coating is fully set (about 15 minutes), melt orange candy melts and pipe small triangle for beak on front. Use red melts to pipe teardrop shape above beak for snood.
- Attach two candy eyes with tiny dab of melted coating. Pipe two small orange lines at bottom for feet. Let everything set completely before serving.
Notes
Chill cake balls thoroughly before dipping to prevent crumbs in coating. Use cream cheese frosting for best texture. Work quickly when adding feathers before coating sets. Can be made ahead and stored in refrigerator for up to 5 days or frozen for up to 3 months.
Nutrition
- Serving Size: 1 cake pop
- Calories: 180
- Sugar: 18
- Sodium: 180
- Fat: 8
- Saturated Fat: 3
- Carbohydrates: 25
- Protein: 2
Keywords: turkey cake pops, Thanksgiving dessert, cake pops, turkey treats, easy Thanksgiving recipe, kid-friendly dessert


