My friend Jenna swore she hated sourdough discard. For years. She’d see me pull that jar out of the fridge and make a face like I’d offered her a spoonful of vinegar. Then last fall, I made this pumpkin focaccia for our weekly book club and caught her sneaking back to the kitchen for a third piece. She didn’t say anything, just stood there with olive oil dripping down her chin and this look of pure betrayal on her face. I pretended not to notice. Honestly, that moment was sweeter than any pumpkin pie I’ve ever made.
This isn’t your typical fall bread. It’s not sweet, it’s not dense, and it definitely doesn’t taste like a science experiment gone wrong. This is a light, airy focaccia with a deep golden crust and the faintest whisper of pumpkin in the background. The sourdough discard does something magical here—it adds a subtle tang that cuts through the richness of the olive oil, making each bite feel surprisingly fresh. I stumbled onto this recipe by accident, trying to use up both my discard jar and a half-can of pumpkin puree that was taking up space in my fridge. Let me tell you, that happy accident has become my most-requested bake of the season.
The first time I made it, I forgot to add the salt. The second time, I let it overproof and it turned into a flat, sad pancake. But the third time—that was the charm. The texture was pillowy, the crust crackled when I tapped it, and the rosemary and sea salt on top looked like something from a fancy bakery. Maybe you’ve been there, standing over a bowl of dough wondering if it’s worth the effort. Trust me, it is. This is the bread that makes people close their eyes when they take that first bite, and honestly, that’s why I keep making it.
Why You’ll Love This Recipe
This pumpkin focaccia has earned a permanent spot in my weekly baking rotation, and I think it will in yours too. It’s one of those rare recipes that feels both special and completely unfussy at the same time.
- Quick & Easy: The dough comes together in about 15 minutes of active work. Most of the time is hands-off rising, which means you can get other things done while it does its thing.
- Simple Ingredients: You probably have everything in your pantry right now. No weird specialty flours, no hard-to-find add-ins. Just pantry staples that work together beautifully.
- Perfect for Fall Gatherings: This bread is a showstopper at Thanksgiving, Friendsgiving, or any cozy dinner party. It’s also amazing for meal prep—slice it, freeze it, and pull out pieces as needed.
- Crowd-Pleaser: I’ve served this to picky kids, health-conscious friends, and serious bread bakers. Every single person has asked for the recipe. It’s that good.
- Unbelievably Delicious: The combination of tangy sourdough discard, earthy pumpkin, and fruity olive oil creates a flavor profile that’s complex but approachable. The texture is light and airy, with a satisfying crunch on the bottom.
What makes this recipe different from other pumpkin breads is the technique. Instead of adding pumpkin for sweetness, I use it to add moisture and a subtle earthy note that complements the sourdough tang. The discard also helps create a more open crumb structure, giving you those beautiful air pockets that make focaccia so satisfying. I’ve tested this recipe at least a dozen times, tweaking hydration levels and proofing times until it was just right. This is the version that works every single time.
This isn’t just good bread. It’s the kind of bread that makes you feel like you’ve accomplished something. It’s comfort food that happens to be made with wholesome ingredients, and it fits perfectly into a balanced eating lifestyle without feeling like a compromise.
What Ingredients You Will Need
This recipe uses simple, wholesome ingredients to deliver bold flavor and satisfying texture without the fuss. Most of these are pantry staples, and the ones that aren’t are easily found at any grocery store.
- All-purpose flour (3 cups / 375g): I recommend King Arthur Flour for consistent results. The protein content is just right for focaccia. Don’t substitute bread flour here—it will make the texture too chewy.
- Sourdough discard (1 cup / 240g, unfed, at room temperature): This is the star of the show. Use unfed discard straight from the fridge. If your discard is very liquidy, you may need to reduce the water slightly. I’ve used discard that was up to two weeks old with great results.
- Pumpkin puree (½ cup / 120g): Make sure you’re using 100% pure pumpkin, not pumpkin pie filling. Libby’s is my go-to brand. If you have homemade pumpkin puree, drain it slightly on paper towels to remove excess moisture.
- Warm water (1 cup / 240ml, about 100°F): The water temperature matters. Too hot and you’ll kill the yeast activity; too cold and the fermentation will be sluggish. Aim for bathwater temperature.
- Olive oil (¼ cup / 60ml, plus more for the pan and topping): Use a good quality extra virgin olive oil here. It’s a major flavor component. I like California Olive Ranch for everyday baking.
- Active dry yeast (1 teaspoon / 3g): This gives the discard a little help. If your discard is very active and bubbly, you can reduce this to ½ teaspoon. Instant yeast works too—just mix it directly with the flour.
- Salt (1½ teaspoons / 9g): Fine sea salt is best. Don’t skip this or reduce it—salt is crucial for flavor development and dough structure.
- Honey (1 tablespoon / 15ml): This balances the tanginess of the sourdough discard and helps with browning. Maple syrup works beautifully as a substitute.
- Fresh rosemary (2 tablespoons, chopped): Use the leaves only, not the woody stems. Dried rosemary works in a pinch, but use half the amount.
- Flaky sea salt (for topping): Maldon salt is my favorite. It adds that beautiful crunch and burst of saltiness that contrasts with the olive oil.
For the pumpkin, look for cans that have a deep orange color and smooth texture. If you’re using fresh pumpkin, roast it until tender, then puree and strain through cheesecloth overnight to remove excess liquid. Wet pumpkin will make your dough sticky and difficult to handle.
I’ve experimented with whole wheat flour here, and I don’t recommend it. The bran interferes with gluten development and makes the focaccia dense. If you want to add whole grains, substitute up to ½ cup of the all-purpose flour with white whole wheat flour.
Equipment Needed
You don’t need a lot of fancy equipment to make this focaccia, which is part of its charm. Here’s what you’ll need:
- Large mixing bowl: A glass or ceramic bowl works best. Avoid metal bowls if your discard is very acidic.
- 9×13-inch baking pan: This is the perfect size for focaccia. A metal pan gives you a crisper bottom crust than glass or ceramic. I use a USA Pan and love the results.
- Kitchen scale: Not strictly necessary, but highly recommended for consistent results. Baking by weight is more accurate than measuring by volume.
- Bench scraper: This makes handling the sticky dough much easier. A plastic dough scraper is cheap and incredibly useful.
- Plastic wrap or a damp kitchen towel: For covering the dough during proofing. Plastic wrap is better because it traps moisture.
- Instant-read thermometer: Helpful for checking water temperature and dough temperature during bulk fermentation.
If you don’t have a 9×13 pan, you can use a 10-inch cast iron skillet. The focaccia will be thicker and need a few extra minutes of baking time. I’ve also used a half-sheet pan with good results—the focaccia will be thinner and crispier.
One tip: don’t use nonstick spray on your pan. Use olive oil instead. It creates a better crust and adds flavor. I learned this the hard way after my first few attempts stuck to the pan despite the nonstick coating.
Preparation Method
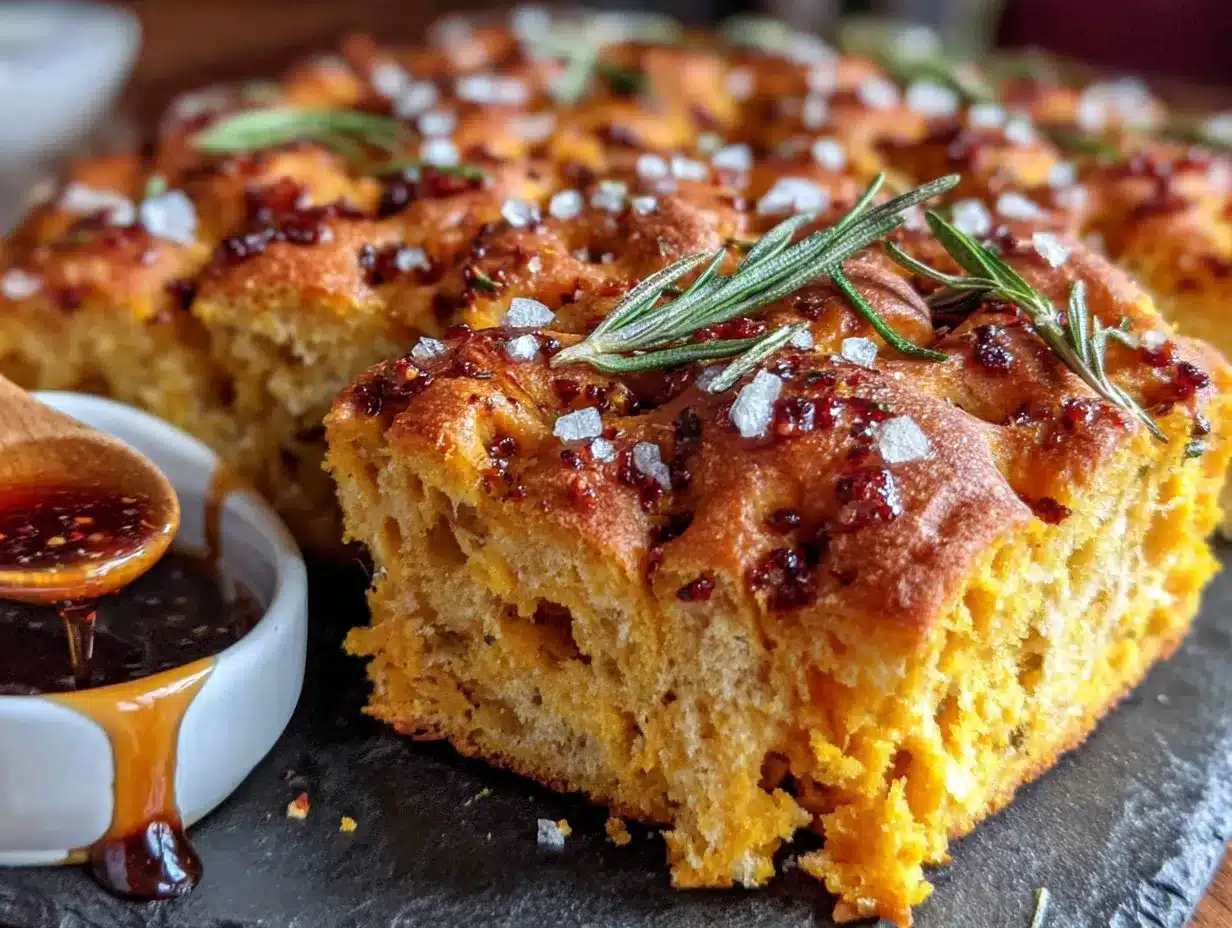
This recipe takes about 3½ hours from start to finish, but most of that is hands-off rising time. Plan ahead and you’ll be rewarded with the best focaccia of your life.
- Make the dough: In a large mixing bowl, combine 3 cups (375g) all-purpose flour, 1 teaspoon active dry yeast, and 1½ teaspoons fine sea salt. Whisk together. In a separate bowl or measuring cup, mix 1 cup (240g) sourdough discard, ½ cup (120g) pumpkin puree, 1 cup (240ml) warm water, ¼ cup (60ml) olive oil, and 1 tablespoon honey. Stir until smooth. Pour the wet ingredients into the dry ingredients and mix with a wooden spoon or your hands until a shaggy dough forms. It will be very sticky—that’s normal.
- Bulk fermentation: Cover the bowl with plastic wrap and let it rest at room temperature for 30 minutes. This is called the autolyse phase and it helps the flour absorb the liquid. After 30 minutes, perform your first set of stretch and folds. Wet your hands slightly, grab one side of the dough, stretch it up, and fold it over the center. Rotate the bowl 90 degrees and repeat. Do this 4-6 times until the dough feels tighter. Cover and let rest for 30 minutes. Repeat the stretch and fold process 2 more times, with 30-minute rests in between. After the third set, let the dough rest, covered, for 1-2 hours until it has nearly doubled in size and is bubbly and jiggly.
- Prepare the pan: While the dough is rising, pour 2-3 tablespoons of olive oil into your 9×13 pan. Use your fingers to spread it evenly over the bottom and up the sides. The oil should pool slightly in the bottom. This is what creates that crispy, golden crust.
- Transfer the dough: Gently scrape the dough out of the bowl and into the oiled pan. It will be very soft and sticky. Don’t try to knead it or deflate it too much. Let it settle in the pan for 10 minutes, then use oiled fingertips to gently stretch it toward the edges of the pan. If it resists, let it rest for another 10 minutes and try again. You want it to fill the pan evenly, but don’t force it—it will spread as it proofs.
- Final proof: Cover the pan loosely with plastic wrap and let the dough rise for 1-2 hours, until it’s puffy and has nearly doubled in height. The time will depend on your kitchen temperature. In a warm kitchen (75-80°F), it will take closer to 1 hour. In a cooler kitchen, it may take 2 hours. Look for visual cues: the dough should look billowy and have small bubbles on the surface.
- Dimple the dough: About 20 minutes before baking, preheat your oven to 425°F (220°C). When the dough is ready, drizzle another tablespoon of olive oil over the top. Use your fingertips to press deep dimples all over the surface of the dough, pushing all the way to the bottom of the pan. Don’t be shy—the dimples catch the oil and create those signature focaccia pockets. Sprinkle the chopped rosemary and flaky sea salt evenly over the top.
- Bake: Place the pan on the middle rack of your preheated oven. Bake for 25-30 minutes, until the top is deep golden brown and the bottom sounds hollow when tapped. If the top is browning too quickly, tent loosely with foil for the last 5-10 minutes. Let the focaccia cool in the pan for 5 minutes, then transfer to a wire rack. Don’t skip the cooling time—it finishes cooking internally and makes the crust extra crispy.
- Serve: Cut into squares or strips and serve warm or at room temperature. The leftovers (if there are any) are amazing toasted the next day.
Your kitchen will smell incredible while this bakes. The combination of olive oil, rosemary, and pumpkin is pure fall magic. When you tap the top and hear that hollow sound, you’ll know you’ve done it right.
Cooking Tips & Techniques
After making this recipe more times than I can count, I’ve picked up a few tricks that make a real difference. Here are my best tips for focaccia success:
Don’t skip the stretch and folds. This technique builds gluten strength without overworking the dough. It’s what gives focaccia that light, airy texture instead of a dense, bready one. I used to think I could just mix everything and let it rise, but the texture was never right. The stretch and folds are non-negotiable.
Watch your water temperature. If your kitchen is cold, use slightly warmer water (around 105°F). If it’s hot, use cooler water (around 95°F). The goal is to keep the dough temperature around 75-78°F during bulk fermentation. I learned this after a batch took 5 hours to rise in my cold winter kitchen. A thermometer takes the guesswork out of it.
Be generous with the olive oil. Focaccia is an oil-based bread, and skimping on the oil leads to a dry, tough crust. I use at least ¼ cup in the pan and another tablespoon on top. The oil not only adds flavor but also helps create that crispy, golden bottom that’s the hallmark of great focaccia.
Let it cool completely before cutting. I know it’s tempting to tear into it while it’s still warm, but the internal structure needs time to set. If you cut too soon, the crumb will be gummy and the crust will lose its crispness. Give it at least 20 minutes on a wire rack.
One mistake I made early on: I used cold discard straight from the fridge without letting it come to room temperature. The dough took forever to rise and the texture was uneven. Now I always take my discard out an hour before I start baking. It makes a noticeable difference.
For consistent results, bake this recipe at the same time of day. I know that sounds weird, but your kitchen temperature and humidity change throughout the day. I get my best results when I start the dough in the morning and bake it in the early afternoon.
Variations & Adaptations
One of the best things about this focaccia is how adaptable it is. Here are some variations I’ve tried and loved:
Herb and Garlic: Add 2 cloves of minced garlic to the olive oil before dimpling the dough. Swap the rosemary for fresh thyme or sage. The garlic infuses the oil and creates an incredible aroma. I made this version for a dinner party and it disappeared in minutes.
Cheese Lover’s: Sprinkle ½ cup of grated Parmesan or crumbled feta over the top before baking. The cheese gets crispy and golden in the oven. For an extra indulgent version, add ½ cup of shredded mozzarella halfway through baking. Just be careful not to burn the cheese—check it a few minutes early.
Everything Bagel: Skip the rosemary and top with everything bagel seasoning instead. The sesame seeds, poppy seeds, garlic, and onion flakes create a savory, crunchy topping that’s addictive. This is my go-to version for brunch.
Gluten-Free Option: I’ve tested this with a 1:1 gluten-free flour blend and it works, but the texture is denser. Add an extra tablespoon of olive oil and let the dough proof for an extra 30 minutes. Cup4Cup brand gave me the best results.
Sweet Version: Reduce the salt to 1 teaspoon, omit the rosemary, and add 2 tablespoons of brown sugar and 1 teaspoon of cinnamon to the dough. Top with a cinnamon-sugar mixture instead of salt. It’s like a pumpkin cinnamon roll in focaccia form. My kids devour this version.
Roasted Pumpkin Seeds: Save the seeds from your pumpkin, roast them with salt and olive oil, and sprinkle them on top before baking. They add a wonderful crunch and nutty flavor that pairs perfectly with the pumpkin in the dough.
Serving & Storage Suggestions
This focaccia is incredibly versatile and can be served in so many ways. Here’s how I like to enjoy it:
Serving: Serve warm or at room temperature. It’s amazing on its own, but even better with a bowl of soup or a hearty stew. I love it alongside a bowl of roasted butternut squash soup or a simple tomato basil soup. For a lighter meal, serve it with a green salad dressed with lemon vinaigrette. The tangy dressing complements the focaccia perfectly.
Presentation: Cut into squares or long strips and arrange on a wooden board. Drizzle with a little extra olive oil and sprinkle with fresh herbs. For a party, serve it with a bowl of olive oil and balsamic vinegar for dipping. It’s also fantastic as the base for small sandwiches—slice it horizontally and fill with roasted vegetables, fresh mozzarella, and pesto.
Storage: Store leftover focaccia in an airtight container at room temperature for up to 2 days. Do not refrigerate it—the cold temperature will make it stale. For longer storage, wrap it tightly in plastic wrap and then foil, and freeze for up to 3 months. I often make a double batch and freeze one for later.
Reheating: The best way to reheat focaccia is in a 350°F oven for 5-7 minutes. It brings back the crispy crust and soft interior. You can also toast it in a toaster or toaster oven. Avoid the microwave—it will make the bread rubbery and tough.
Flavor Development: Here’s a secret: this focaccia actually tastes better the next day. The flavors meld together and the texture becomes even more complex. If you can resist eating it all on day one, you’re in for a treat on day two.
Nutritional Information & Benefits
This focaccia is made with wholesome ingredients that offer some surprising nutritional benefits. Here’s the breakdown per serving (1 square, based on 12 servings):
- Calories: 195
- Total Fat: 7g
- Saturated Fat: 1g
- Carbohydrates: 28g
- Fiber: 2g
- Sugar: 2g
- Protein: 4g
- Sodium: 290mg
The pumpkin puree adds a good dose of vitamin A (in the form of beta-carotene), which is great for eye health and immune function. The sourdough fermentation process makes the bread easier to digest by breaking down some of the gluten and phytic acid. Olive oil provides healthy monounsaturated fats that are good for heart health.
This recipe is vegetarian and can be made vegan by substituting the honey with maple syrup. It’s also nut-free and egg-free. If you’re watching your sodium, you can reduce the flaky salt topping, but I wouldn’t reduce the salt in the dough itself—it’s essential for structure and flavor.
I love that this bread feels indulgent but is made with real, whole ingredients. It fits perfectly into a balanced eating lifestyle where you don’t have to choose between delicious and nutritious.
Conclusion
This light and savory sourdough discard pumpkin focaccia has become my favorite fall bake, and I think it will become yours too. It’s the perfect way to use up sourdough discard and pumpkin puree, and the results are absolutely stunning. The combination of tangy sourdough, earthy pumpkin, and fruity olive oil creates a bread that’s complex, satisfying, and surprisingly easy to make.
What I love most about this recipe is how forgiving it is. Even if you’re new to bread baking, this focaccia will turn out beautifully. The technique is simple, the ingredients are basic, and the reward is a bakery-quality bread that will impress everyone who tries it. Whether you serve it alongside a cozy soup, use it for sandwiches, or just eat it straight out of the pan (no judgment here), this focaccia is sure to become a staple in your kitchen.
I’d love to hear how this recipe turns out for you! Did you try any of the variations? Did you come up with your own twist? Drop a comment below and let me know. And if you loved this recipe, please share it with your friends and family. Happy baking!
Frequently Asked Questions
Can I use active sourdough starter instead of discard?
Yes, you can! If you use active starter, reduce the yeast to ½ teaspoon and expect a slightly faster rise. The flavor will be less tangy than if you used discard, but it will still be delicious.
Why is my dough so sticky?
Focaccia dough is supposed to be sticky—that’s what gives it that light, airy texture. Don’t be tempted to add more flour. Use wet hands or a bench scraper to handle it, and trust the process. The stretch and folds will help develop the gluten and make the dough easier to work with.
Can I make this ahead of time?
Absolutely. You can prepare the dough through the bulk fermentation stage, then cover and refrigerate it overnight. The next day, let it come to room temperature for about an hour before transferring it to the pan and continuing with the recipe. The cold fermentation actually improves the flavor.
What can I substitute for sourdough discard?
If you don’t have sourdough discard, you can make a quick version by mixing ½ cup flour and ½ cup water and letting it sit at room temperature for 12-24 hours until it’s bubbly. Alternatively, you can substitute with an equal amount of yogurt or buttermilk, though the flavor will be different.
How do I know when the focaccia is done baking?
The top should be deep golden brown, and the bottom should sound hollow when you tap it. You can also use an instant-read thermometer—the internal temperature should be around 200-205°F. If you’re unsure, it’s better to bake it a few minutes longer than to underbake it.
Pin This Recipe!

Easy Sourdough Discard Pumpkin Focaccia Recipe
This light and savory sourdough discard pumpkin focaccia is the perfect fall bake. It uses simple ingredients to create a bread with a deep golden crust, airy crumb, and a subtle tang from the sourdough discard, complemented by earthy pumpkin and fruity olive oil.
- Prep Time: 15 minutes
- Cook Time: 30 minutes
- Total Time: 3 hours 30 minutes
- Yield: 12 servings 1x
- Category: Bread
- Cuisine: American
Ingredients
- 3 cups (375g) all-purpose flour
- 1 cup (240g) sourdough discard, unfed, at room temperature
- ½ cup (120g) pumpkin puree (100% pure, not pie filling)
- 1 cup (240ml) warm water (about 100°F)
- ¼ cup (60ml) olive oil, plus more for pan and topping
- 1 teaspoon (3g) active dry yeast
- 1½ teaspoons (9g) fine sea salt
- 1 tablespoon (15ml) honey
- 2 tablespoons fresh rosemary, chopped
- Flaky sea salt for topping
Instructions
- Make the dough: In a large mixing bowl, whisk together 3 cups (375g) all-purpose flour, 1 teaspoon active dry yeast, and 1½ teaspoons fine sea salt. In a separate bowl or measuring cup, mix 1 cup (240g) sourdough discard, ½ cup (120g) pumpkin puree, 1 cup (240ml) warm water, ¼ cup (60ml) olive oil, and 1 tablespoon honey until smooth. Pour the wet ingredients into the dry and mix with a wooden spoon or your hands until a shaggy, sticky dough forms.
- Bulk fermentation: Cover the bowl with plastic wrap and let rest at room temperature for 30 minutes (autolyse). After 30 minutes, perform the first set of stretch and folds: wet your hands, grab one side of the dough, stretch it up, and fold it over the center. Rotate the bowl 90 degrees and repeat 4-6 times. Cover and rest 30 minutes. Repeat the stretch and fold process 2 more times with 30-minute rests. After the third set, let the dough rest, covered, for 1-2 hours until nearly doubled in siz…
- Prepare the pan: Pour 2-3 tablespoons of olive oil into a 9×13-inch baking pan and spread evenly over the bottom and up the sides.
- Transfer the dough: Gently scrape the dough into the oiled pan. Let it settle for 10 minutes, then use oiled fingertips to gently stretch it toward the edges. If it resists, let rest another 10 minutes and try again.
- Final proof: Cover the pan loosely with plastic wrap and let rise for 1-2 hours until puffy and nearly doubled in height.
- Dimple the dough: About 20 minutes before baking, preheat oven to 425°F (220°C). Drizzle another tablespoon of olive oil over the dough. Use your fingertips to press deep dimples all over the surface, pushing to the bottom of the pan. Sprinkle chopped rosemary and flaky sea salt evenly on top.
- Bake: Place pan on the middle rack and bake for 25-30 minutes until deep golden brown and the bottom sounds hollow when tapped. If browning too quickly, tent with foil for the last 5-10 minutes. Let cool in the pan for 5 minutes, then transfer to a wire rack.
- Serve: Cut into squares or strips and serve warm or at room temperature.
Notes
Don’t skip the stretch and folds—they build gluten for a light, airy texture. Be generous with olive oil for a crispy crust. Let the focaccia cool completely before cutting to avoid a gummy crumb. For best results, bring sourdough discard to room temperature before starting.
Nutrition
- Serving Size: 1 square
- Calories: 195
- Sugar: 2
- Sodium: 290
- Fat: 7
- Saturated Fat: 1
- Carbohydrates: 28
- Fiber: 2
- Protein: 4
Keywords: sourdough discard, pumpkin focaccia, fall bread, easy focaccia, sourdough recipe, pumpkin recipe, savory bread


