This was supposed to be a simple batch of chocolate crinkle cookies. You know the ones—those classic powdered sugar-dusted cookies that show up on every holiday cookie tray. I had the dough chilling, the oven preheating, and my three-year-old “helping” by dumping an entire bag of powdered sugar onto the counter. I grabbed what I thought was the cocoa powder to start the next batch, but my hand closed around a jar of black cocoa instead. The kind that makes things look like charcoal. I was already running late for a playdate, the kitchen looked like a flour bomb had gone off, and honestly? I almost just threw the whole thing in the trash. But I didn’t. I baked them anyway, and when I pulled that tray out of the oven, I just stared. The black cocoa had created these deep, dark cracks against the white sugar, and it hit me—those looked exactly like spider webs. I mean, exactly. I haven’t made regular crinkle cookies since, and that was three Halloweens ago. Maybe you’ve been there—that moment when a kitchen disaster turns into something you actually want to repeat on purpose.
Why You Will Love This Recipe
Let me tell you why these spooky spider web chocolate crinkle cookies have become my most-requested Halloween treat. They are not just another cookie recipe—they are the one that makes people stop mid-bite and say, “Wait, how did you do that?”
- Quick & Easy: From start to finish, you are looking at about 45 minutes plus chilling time. The actual hands-on work is maybe 15 minutes. Perfect for those nights when you realize tomorrow is the school Halloween party.
- Simple Ingredients: Nothing fancy here. Butter, sugar, eggs, flour, cocoa powder—the usual suspects. The only special thing is black cocoa powder, and I will tell you where to find it.
- Perfect for Halloween: These are made for spooky season. The spider web effect is completely natural—no piping bags, no food coloring, no special tools. The cookies do all the work themselves.
- Crowd-Pleaser: Kids love the creepy factor. Adults love that they taste like a really rich, fudgy brownie in cookie form. I have watched people eat four in a row without blinking.
- Unbelievably Delicious: The black cocoa gives these a deep, almost Oreo-like chocolate flavor that regular cocoa just cannot match. It is next-level comfort food disguised as something spooky.
What makes this recipe different from every other crinkle cookie out there? It is the combination of black cocoa and regular cocoa that creates that dramatic contrast. Most recipes use all regular cocoa, and the cracks just look like… cracks. But with black cocoa, the dough is nearly black, so when it cracks open during baking, the lighter interior creates a web pattern that is genuinely spooky. I have tested this at least a dozen times to get the ratios right—too much black cocoa and the cookies are bitter, too little and you lose the effect. This version hits the sweet spot.
Honestly, this is the kind of cookie that makes you close your eyes after the first bite. It is comfort food reimagined for the spookiest time of year—richer, darker, but with the same soul-soothing satisfaction as the cookies your grandma used to make.
What Ingredients You Will Need
This recipe uses simple, mostly pantry-staple ingredients to deliver that bold, fudgy chocolate flavor and the signature spider web effect. The key player here is the black cocoa powder, which does the heavy lifting for that creepy look.
- Unsalted butter, softened (1/2 cup or 1 stick) – Make sure it is truly at room temperature. Cold butter will not cream properly with the sugar, and you will end up with flat cookies.
- Granulated sugar (1 cup) – Regular white sugar works best here. I have tried coconut sugar, and the cookies come out too dark to see the web pattern.
- Large eggs (2, room temperature) – Room temperature eggs incorporate into the butter-sugar mixture much more smoothly than cold ones. If you forgot to take them out, place them in a bowl of warm water for 5 minutes.
- Vanilla extract (1 teaspoon) – Use pure vanilla if you have it. It rounds out the deep cocoa flavor beautifully.
- All-purpose flour (1 and 1/2 cups) – Spoon and level your flour. Scooping directly from the bag packs in too much and makes the cookies dry.
- Black cocoa powder (1/2 cup) – This is the star. I recommend Rodelle or King Arthur Flour brand. You can find it at specialty baking stores or online. Do not substitute with regular Dutch-process cocoa—the color will not be dark enough.
- Regular unsweetened cocoa powder (1/4 cup) – This adds depth and prevents the black cocoa from making the cookies taste flat or one-dimensional.
- Baking powder (1 teaspoon) – Make sure it is fresh. Test it by dropping a bit in hot water—if it fizzes, you are good.
- Salt (1/2 teaspoon) – Balances the sweetness and enhances the chocolate flavor.
- Powdered sugar (1/2 to 3/4 cup, for rolling) – You will need a generous amount. The cookies absorb some of it as they chill, so do not skimp.
Ingredient substitution guidance: If you cannot find black cocoa powder, you can use all regular Dutch-process cocoa, but the spider web effect will be much less dramatic—more like gray cracks on a brown background. For a dairy-free version, use vegan butter sticks (not tub margarine, which has too much water). I have tested this with Bob’s Red Mill Gluten-Free 1-to-1 Baking Flour, and it works well, though the cookies spread a tiny bit more.
Equipment Needed
You do not need anything fancy for these spooky spider web chocolate crinkle cookies. Here is what you will need:
- Electric mixer (hand or stand) – You can cream the butter and sugar by hand, but your arm will thank you for using a mixer. I use my trusty KitchenAid, but a hand mixer works just fine.
- Large mixing bowls – One for the wet ingredients, one for the dry.
- Whisk – For combining the dry ingredients evenly.
- Rubber spatula – For scraping down the bowl and folding the dough.
- Baking sheets – I recommend heavy-duty aluminum sheets. Thin, dark sheets tend to over-brown the bottoms.
- Parchment paper – Non-negotiable. These cookies stick like crazy to unlined sheets.
- Cooling rack – Wire racks let air circulate so the cookies set properly.
- Small bowl – For the powdered sugar for rolling.
- Cookie scoop (about 1.5 tablespoons) – Ensures uniform size and even baking. If you do not have one, use two spoons.
Budget-friendly tip: If you do not own a stand mixer, a hand mixer costs about $15 and will last you years. Or just use a wooden spoon and some elbow grease—it is good arm workout, honestly.
Preparation Method

Let me walk you through this step by step. I have made these cookies so many times that I have the process memorized, but I still check my notes every time because baking is finicky like that.
-
Cream the butter and sugar. In a large bowl, beat the softened butter and granulated sugar together on medium speed until light and fluffy, about 2-3 minutes. Scrape down the sides of the bowl with your spatula. The mixture should look pale and almost whipped. If it looks greasy or separated, your butter was too soft.
-
Add the eggs and vanilla. Add the eggs one at a time, beating well after each addition. Then add the vanilla and beat until combined. The mixture might look slightly curdled at this point—that is okay. Do not panic.
-
Whisk the dry ingredients. In a separate bowl, whisk together the flour, black cocoa powder, regular cocoa powder, baking powder, and salt. Whisk for at least 30 seconds to make sure everything is evenly distributed. Cocoa powder tends to clump, so break up any lumps with your fingers or the whisk.
-
Combine wet and dry. Gradually add the dry ingredients to the wet mixture, mixing on low speed. Stop when just combined—overmixing will make the cookies tough. The dough will be very dark, almost black, and quite sticky. That is exactly what you want.
-
Chill the dough. Cover the bowl with plastic wrap and refrigerate for at least 2 hours, or overnight. This step is crucial. The dough needs to firm up enough to roll into balls, and the chilling time allows the flavors to deepen. I have skipped this step before, and the cookies spread into flat, sad puddles. Learn from my mistake.
-
Preheat and prepare. When you are ready to bake, preheat your oven to 350°F (175°C). Line two baking sheets with parchment paper. Pour the powdered sugar into a small bowl.
-
Shape and coat the cookies. Using your cookie scoop or a spoon, portion out rounded tablespoons of dough. Roll each portion into a ball between your palms. The dough will be sticky, so work quickly. Drop each ball into the powdered sugar and roll it around until completely coated. I like to double-coat mine—roll once, let it sit for a minute, then roll again. This creates a thicker sugar crust that cracks more dramatically.
-
Bake. Place the sugar-coated dough balls on the prepared baking sheets, spacing them about 2 inches apart. Bake for 10-12 minutes. The cookies will look puffed and cracked when they come out. They will be soft—do not overbake them. The edges should be set but the centers should still look slightly underdone. They will continue to set on the baking sheet.
-
Cool. Let the cookies cool on the baking sheet for 5 minutes. This is important—moving them too early will cause them to fall apart. Then transfer them to a wire rack to cool completely. The spider web cracks will become more pronounced as they cool.
Sensory cues to watch for: When you roll the dough in powdered sugar, you should see the sugar clinging to every surface. As the cookies bake, you will see the dark dough pushing through the white sugar crust, creating those web-like cracks. The kitchen will smell intensely chocolatey—almost like a brownie bakery. When you tap the edge of a cookie, it should feel set but the center should still give slightly.
Cooking Tips & Techniques
I have ruined more batches of these cookies than I care to admit. Let me save you some trouble.
The biggest mistake people make is skipping the chill time. I get it—you want cookies now. But warm dough melts into flat disks with no cracks. The dough needs to be cold enough that the outside sets quickly in the oven while the inside expands and pushes through the sugar coating. That is what creates the spider web effect. If your kitchen is warm, chill the shaped, sugar-coated dough balls for an extra 15 minutes before baking.
Another common issue is using too little powdered sugar. I made this mistake the second time I baked these. I was trying to be frugal, and the cookies came out looking more like sad, muddy cookies than spooky spider webs. Be generous with the powdered sugar. The thick coating is what cracks open to reveal the dark dough underneath. If you see any dark spots peeking through before baking, roll that ball in more sugar.
Here is a pro tip I learned from a pastry chef friend: After rolling the dough balls in powdered sugar, let them sit on the counter for 5 minutes before baking. The sugar will start to dissolve slightly and form a thin crust. When they bake, that crust shatters beautifully. I have tested this side by side, and it makes a noticeable difference.
Timing strategy: I like to make the dough the night before and chill it overnight. The next day, I roll and bake in the afternoon. This breaks the work into manageable chunks and makes the whole process feel effortless.
If your cookies are not cracking: Your oven might not be hot enough, or your dough was too warm. Check your oven temperature with an oven thermometer—mine runs 25 degrees cool, so I set it to 375°F to get an actual 350°F. Also, make sure your baking powder is fresh. Expired baking powder will not give you that lift.
Variations & Adaptations
One of the best things about this recipe is how adaptable it is. Here are some variations I have tried and loved:
Gluten-Free Version: Substitute the all-purpose flour with a 1-to-1 gluten-free baking blend that contains xanthan gum. I have used Bob’s Red Mill and King Arthur Flour brands with success. The cookies will spread a bit more, so chill the dough for an extra 30 minutes.
Vegan Version: Use vegan butter sticks (like Earth Balance) and replace each egg with a flax egg (1 tablespoon ground flaxseed mixed with 3 tablespoons water, let sit for 5 minutes). The texture will be slightly less fudgy but still delicious.
Peppermint Spider Webs: Add 1/2 teaspoon peppermint extract along with the vanilla. The combination of dark chocolate and peppermint is absolutely perfect for the holiday season. I made these for a Christmas party once, and they disappeared in minutes.
Extra Spooky: Press a candy eyeball into the center of each cookie immediately after baking. The residual heat will melt it slightly so it sticks. This turns them from spider web cookies into actual spider cookies, which is a huge hit with kids.
White Chocolate Drizzle: Once the cookies have cooled completely, melt some white chocolate and drizzle it over the top in thin lines. It adds another layer of web-like detail and makes them look even more dramatic.
Spice It Up: Add 1/2 teaspoon of cinnamon and a pinch of cayenne pepper to the dry ingredients. The warmth of the spices plays beautifully with the deep cocoa flavor, and it gives the cookies a subtle heat that lingers.
Serving & Storage Suggestions
These spooky spider web chocolate crinkle cookies are best served at room temperature. The texture is soft and fudgy, almost like a brownie in cookie form. I like to arrange them on a dark platter or a black cake stand to really make the white powdered sugar pop. For Halloween parties, I place them on a tray with fake spider webs draped around the edges—it is a little cheesy, but guests love it.
Storage: Store the cookies in an airtight container at room temperature for up to 5 days. Place a slice of bread in the container to keep them soft—the cookies will absorb moisture from the bread, and the bread will get stale. Replace the bread slice every other day.
Freezer instructions: These cookies freeze beautifully. Place the baked, cooled cookies in a single layer in a freezer-safe container, with parchment paper between layers. They will keep for up to 3 months. To thaw, let them sit at room temperature for about 30 minutes. You can also freeze the unbaked dough balls (coated in powdered sugar) on a baking sheet, then transfer to a freezer bag. Bake directly from frozen, adding 2-3 minutes to the baking time.
Reheating: If you want that just-baked experience, pop a cookie in the microwave for about 10 seconds. It will be soft and warm, with the chocolate flavor intensified. I do this when I am having a rough day and need a little comfort.
Flavor development: Honestly, these cookies taste even better on day two. The flavors meld together, and the texture becomes even more fudgy. If you can resist eating them all on day one, you will be rewarded.
Nutritional Information & Benefits
Here is the estimated nutritional information per cookie (based on 24 cookies):
- Calories: 145
- Total Fat: 6g
- Saturated Fat: 3.5g
- Cholesterol: 25mg
- Sodium: 85mg
- Total Carbohydrates: 22g
- Dietary Fiber: 1.5g
- Sugars: 14g
- Protein: 2.5g
Health benefits of key ingredients: Black cocoa powder is rich in antioxidants called flavonoids, which can help reduce inflammation and support heart health. Cocoa also contains compounds that may improve mood and cognitive function. Of course, these are cookies, not health food, but it is nice to know there is a little something good in there.
Dietary considerations: These cookies contain gluten, dairy, and eggs. For gluten-free and vegan options, see the variations section above. They are nut-free as written, making them safe for school parties where nut allergies are a concern.
My personal wellness perspective: I believe in balance. These cookies are a treat, meant to be enjoyed in moderation. I make them for special occasions and holidays, and I savor every single bite. Life is too short to skip dessert.
Conclusion
These spooky spider web chocolate crinkle cookies are the kind of recipe that makes you look like a baking genius with almost no effort. They are dramatic enough for a Halloween party, delicious enough to be requested year-round, and simple enough that you can whip up a batch on a weeknight. The spider web effect is completely natural—no special tools, no food coloring, no piping bags. Just a happy accident that turned into my favorite Halloween tradition.
I love this recipe because it reminds me that sometimes the best things in the kitchen happen when you are not trying so hard. That first batch, born from a mistake and a three-year-old’s powdered sugar disaster, taught me to embrace the chaos. And honestly? These cookies taste like that lesson—sweet, a little bit messy, and absolutely worth making.
I would love to hear how yours turn out. Did you add any fun variations? Did your kids help with the rolling? Drop a comment below and let me know. And if you share them on social media, tag me—I want to see your spider webs!
Frequently Asked Questions
Can I use only black cocoa powder instead of mixing with regular cocoa?
You can, but I do not recommend it. Black cocoa powder on its own can taste flat and slightly bitter. The combination of black and regular cocoa gives you that deep, dark color with a rich, balanced chocolate flavor. Think of it like using both dark and milk chocolate—each brings something different to the table.
Why did my cookies not crack?
This usually happens for one of three reasons: the dough was not chilled enough, the oven temperature was too low, or you did not use enough powdered sugar. Make sure your dough is thoroughly chilled (at least 2 hours), your oven is properly preheated (use an oven thermometer to double-check), and your dough balls are completely coated in a thick layer of powdered sugar.
Can I make the dough ahead of time?
Absolutely. The dough can be refrigerated for up to 3 days before baking. In fact, the flavor improves with time. You can also freeze the unbaked dough balls (coated in powdered sugar) for up to 3 months. Just bake them straight from the freezer, adding a couple of minutes to the baking time.
How do I get perfectly round cookies?
Right after you take the cookies out of the oven, use a round cookie cutter or a glass that is slightly larger than the cookies to gently scoot them into a perfect circle. Work quickly while the cookies are still warm and pliable. This trick works for almost any drop cookie.
Can I reduce the sugar in this recipe?
I would not recommend it. The sugar is not just for sweetness—it contributes to the texture and the cracking effect. Reducing the sugar will result in flatter, less crackly cookies. If you want to cut back, try using a sugar substitute like monk fruit sweetener, but know that the texture will be different. I have not tested this myself, so I cannot guarantee the results.
Pin This Recipe!
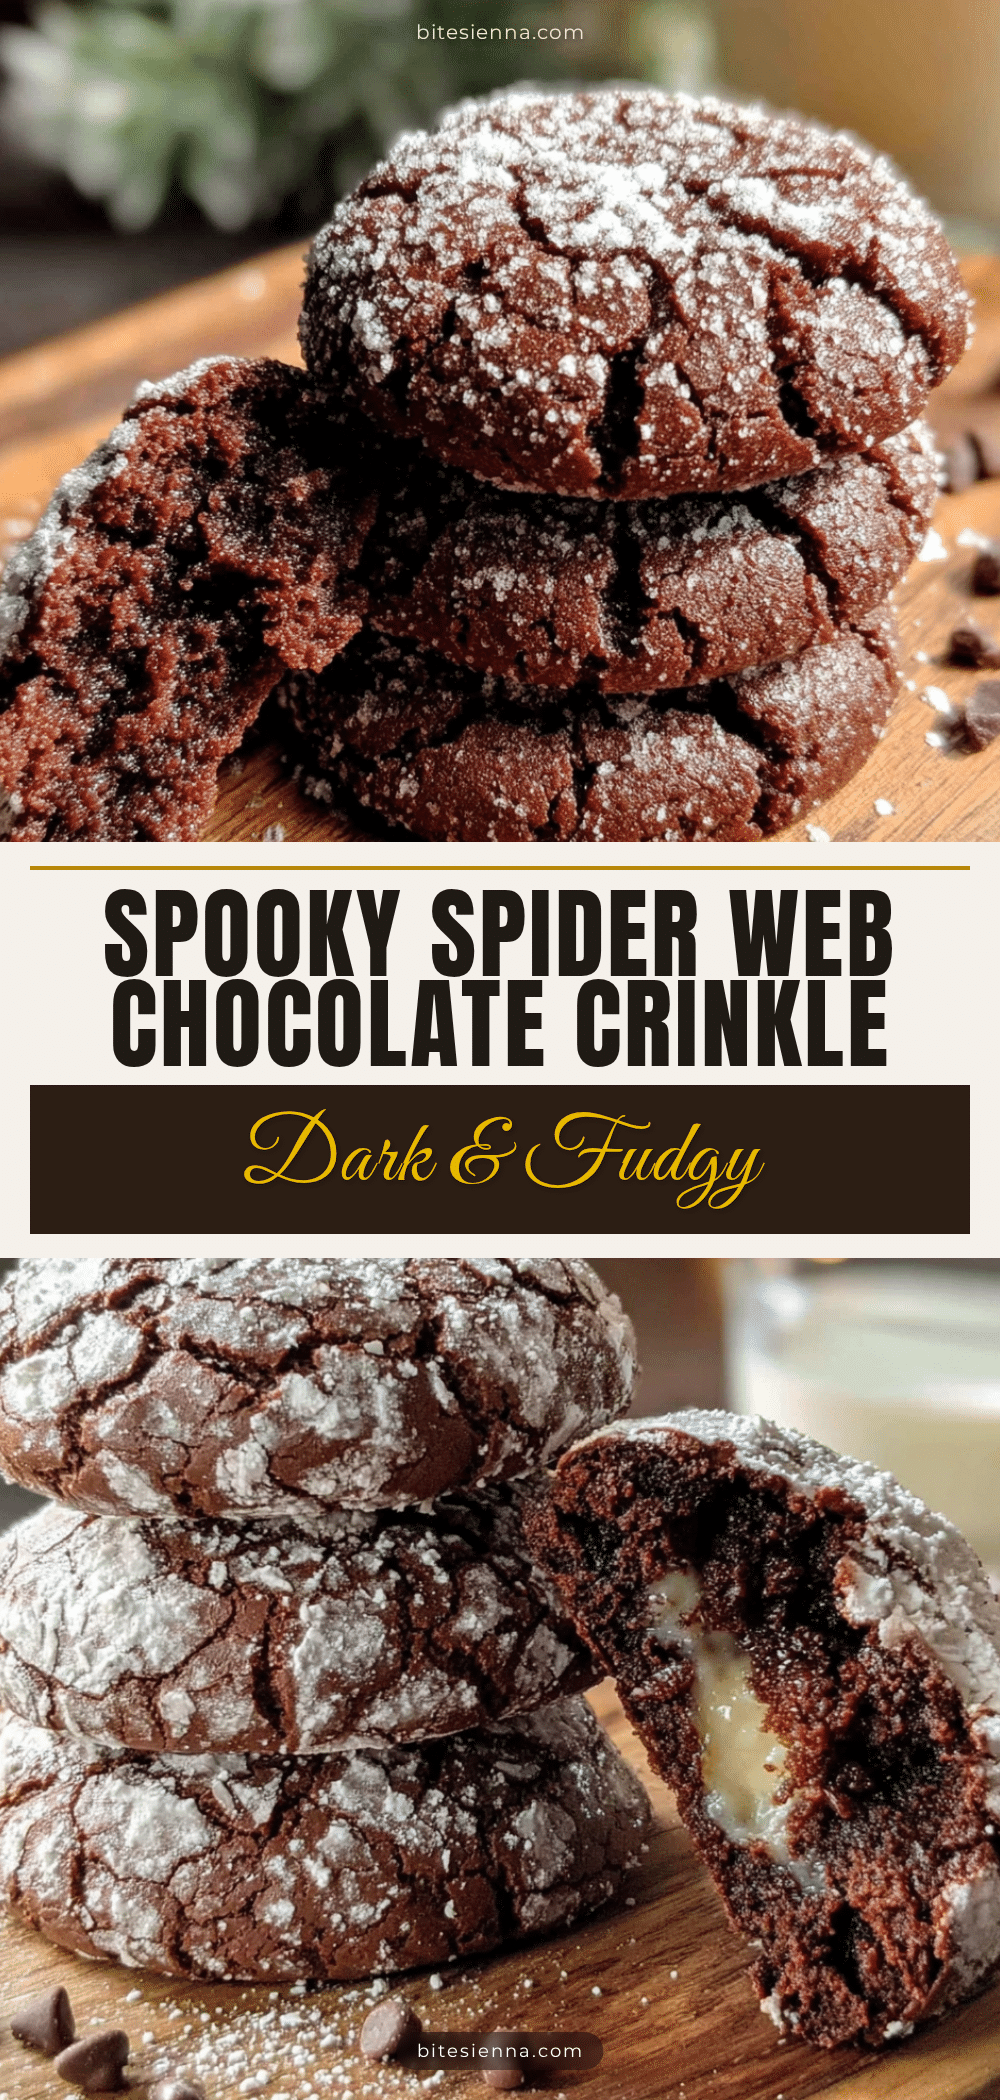
Spooky Spider Web Chocolate Crinkle Cookies

These spooky spider web chocolate crinkle cookies are the perfect Halloween treat, featuring a dramatic spider web effect created naturally with black cocoa powder. They are rich, fudgy, and surprisingly easy to make with simple ingredients.
- Prep Time: 15 minutes
- Cook Time: 12 minutes
- Total Time: 2 hours 27 minutes (includes chilling)
- Yield: 24 cookies 1x
- Category: Dessert
- Cuisine: American
Ingredients
- 1/2 cup (1 stick) unsalted butter, softened
- 1 cup granulated sugar
- 2 large eggs, room temperature
- 1 teaspoon vanilla extract
- 1 and 1/2 cups all-purpose flour
- 1/2 cup black cocoa powder
- 1/4 cup regular unsweetened cocoa powder
- 1 teaspoon baking powder
- 1/2 teaspoon salt
- 1/2 to 3/4 cup powdered sugar (for rolling)
Instructions
- Cream the butter and sugar: In a large bowl, beat the softened butter and granulated sugar together on medium speed until light and fluffy, about 2-3 minutes. Scrape down the sides of the bowl.
- Add the eggs and vanilla: Add the eggs one at a time, beating well after each addition. Then add the vanilla and beat until combined.
- Whisk the dry ingredients: In a separate bowl, whisk together the flour, black cocoa powder, regular cocoa powder, baking powder, and salt for at least 30 seconds.
- Combine wet and dry: Gradually add the dry ingredients to the wet mixture, mixing on low speed until just combined. The dough will be very dark and sticky.
- Chill the dough: Cover the bowl with plastic wrap and refrigerate for at least 2 hours, or overnight.
- Preheat and prepare: When ready to bake, preheat oven to 350°F (175°C). Line two baking sheets with parchment paper. Pour powdered sugar into a small bowl.
- Shape and coat the cookies: Using a cookie scoop or spoon, portion out rounded tablespoons of dough. Roll each into a ball between your palms. Drop each ball into the powdered sugar and roll until completely coated. For a thicker crust, double-coat by rolling once, letting it sit for a minute, then rolling again.
- Bake: Place the sugar-coated dough balls on the prepared baking sheets, spacing them about 2 inches apart. Bake for 10-12 minutes. The cookies will look puffed and cracked when done; edges should be set but centers slightly underdone.
- Cool: Let the cookies cool on the baking sheet for 5 minutes, then transfer to a wire rack to cool completely.
Notes
Chilling the dough is crucial for the spider web effect. Use an oven thermometer to ensure accurate temperature. For best results, double-coat the dough balls in powdered sugar. The cookies taste even better on day two.
Nutrition
- Serving Size: 1 cookie
- Calories: 145
- Sugar: 14
- Sodium: 85
- Fat: 6
- Saturated Fat: 3.5
- Carbohydrates: 22
- Fiber: 1.5
- Protein: 2.5
Keywords: Halloween cookies, spider web cookies, chocolate crinkle cookies, black cocoa cookies, spooky cookies, easy Halloween dessert


