There used to be a little diner off Route 9 called The Rusty Spoon that made a bowl of chili so dark and rich it looked like melted chocolate. When they closed in 2018—the owner finally retired after forty years—I honestly felt a little lost. I mean, where do you go when your go-to comfort food disappears? After twelve tries—some too watery, one so spicy it was basically a biohazard—I finally cracked the code. This no-bean chili recipe for a crowd is the exact recreation of that deep, meaty, soul-warming bowl I’d been chasing. The first time I ladled it up for a Super Bowl party, my brother-in-law took one bite and asked if I’d found the old Rusty Spoon cookbook. Nope. Just stubbornness and a lot of burned pots. If you’ve ever lost a restaurant you loved, you know that feeling when you finally get it right. This is that moment.
Why You’ll Love This Recipe
Let’s be honest—chili is one of those dishes everyone has an opinion about. Beans or no beans? Beef or turkey? Topped with cheese or left pure? This recipe settles the debate by going bold and bean-free, focusing entirely on the meat and the slow-cooked depth of the sauce. Here’s why this is the only no-bean chili recipe you’ll ever need:
- Perfect for a Crowd: This recipe scales beautifully and feeds 12 to 14 people without breaking a sweat. Game day, potluck, or family reunion? You’re covered.
- Deep, Complex Flavor: The secret is in the layering—browning the meat in batches, toasting the spices, and letting everything simmer until it’s thick and almost jammy.
- Simple Pantry Ingredients: Ground beef, canned tomatoes, onions, garlic, and a handful of spices. No weird specialty items you’ll never use again.
- Make-Ahead Friendly: This chili actually gets better after a day in the fridge. The flavors meld together and deepen overnight.
- Crowd-Pleaser Guaranteed: I’ve served this to picky kids, chili purists, and vegetarian skeptics who “just wanted a taste.” Every single one went back for seconds.
What makes this different from every other no-bean chili out there? It’s the technique. Most recipes just dump everything in a pot and hope for the best. This one takes the time to build flavor at every step—browning the meat until it’s deeply caramelized, blooming the spices in the rendered fat, and simmering low and slow until the sauce thickens naturally. The result is a chili that’s rich, velvety, and complex without being complicated. It’s the kind of dish that makes you close your eyes after the first bite and forget about the world for a minute.
What Ingredients You Will Need
This no-bean chili recipe relies on simple, high-quality ingredients to deliver that deep, slow-cooked flavor. Most of these are pantry staples, so you probably already have everything on hand.
For the Chili Base
- 4 pounds ground beef (80/20 blend) – The fat content is key here. Lean ground beef will result in dry, crumbly chili. I prefer 80/20 for the best flavor and texture. If you can find ground chuck, even better.
- 2 large yellow onions, diced – About 3 cups total. Yellow onions have the perfect balance of sweetness and sharpness for chili.
- 8 cloves garlic, minced – Fresh garlic is non-negotiable here. The jarred stuff just won’t give you the same punch.
- 2 tablespoons tomato paste – This adds depth and helps thicken the chili. I like the double-concentrated tubes for convenience.
The Spice Blend
- ¼ cup chili powder – Use a good-quality blend. I’m partial to McCormick or Penzeys. Avoid the super cheap stuff—it’s mostly filler.
- 1 tablespoon ground cumin – Cumin is the backbone of any great chili. Toast it briefly in the pan for extra flavor.
- 1 tablespoon smoked paprika – This adds a subtle smokiness that mimics hours of slow cooking.
- 2 teaspoons dried oregano – Mexican oregano is ideal, but regular works fine too.
- 1 teaspoon cayenne pepper – Adjust to your heat preference. I use a full teaspoon for a noticeable kick.
- 1 teaspoon black pepper – Freshly ground, please.
- 2 teaspoons kosher salt – Plus more to taste at the end.
The Liquid & Finishing Touches
- 1 (28-ounce) can crushed tomatoes – Look for San Marzano tomatoes if you can find them. They’re sweeter and less acidic.
- 1 (14.5-ounce) can diced tomatoes, undrained – Fire-roasted adds a nice smoky note.
- 2 cups beef broth – Low-sodium so you can control the salt. I use Kitchen Basics or homemade.
- 2 tablespoons Worcestershire sauce – This adds umami depth you can’t get from anything else.
- 1 tablespoon brown sugar – Just enough to balance the acidity of the tomatoes. Don’t skip it.
- 2 bay leaves – Remember to remove them before serving!
For Serving (Optional but Recommended)
- Shredded cheddar cheese
- Sour cream or Greek yogurt
- Diced white onion
- Fresh cilantro
- Pickled jalapeños
- Cornbread or saltine crackers
Equipment Needed
You don’t need fancy equipment for this no-bean chili recipe, but having the right tools makes the process smoother. Here’s what you’ll need:
- Large Dutch oven or heavy-bottomed pot (7 to 8 quarts) – This is your workhorse. I use a Le Creuset, but any heavy pot with a tight-fitting lid works. The key is even heat distribution to prevent burning.
- Wooden spoon or heat-resistant spatula – You’ll be doing a lot of stirring and scraping up browned bits. A flat-edged wooden spoon works best.
- Sharp chef’s knife and cutting board – For dicing onions and mincing garlic. A dull knife makes the prep work miserable.
- Measuring spoons and cups – Precision matters with spices. Don’t eyeball it.
- Can opener – Obvious, but you’d be surprised how many times I’ve forgotten.
- Large bowl for serving – Or individual bowls if you’re feeling fancy.
If you don’t have a Dutch oven, a large stainless steel stockpot works fine. Just keep an eye on the bottom—thinner pots can scorch more easily. My first attempt at this recipe was in a cheap nonstick pot, and I ended up with a burnt layer that flavored the whole batch. Lesson learned: invest in a good heavy-bottomed pot. It doesn’t have to be expensive—a Lodge enameled Dutch oven is budget-friendly and works beautifully.
Preparation Method
This method looks long, but I promise it’s straightforward. The key is not rushing the browning steps—that’s where all the flavor lives.
- Prep your ingredients first – Dice the onions, mince the garlic, measure out your spices, and open the cans. Chili comes together fast once you start cooking, and you don’t want to be scrambling for an ingredient while something’s burning.
- Brown the beef in batches – Heat your Dutch oven over medium-high heat. Add a splash of oil, then add about a third of the ground beef. Let it sit undisturbed for 3 to 4 minutes until deeply browned on one side. Break it up with your spoon and continue cooking until no longer pink. Transfer to a bowl with a slotted spoon, leaving the fat in the pot. Repeat with the remaining beef. This browning in batches is non-negotiable—if you crowd the pan, the meat steams instead of browns, and you lose all that delicious flavor.
- Sauté the aromatics – Reduce heat to medium. Add the diced onions to the rendered fat and cook, stirring occasionally, until soft and translucent, about 6 to 8 minutes. Scrape up any browned bits from the bottom of the pot. Add the minced garlic and cook for 1 minute more until fragrant.
- Bloom the spices – Add the tomato paste, chili powder, cumin, smoked paprika, oregano, cayenne, black pepper, and salt. Stir constantly for 1 to 2 minutes until the spices are fragrant and the tomato paste has darkened slightly. This step wakes up the spices and gives them a toasty depth you can’t get from just dumping them in.
- Add the liquids – Pour in the crushed tomatoes, diced tomatoes (with their juices), beef broth, Worcestershire sauce, and brown sugar. Stir well, scraping up any remaining browned bits from the bottom of the pot. Add the bay leaves.
- Return the beef – Add the browned beef back to the pot, along with any accumulated juices. Stir to combine.
- Simmer low and slow – Bring the chili to a gentle boil, then reduce heat to low. Cover and let simmer for 1 hour, stirring occasionally. After 1 hour, remove the lid and continue simmering for another 30 to 45 minutes, stirring more frequently toward the end, until the chili has thickened to your liking. The sauce should coat the back of a spoon and not be watery.
- Season and rest – Remove the bay leaves. Taste and adjust seasoning—you might want more salt, a pinch of sugar, or a splash of vinegar to brighten it up. Let the chili rest off the heat for 10 to 15 minutes before serving. This resting time allows the flavors to settle and meld together.
One thing I learned the hard way: don’t skip the resting step. I once served this chili straight from the pot at a party, and it tasted good but not great. The leftovers the next day? Mind-blowing. The rest gives the flavors time to get to know each other.
Cooking Tips & Techniques
After making this no-bean chili recipe more times than I can count, I’ve picked up a few tricks that make a real difference. Here are the ones I swear by:
Don’t drain the fat – I know it’s tempting to pour off the rendered fat after browning the beef, but leave it in. That fat carries flavor and helps sauté the onions and bloom the spices. If you’re worried about it being greasy, skim off any excess at the end—but honestly, with 80/20 beef, it balances out perfectly.
Toast your cumin separately – This is a game-changer. Before adding it to the pot, toss the ground cumin in a dry skillet over medium heat for 30 to 60 seconds until fragrant. It takes on a nutty, almost floral quality that elevates the entire dish. I learned this from a chef friend who makes the best chili I’ve ever had.
Watch the heat – Chili can go from simmering to scorched in a heartbeat, especially as it thickens. Stir more frequently in the last 30 minutes, and if you notice the bottom starting to stick, reduce the heat further. I ruined a batch by walking away to answer the phone—came back to a burnt crust that flavored the whole pot.
Use a lid for the first hour – Keeping the pot covered during the initial simmer helps the flavors meld without too much evaporation. Once you remove the lid, the chili thickens naturally. This two-stage simmering gives you the best of both worlds: deep flavor and perfect consistency.
Make it ahead – This chili is actually better on day two. Make it a day ahead, let it cool, and refrigerate overnight. Reheat gently on the stovetop, adding a splash of broth or water if it’s too thick. The flavors deepen and meld in a way that’s almost magical.
Variations & Adaptations
One of the best things about this no-bean chili recipe is how adaptable it is. Here are a few ways to make it your own:
Spicy Kick Version: Add 2 finely diced jalapeños (seeds and all) with the onions, and stir in 1 tablespoon of chipotle peppers in adobo sauce along with the tomatoes. The chipotle adds a smoky heat that’s absolutely addictive.
Turkey or Chicken Chili: Substitute ground turkey or chicken for the beef. Use 93/7 lean turkey and add 2 tablespoons of olive oil to compensate for the lower fat content. The flavor will be lighter but still delicious.
Smoky Brisket Chili: This is my personal favorite variation. Substitute half the ground beef with 2 pounds of smoked brisket, chopped into bite-sized pieces. Add it in step 6 along with the browned beef. The smoky flavor permeates the entire pot.
Vegetarian No-Bean Chili: Replace the beef with 2 pounds of chopped portobello mushrooms and 1 pound of textured vegetable protein (TVP) rehydrated in vegetable broth. Use vegetable broth instead of beef broth. The mushrooms provide that meaty texture and umami depth.
Slow Cooker Adaptation: Brown the beef and sauté the aromatics on the stovetop, then transfer everything to a slow cooker. Cook on low for 6 to 8 hours or on high for 3 to 4 hours. Remove the lid for the last 30 minutes if you want it thicker.
Keto/Low-Carb Version: This recipe is already relatively low in carbs (about 12 grams per serving), but you can reduce it further by omitting the brown sugar and using a sugar-free ketchup or tomato paste. Serve over cauliflower rice or with cheese crisps.
Serving & Storage Suggestions
This no-bean chili recipe is incredibly versatile when it comes to serving. Here’s how I like to do it:
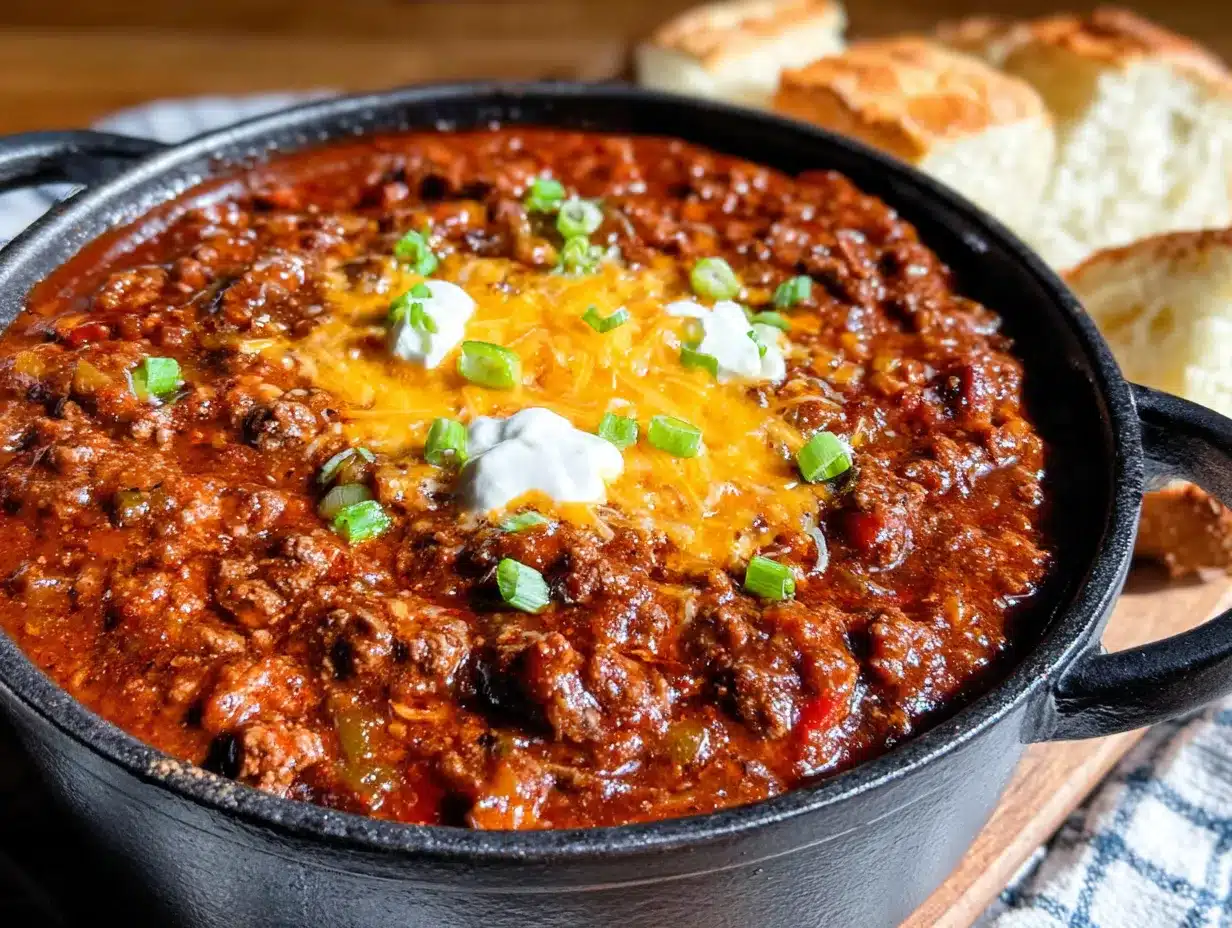
Serving Temperature: Serve piping hot, straight from the pot. Ladle into deep bowls and let everyone customize their own toppings. I set up a little chili bar with bowls of shredded cheddar, sour cream, diced onion, fresh cilantro, pickled jalapeños, and hot sauce. It’s always a hit.
What to Serve With: A slice of warm cornbread with honey butter is the classic pairing, and for good reason—the sweet cornbread balances the spicy, savory chili perfectly. Saltine crackers, tortilla chips, or even a baked potato work great too. For a lighter option, serve with a simple green salad dressed with lime vinaigrette.
Storage: Let the chili cool completely, then transfer to airtight containers. It will keep in the refrigerator for up to 5 days. The flavors actually improve over the first 2 to 3 days as they meld together.
Freezing: This chili freezes beautifully. Portion it into freezer-safe bags or containers, leaving a little room for expansion. It will keep for up to 3 months. Thaw overnight in the refrigerator before reheating.
Reheating: Reheat gently on the stovetop over medium-low heat, stirring occasionally. Add a splash of beef broth or water if it’s too thick. You can also reheat individual portions in the microwave—just cover the bowl and heat in 1-minute intervals, stirring between each.
How Flavors Develop: If you can, make this chili a day ahead. The resting time allows the spices to mellow and meld, and the meat becomes even more tender. I’ve had people tell me the leftovers are better than the original serving, and I have to agree.
Nutritional Information & Benefits
Here’s the approximate nutritional breakdown for one serving (based on 12 servings, without toppings):
| Nutrient | Amount Per Serving |
|---|---|
| Calories | 385 |
| Total Fat | 22g |
| Saturated Fat | 8g |
| Cholesterol | 95mg |
| Sodium | 780mg |
| Total Carbohydrates | 14g |
| Dietary Fiber | 4g |
| Sugars | 7g |
| Protein | 35g |
This no-bean chili is packed with protein from the beef, which helps keep you full and satisfied. The tomatoes provide a good dose of lycopene, an antioxidant linked to heart health. The spices—especially cumin and chili powder—have anti-inflammatory properties and aid digestion. If you’re watching your sodium, use low-sodium broth and tomatoes, and go easy on the salt. For a lower-fat option, use ground sirloin (90/10) and drain the fat after browning.
Dietary considerations: This recipe is naturally gluten-free (check your Worcestershire sauce and broth labels), low-carb, and keto-friendly. It contains no dairy in the base, so it’s easy to make dairy-free by skipping the cheese and sour cream toppings.
Conclusion
This no-bean chili recipe for a crowd is more than just a meal—it’s the kind of dish that brings people together. Whether you’re feeding a hungry game-day crowd, hosting a cozy winter dinner, or just craving a bowl of something deeply satisfying, this chili delivers every single time. It’s rich, meaty, and packed with layers of flavor that taste like you spent all day cooking, even though the active time is minimal.
I love this recipe because it’s forgiving and adaptable. You can tweak the spices, swap the meat, or load it up with toppings, and it always turns out delicious. It’s the recipe I turn to when I want to impress without stress, and it never lets me down.
Now it’s your turn. Give this recipe a try, and don’t be afraid to make it your own. Add more heat, swap in different meats, or pile on your favorite toppings. When you do, come back and let me know how it turned out. Drop a comment below, share a photo, or tell me your favorite chili memory. I read every single one, and I love hearing how this recipe shows up in your kitchen. Happy cooking!
Frequently Asked Questions
Can I make this no-bean chili in an Instant Pot?
Absolutely! Use the sauté function to brown the beef and cook the onions and garlic. Add the remaining ingredients, then pressure cook on high for 20 minutes. Let the pressure release naturally for 10 minutes, then quick release. If the chili is too thin, use the sauté function to simmer and thicken it for a few minutes.
How can I thicken my no-bean chili?
The easiest way is to simmer it uncovered for longer—the liquid will evaporate and the chili will naturally thicken. You can also mash a few tablespoons of the cooked chili against the side of the pot to release the starches, or stir in a slurry of 1 tablespoon cornstarch mixed with 2 tablespoons cold water. Let it simmer for 5 minutes after adding the slurry.
Can I use ground turkey instead of beef?
Yes, but I recommend using 93/7 lean turkey and adding 2 tablespoons of olive oil when browning to prevent it from drying out. The flavor will be lighter, so you might want to boost the spices slightly. Turkey chili is a great lower-fat option that still delivers on taste.
How long does this chili last in the fridge?
Properly stored in an airtight container, this no-bean chili will keep in the refrigerator for up to 5 days. The flavors actually improve over the first 2 to 3 days as they meld together. Just reheat gently on the stovetop or in the microwave, adding a splash of broth if needed.
What toppings go best with no-bean chili?
The classics are always a good bet: shredded cheddar cheese, sour cream or Greek yogurt, diced white onion, fresh cilantro, and pickled jalapeños. For something different, try crumbled tortilla chips, sliced avocado, a squeeze of lime, or a drizzle of hot honey. I also love serving it with a side of warm cornbread or saltine crackers.
PrintBest Easy No-Bean Chili Recipe for a Crowd

This no-bean chili recipe for a crowd is the exact recreation of that deep, meaty, soul-warming bowl from a beloved diner. It’s rich, velvety, and complex without being complicated, perfect for game day, potlucks, or family reunions.
- Prep Time: 20 minutes
- Cook Time: 1 hour 45 minutes
- Total Time: 2 hours 5 minutes
- Yield: 12 servings 1x
- Category: Main Course
- Cuisine: American
Ingredients
- 4 pounds ground beef (80/20 blend)
- 2 large yellow onions, diced
- 8 cloves garlic, minced
- 2 tablespoons tomato paste
- ¼ cup chili powder
- 1 tablespoon ground cumin
- 1 tablespoon smoked paprika
- 2 teaspoons dried oregano
- 1 teaspoon cayenne pepper
- 1 teaspoon black pepper
- 2 teaspoons kosher salt
- 1 (28-ounce) can crushed tomatoes
- 1 (14.5-ounce) can diced tomatoes, undrained
- 2 cups beef broth
- 2 tablespoons Worcestershire sauce
- 1 tablespoon brown sugar
- 2 bay leaves
- Shredded cheddar cheese (for serving)
- Sour cream or Greek yogurt (for serving)
- Diced white onion (for serving)
- Fresh cilantro (for serving)
- Pickled jalapeños (for serving)
- Cornbread or saltine crackers (for serving)
Instructions
- Prep your ingredients first: dice the onions, mince the garlic, measure out your spices, and open the cans.
- Brown the beef in batches: Heat your Dutch oven over medium-high heat. Add a splash of oil, then add about a third of the ground beef. Let it sit undisturbed for 3 to 4 minutes until deeply browned on one side. Break it up with your spoon and continue cooking until no longer pink. Transfer to a bowl with a slotted spoon, leaving the fat in the pot. Repeat with the remaining beef.
- Sauté the aromatics: Reduce heat to medium. Add the diced onions to the rendered fat and cook, stirring occasionally, until soft and translucent, about 6 to 8 minutes. Scrape up any browned bits from the bottom of the pot. Add the minced garlic and cook for 1 minute more until fragrant.
- Bloom the spices: Add the tomato paste, chili powder, cumin, smoked paprika, oregano, cayenne, black pepper, and salt. Stir constantly for 1 to 2 minutes until the spices are fragrant and the tomato paste has darkened slightly.
- Add the liquids: Pour in the crushed tomatoes, diced tomatoes (with their juices), beef broth, Worcestershire sauce, and brown sugar. Stir well, scraping up any remaining browned bits from the bottom of the pot. Add the bay leaves.
- Return the beef: Add the browned beef back to the pot, along with any accumulated juices. Stir to combine.
- Simmer low and slow: Bring the chili to a gentle boil, then reduce heat to low. Cover and let simmer for 1 hour, stirring occasionally. After 1 hour, remove the lid and continue simmering for another 30 to 45 minutes, stirring more frequently toward the end, until the chili has thickened to your liking.
- Season and rest: Remove the bay leaves. Taste and adjust seasoning. Let the chili rest off the heat for 10 to 15 minutes before serving.
Notes
Don’t drain the fat after browning the beef; it carries flavor. Toast the cumin separately in a dry skillet for 30-60 seconds for a nutty quality. Watch the heat as the chili thickens to prevent scorching. This chili is even better on day two; make it ahead and refrigerate overnight.
Nutrition
- Serving Size: 1 serving (about 1.5
- Calories: 385
- Sugar: 7
- Sodium: 780
- Fat: 22
- Saturated Fat: 8
- Carbohydrates: 14
- Fiber: 4
- Protein: 35
Keywords: no-bean chili, chili for a crowd, game day chili, beef chili, easy chili recipe, crowd-pleasing chili, gluten-free chili, low-carb chili


