I used to think Halloween desserts were a little, well, ridiculous. All that neon food coloring, bags of candy corn that nobody actually finishes, and those creepy gelatin things that wobble on the plate like they’re about to crawl away. For years, I stuck to handing out full-size candy bars and calling it a day. Then my niece showed up at my door last October with a little plastic cup full of crushed cookies and gummy worms, and I caught myself asking for a bite. She looked at me like I’d just admitted I didn’t know how to use a microwave.
Honestly, I wasn’t expecting much. But that first spoonful—cool, creamy, with that little crunch of chocolate and the ridiculous chew of a gummy worm—hit different. It was playful without being over-the-top. It was cozy, somehow, even with fake bugs involved. I made a batch the very next weekend, just for myself, and I’ve been making them every October since. Maybe you’ve been there—you write off a certain kind of recipe as kid stuff, then one version proves you completely wrong.
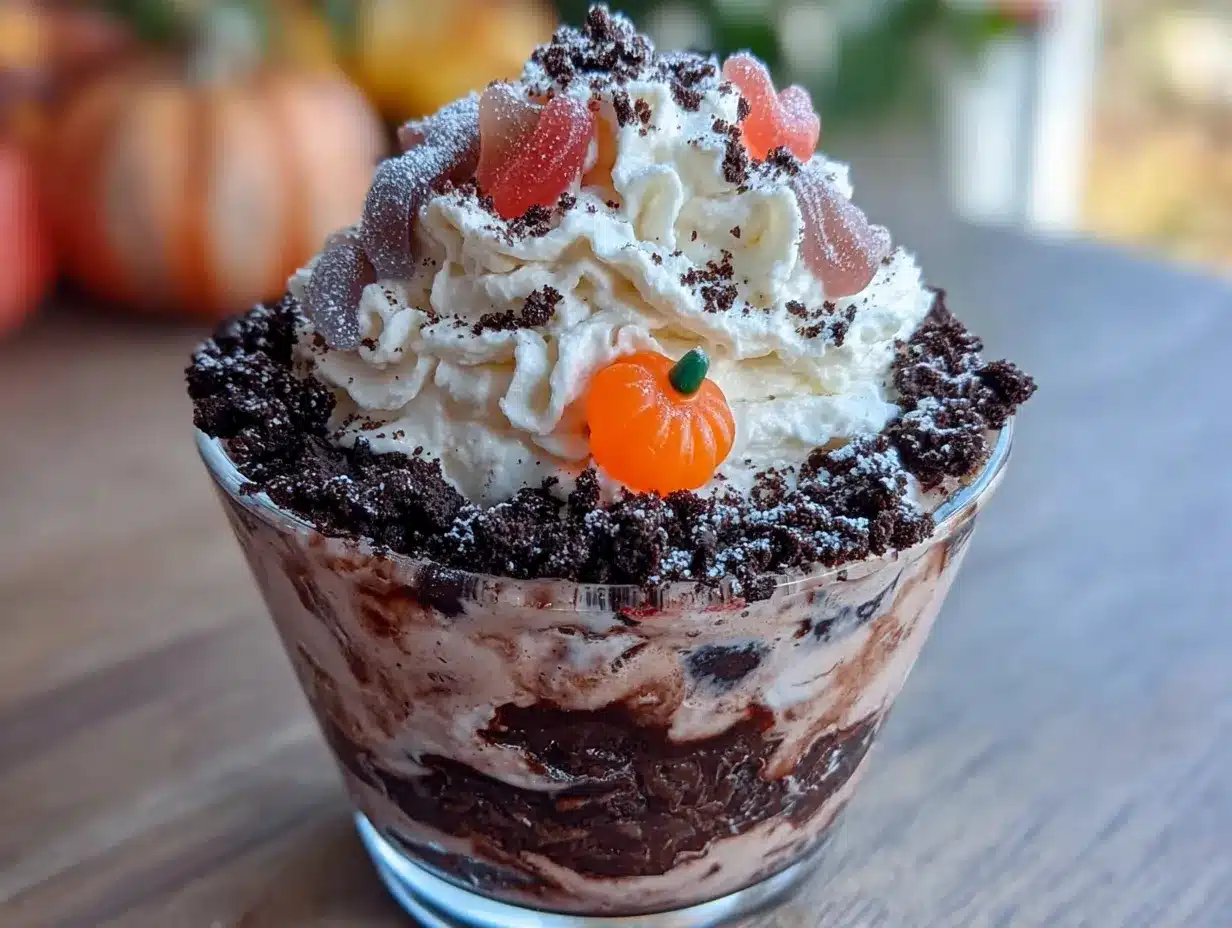
These Cozy Halloween Dirt Cups with Gummy Worms are that recipe for me. They’re not about being scary or gross. They’re about sitting on the couch in your softest sweater, watching Hocus Pocus, and eating something that feels like a hug with a sense of humor. The chocolate pudding is silky, the crushed Oreos give that perfect dirt-like texture, and the gummy worms peeking out just make you smile. I keep making them because they’re the kind of treat that doesn’t take itself too seriously—and honestly, we could all use more of that.
Why You’ll Love This Recipe
These dirt cups aren’t just another Halloween dessert. They’ve become my most-requested fall treat, and here’s why they stand out from the crowd.
- Quick & Easy : Comes together in under 20 minutes of active time. No baking, no complicated steps—just layer and chill.
- Simple Ingredients : You likely already have most of these in your pantry. No fancy grocery trips required.
- Perfect for Halloween Parties : Great for classroom treats, office potlucks, or a cozy night in with the family.
- Crowd-Pleaser : Kids love the gummy worms, and adults love the nostalgic chocolate pudding combo.
- Unbelievably Delicious : The contrast between creamy pudding, crunchy cookie crumbs, and chewy gummy candy is pure comfort.
What makes my version different? I use a slightly thicker pudding base so the “dirt” doesn’t sink overnight. I also toast the Oreo crumbs lightly for extra depth—trust me on this one. It’s a small tweak, but it turns a simple dessert into something you’ll crave all season long.
This recipe is comfort food reimagined—faster, easier, but with the same soul-soothing satisfaction as a slice of homemade pie. Perfect for impressing guests without stress, or turning a simple Tuesday night into something memorable.
What Ingredients You Will Need
This recipe uses simple, wholesome ingredients to deliver that classic dirt cup experience. Most are pantry staples, and substitutions are easy if you need them.
For the Pudding Layer
- 3.4 oz instant chocolate pudding mix (I prefer Jell-O brand for consistent texture)
- 2 cups cold whole milk (adds richness; 2% works fine too)
- 1 cup heavy cream (optional but makes the pudding extra silky)
- 1/2 cup powdered sugar (only if using homemade whipped cream)
For the Dirt Layer
- 20 chocolate sandwich cookies (Oreos are classic, but any brand works)
- 2 tablespoons unsalted butter, melted (for toasting the crumbs)
For the Decoration
- 24 gummy worms (I recommend Trolli or Black Forest for best chew)
- Optional: 2 tablespoons chocolate shavings (for extra texture)
- Optional: 4 small plastic pumpkins or Halloween sprinkles
Ingredient selection tip: Look for chocolate sandwich cookies that aren’t double-stuffed—the regular ones crush better and give that authentic dirt texture. For a dairy-free version, use almond milk and coconut cream. If you’re gluten-sensitive, there are great gluten-free chocolate sandwich cookies available now.
Equipment Needed
- 6 small clear cups or mason jars (4 to 6 ounces each; clear is best for showing the layers)
- Electric hand mixer or whisk (hand mixer makes the pudding smoother)
- Food processor or zip-top bag with rolling pin (for crushing cookies)
- Baking sheet (for toasting the crumbs)
- Medium mixing bowl
- Spatula
- Measuring cups and spoons
I’ve made these with just a whisk and a zip-top bag when I didn’t have my food processor. It takes a little more elbow grease, but the result is the same. The key tool is clear cups—seeing those layers of pudding, dirt, and gummy worms is half the fun.
Preparation Method
- Make the pudding base : In a medium mixing bowl, whisk together the instant pudding mix and cold milk for about 2 minutes until it starts to thicken. If you’re using heavy cream, replace 1/2 cup of the milk with cream. The mixture should be smooth with no lumps. Let it sit for 5 minutes to set up completely.
- Prepare the Oreo crumbs : While the pudding sets, crush the chocolate sandwich cookies in a food processor until they resemble fine crumbs. If you don’t have a food processor, place the cookies in a zip-top bag and crush them with a rolling pin. You want a mix of fine crumbs and tiny pebbles—not powder.
- Toast the crumbs : Preheat your oven to 350°F. Spread the cookie crumbs on a baking sheet and drizzle with the melted butter. Toss gently to coat. Bake for 5 minutes, stirring halfway through. Let them cool completely. This step is optional but adds a subtle toasty flavor that makes the “dirt” taste more complex.
- Layer the cups : Spoon 2 tablespoons of the cooled cookie crumbs into the bottom of each clear cup. Press down gently with the back of a spoon to create a firm base layer.
- Add the pudding : Spoon or pipe the prepared pudding over the cookie crumbs, filling each cup about halfway. Tap the cups gently on the counter to remove air bubbles.
- Add more dirt : Sprinkle another tablespoon of cookie crumbs over the pudding layer. This creates that distinct dirt-and-worm sandwich effect.
- Insert the gummy worms : Gently push 3 to 4 gummy worms into each cup, leaving their heads poking out of the top layer of crumbs. Arrange them so it looks like they’re crawling out.
- Top with remaining crumbs : Sprinkle the last of the cookie crumbs over the top, covering the pudding completely. Add a few chocolate shavings if desired.
- Chill : Refrigerate the cups for at least 2 hours before serving. This allows the flavors to meld and the texture to set properly.
Pro tip : If you’re serving these at a party, make them the night before. The pudding thickens beautifully overnight, and the crumbs stay perfectly crunchy on top.
Cooking Tips & Techniques
I learned the hard way that not all instant pudding is created equal. The first time I made these, I used a store-brand mix and ended up with runny pudding that soaked into the cookie crumbs within an hour. Stick with a trusted brand like Jell-O for that thick, silky texture.
Another mistake I made early on? Not toasting the crumbs. I thought it was an unnecessary step, but after one batch of soggy dirt cups, I changed my tune. Toasting the crumbs with butter creates a barrier that keeps them crunchy even after refrigeration. It also deepens the chocolate flavor in a way that plain crushed cookies just can’t match.
When layering, use a piping bag or a zip-top bag with the corner snipped off to add the pudding. It gives you more control and keeps the sides of the cups clean. Nobody wants smeared pudding ruining that beautiful dirt effect.
If you’re short on time, you can skip the homemade whipped cream and use Cool Whip instead. Just fold it into the pudding before layering. It makes the cups lighter and fluffier—perfect if you’re serving them after a heavy meal.
Variations & Adaptations
Dietary Variations
- Gluten-Free : Use gluten-free chocolate sandwich cookies and ensure your pudding mix is certified gluten-free.
- Dairy-Free : Substitute almond milk or oat milk for the milk, and use coconut cream instead of heavy cream. Dairy-free butter works fine for toasting the crumbs.
- Lower Sugar : Use sugar-free pudding mix and reduce the powdered sugar in the whipped cream. The gummy worms add enough sweetness on their own.
Flavor Twists
- Peanut Butter Dirt Cups : Swirl 2 tablespoons of peanut butter into the pudding before layering. It pairs beautifully with the chocolate and gummy worms.
- Mint Chocolate Version : Add 1/4 teaspoon peppermint extract to the pudding. Use mint Oreos for the crumb layer.
- Pumpkin Spice Dirt Cups : Replace the chocolate pudding with vanilla pudding and add 1 teaspoon pumpkin pie spice. Use gingersnap cookies for the dirt.
Presentation Ideas
For a Halloween party, I like to top each cup with a small plastic spider or a candy eyeball. You can also use orange and black sprinkles for a festive touch. One year, I served these in mini terra cotta pots with a fake flower on top—total hit.
Serving & Storage Suggestions
Serve these dirt cups chilled, straight from the fridge. The contrast between the cold pudding and the crunchy cookie crumbs is at its best within the first 24 hours. If you’re serving at a party, set them out on a tray with extra gummy worms on the side for topping.
These pair wonderfully with a warm drink—think apple cider, hot chocolate, or even a pumpkin spice latte. For a full Halloween spread, serve them alongside Halloween popcorn mix or pumpkin dip with graham crackers.
Storage : Cover each cup with plastic wrap or a lid and refrigerate for up to 3 days. The cookie crumbs will soften over time, but they still taste great. I don’t recommend freezing these—the pudding becomes watery when thawed.
Reheating : These are meant to be served cold, so no reheating needed. If you’ve stored them for more than a day, give the top a fresh sprinkle of cookie crumbs before serving to restore some crunch.
Nutritional Information & Benefits
Per serving (based on 6 servings with whole milk and heavy cream):
- Calories: 345
- Fat: 18g
- Carbohydrates: 42g
- Protein: 5g
- Fiber: 1g
- Sugar: 28g
While these are definitely a treat, the chocolate pudding provides a small amount of calcium and protein from the milk. The gummy worms are mostly sugar, but they make the experience playful and fun. If you’re looking for a lighter version, use low-fat milk and skip the heavy cream—you’ll save about 80 calories per serving.
For those with dietary restrictions, the gluten-free and dairy-free variations work beautifully. Just be mindful of cross-contamination if you’re serving someone with celiac disease.
Conclusion
These Cozy Halloween Dirt Cups with Gummy Worms have become my go-to fall dessert for good reason. They’re ridiculously easy, endlessly customizable, and they bring a smile to everyone’s face. Whether you’re making them for a costume party, a classroom celebration, or just a quiet night in, they deliver that perfect mix of nostalgia and comfort.
I love that this recipe doesn’t take itself too seriously. It’s okay to have fun with your food, especially around Halloween. So go ahead—pile on the gummy worms, add extra cookie crumbs, and maybe sneak one for yourself before the kids get home. I won’t tell.
If you try these, I’d love to hear how they turned out. Drop a comment below with your favorite variation, or tag me in your photos. Happy Halloween, and happy eating!
Frequently Asked Questions
Can I make these dirt cups ahead of time?
Absolutely! These are perfect for making the night before. Just keep them covered in the fridge and add a fresh sprinkle of cookie crumbs right before serving to restore some crunch.
Can I use homemade chocolate pudding instead of instant?
Yes, but it will be thinner. If you use homemade pudding, let it chill for at least 4 hours before layering, and expect the cookie crumbs to soften faster.
How do I keep the gummy worms from sliding down?
Insert them after you’ve added the top layer of cookie crumbs. The crumbs create friction that holds the worms in place. You can also push them in at an angle so they’re anchored in the pudding.
Can I use different candies besides gummy worms?
Of course! Try gummy spiders, candy eyeballs, or even chopped up candy bars. Just keep the pieces small so they fit in the cups.
How long do these last in the fridge?
They’ll keep for up to 3 days in an airtight container. The cookie crumbs will soften over time, but the flavor is still delicious. I don’t recommend freezing them.
PrintCozy Halloween Dirt Cups: Easy Gummy Worm Dessert
These Cozy Halloween Dirt Cups with Gummy Worms are a playful, no-bake dessert featuring silky chocolate pudding, crunchy Oreo crumbs, and chewy gummy worms. Perfect for Halloween parties or a cozy night in, they come together in under 20 minutes of active time.
- Prep Time: 20 minutes
- Cook Time: 5 minutes
- Total Time: 2 hours 25 minutes (includes chilling)
- Yield: 6 servings 1x
- Category: Dessert
- Cuisine: American
Ingredients
- 3.4 oz instant chocolate pudding mix (Jell-O brand recommended)
- 2 cups cold whole milk (2% works too)
- 1 cup heavy cream (optional, for extra silkiness)
- 1/2 cup powdered sugar (only if using homemade whipped cream)
- 20 chocolate sandwich cookies (Oreos recommended, not double-stuffed)
- 2 tablespoons unsalted butter, melted
- 24 gummy worms (Trolli or Black Forest recommended)
- Optional: 2 tablespoons chocolate shavings
- Optional: 4 small plastic pumpkins or Halloween sprinkles
Instructions
- Make the pudding base: In a medium mixing bowl, whisk together the instant pudding mix and cold milk for about 2 minutes until it starts to thicken. If using heavy cream, replace 1/2 cup of the milk with cream. Let it sit for 5 minutes to set up completely.
- Prepare the Oreo crumbs: While the pudding sets, crush the chocolate sandwich cookies in a food processor until they resemble fine crumbs. Alternatively, place cookies in a zip-top bag and crush with a rolling pin. Aim for a mix of fine crumbs and tiny pebbles.
- Toast the crumbs: Preheat oven to 350°F. Spread cookie crumbs on a baking sheet, drizzle with melted butter, and toss gently. Bake for 5 minutes, stirring halfway through. Let cool completely.
- Layer the cups: Spoon 2 tablespoons of cooled cookie crumbs into the bottom of each clear cup. Press down gently with the back of a spoon.
- Add the pudding: Spoon or pipe the prepared pudding over the cookie crumbs, filling each cup about halfway. Tap cups gently on the counter to remove air bubbles.
- Add more dirt: Sprinkle another tablespoon of cookie crumbs over the pudding layer.
- Insert the gummy worms: Gently push 3 to 4 gummy worms into each cup, leaving their heads poking out of the top layer of crumbs.
- Top with remaining crumbs: Sprinkle the last of the cookie crumbs over the top, covering the pudding completely. Add chocolate shavings if desired.
- Chill: Refrigerate the cups for at least 2 hours before serving. For best results, make them the night before.
Notes
For best results, use Jell-O brand pudding mix to avoid runny pudding. Toasting the cookie crumbs with butter creates a barrier that keeps them crunchy. Use a piping bag for clean layers. For dairy-free, use almond milk and coconut cream. For gluten-free, use gluten-free cookies and certified gluten-free pudding mix.
Nutrition
- Serving Size: 1 cup
- Calories: 345
- Sugar: 28
- Sodium: 380
- Fat: 18
- Saturated Fat: 10
- Carbohydrates: 42
- Fiber: 1
- Protein: 5
Keywords: Halloween dessert, dirt cups, gummy worms, chocolate pudding, no-bake dessert, easy Halloween treat


