I was standing in the checkout line at the grocery store last October, totally zoned out, when I saw it—a bag of candy eyeballs hanging by the register. And just like that, I was eight years old again, sitting cross-legged on my Aunt Maggie’s linoleum kitchen floor. She was rolling something dark and rich between her palms, and the whole room smelled like crushed-up chocolate cookies and cream cheese. I remember the way her hands moved, quick and sure, like she’d done it a thousand times before. She’d let me press the little candy eyes into each truffle, and I’d always put them on crooked. “Gives ’em character,” she’d say, laughing. She passed away a few years back, and honestly, I haven’t thought about that afternoon in ages. But standing there holding that bag of eyeballs, I felt this sudden, sharp pang to make those truffles myself. To get the feeling back, you know?
I grabbed the Oreos and cream cheese before I could talk myself out of it. I mean, I’m not a big baker—my specialty is usually burning toast. But this recipe? It’s so simple it almost feels like cheating. No oven, no fancy mixer, just a food processor and your hands. The first batch I made came out a little lopsided, and one of the truffles looked less like a black cat and more like a sad potato with googly eyes. But I ate it anyway, and let me tell you, it was perfect. Maybe you’ve been there—chasing a memory through a recipe, hoping the taste will bring something back. That’s what these are. They’re not just Halloween treats. They’re little black cat-shaped time machines.
Why You’ll Love This Recipe
Let’s be real for a second. Halloween baking can get complicated. Between shaping fondant and tempering chocolate, it’s easy to feel like you need a pastry degree just to make something cute for the party. That’s where these Black Cat Oreo Truffles come in. They’re the kind of recipe that makes you look like a rockstar with almost zero effort, and I mean that.
- Quick & Easy: From start to finish, you’re looking at about 30 minutes of active work. The hardest part is waiting for them to chill in the fridge.
- Simple Ingredients: You only need five things—Oreos, cream cheese, black candy melts, candy eyeballs, and a few black licorice strings for whiskers. That’s it.
- Perfect for Halloween: These are the star of any spooky spread. Class parties, office potlucks, or just a fun weekend project with the kids.
- Crowd-Pleaser: I’ve brought these to two different gatherings now, and both times, people asked for the recipe before they even finished chewing. They disappear fast.
- Unbelievably Delicious: The texture is this amazing mix of creamy and crunchy, with that signature Oreo flavor turned up to eleven. It’s comfort food in a tiny, cat-shaped package.
What makes these different from every other Oreo ball recipe out there? It’s the shape, honestly. Turning a simple truffle into a black cat is such a small change, but it completely transforms the treat. It goes from “oh, another dessert” to “wait, did you make these?” And the best part? No special molds or cutters needed. You shape them entirely by hand, which means each one has its own little personality. Some of my cats ended up with squished faces or extra-long ears, and honestly, those were the ones people loved the most. This recipe isnt just good—it is the kind that makes you close your eyes after the first bite. It’s Halloween magic without the stress.
What Ingredients You Will Need
This recipe uses simple, store-bought ingredients to create something that looks way more impressive than it actually is. Most of these are pantry staples during Halloween season, so you probably already have a few on hand.
- 1 package (14.3 oz) Oreo cookies – Regular Oreos work best here. Don’t use Double Stuf, because the extra filling throws off the texture. You want the whole cookie, cream and all, ground up into fine crumbs. (Pro tip: I’ve tried this with generic chocolate sandwich cookies, and they just don’t hit the same. Stick with the brand name for the best texture.)
- 8 oz block cream cheese, softened – Full-fat cream cheese is non-negotiable here. The reduced-fat stuff makes the mixture too sticky and hard to shape. Let it sit out on the counter for about 30 minutes before you start so it blends smoothly. (Philadelphia is my go-to, but any block-style cream cheese works.)
- 1 package (12 oz) black candy melts – You can find these at most craft stores or online. Wilton is a reliable brand, but I’ve also had good luck with the store-brand versions. If you can’t find black, dark chocolate chips with a drop of black food coloring work in a pinch—but candy melts give that glossy, professional finish.
- 1 tablespoon coconut oil or shortening – This is optional but highly recommended. Adding a little fat to your melted candy melts makes them smoother and easier to dip. It also helps prevent that annoying cracking when the coating sets.
- Candy eyeballs – The little white ones with black pupils are perfect. You can find them in the baking aisle at most grocery stores or online. Get the small size, about 6mm, so they look proportional on the truffles.
- Black licorice strings – These become the whiskers. Cut them into tiny 1-inch pieces. If you’re not a licorice fan, you can use black decorating icing in a tube instead, but the strings look more realistic.
- Optional: pink candy melts or frosting – For a tiny pink nose on each cat. Totally optional, but it adds that extra “aww” factor.
I always recommend setting out all your ingredients before you start. There’s nothing worse than getting halfway through and realizing you forgot the eyeballs. Ask me how I know.
Equipment Needed
You don’t need a fully stocked bakery to make these, which is exactly why I love this recipe. Here’s what you’ll want to have on hand:
- Food processor – This is the easiest way to crush your Oreos into fine crumbs. You can also use a blender, or place the cookies in a zip-top bag and crush them with a rolling pin. The bag method is a great arm workout, honestly.
- Large mixing bowl – For combining the Oreo crumbs and cream cheese. Any big bowl will do.
- Baking sheet lined with parchment paper – This is where your shaped truffles will sit while they chill. The parchment keeps them from sticking.
- Microwave-safe bowl – For melting the candy coating. Glass or ceramic works best.
- Fork or dipping tool – For lowering the truffles into the melted coating and lifting them out. A regular dinner fork works fine, but if you have a dipping fork, it’s a little easier to get the excess coating to drip off.
- Toothpicks – These are lifesavers for fixing any bare spots after dipping. You can also use them to help position the eyes and whiskers before the coating sets.
- Refrigerator – You’ll need space for the baking sheet to chill for at least an hour. Clear a shelf ahead of time.
If you don’t have a food processor, don’t sweat it. I’ve made these using the bag-and-rolling-pin method, and while it takes a little longer, the truffles turn out just as good. Just make sure you crush the Oreos until they’re very fine—no big chunks left.
Preparation Method
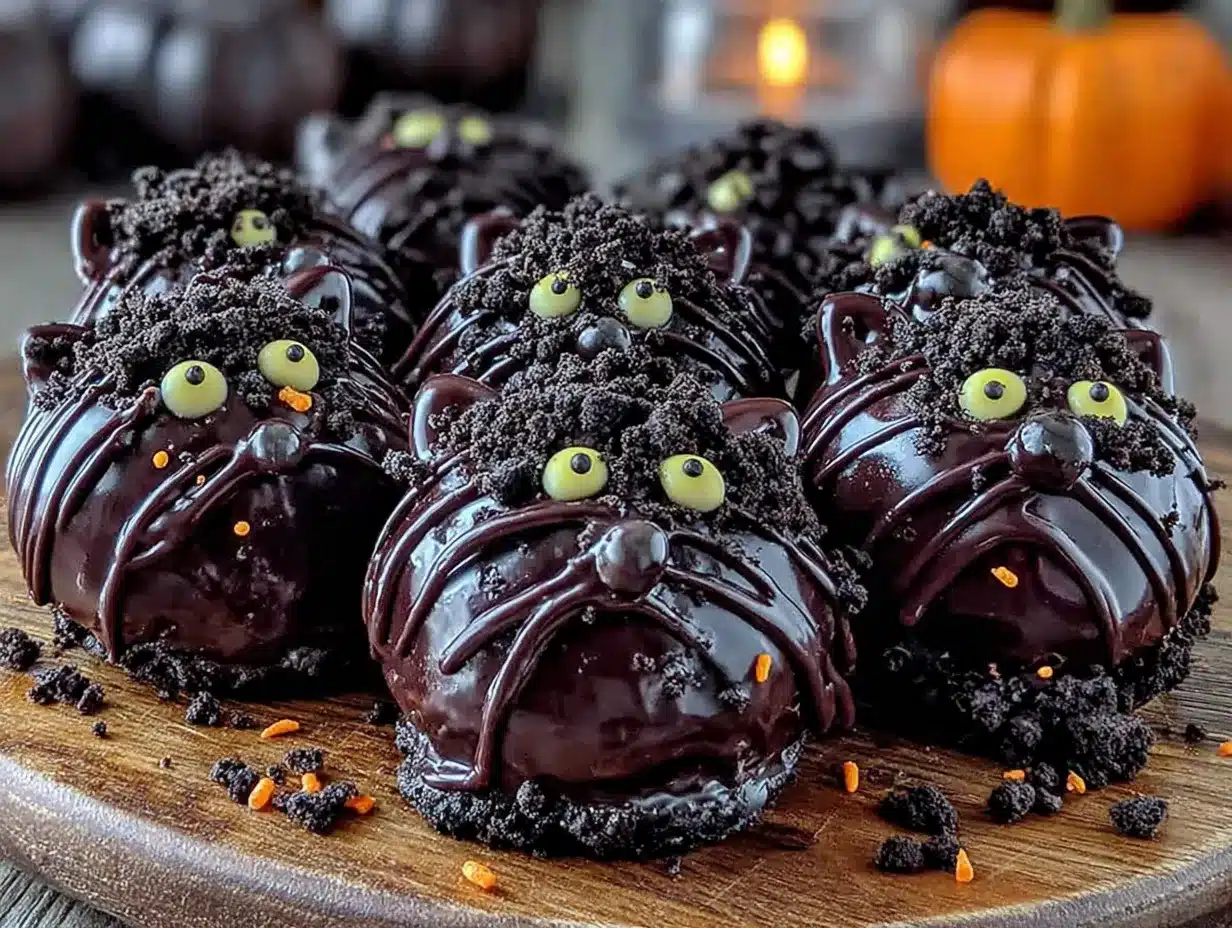
Alright, let’s get into it. This is the fun part. Follow these steps, and you’ll have a batch of adorable black cat truffles in no time.
- Crush the Oreos. Place the entire package of Oreos (cream and all) into your food processor. Pulse until you have fine, sand-like crumbs. No big pieces should remain. If you’re using the bag method, seal the cookies in a zip-top bag and go to town with a rolling pin until they’re crushed evenly. This should take about 2-3 minutes.
- Mix the dough. In a large bowl, combine the crushed Oreos with the softened cream cheese. Use a spatula or your hands (I prefer my hands—it’s faster) to mix until everything is fully incorporated. The mixture should be dark, uniform, and hold together when pressed. If it feels too dry, add a teaspoon of milk. Too sticky? Add a few more crushed Oreos.
- Shape the cats. Scoop out about 1 tablespoon of the mixture and roll it into a ball between your palms. Then, gently pinch one side to form a pointed ear shape. Repeat on the other side to make two ears. You’re basically making a round ball with two little triangles on top. Don’t stress over perfection—cats come in all shapes and sizes. Place each shaped truffle on the parchment-lined baking sheet. This step takes about 10-15 minutes for a full batch.
- Chill the truffles. Pop the baking sheet into the refrigerator for at least 30 minutes. This firms them up so they don’t fall apart when you dip them in the coating. If you’re in a hurry, you can stick them in the freezer for 15 minutes, but don’t leave them longer or they’ll get too hard.
- Melt the candy coating. Place the black candy melts in a microwave-safe bowl. Microwave in 30-second intervals, stirring well after each one, until fully melted and smooth. Stir in the coconut oil or shortening if using. Be careful not to overheat—candy melts can seize up if they get too hot.
- Dip the truffles. Using a fork, carefully lower one chilled truffle into the melted coating. Spoon the coating over the top to cover it completely. Lift the truffle out and gently tap the fork on the edge of the bowl to let the excess drip off. Place it back on the parchment paper. Repeat with the remaining truffles. Work quickly, because the coating starts to set fast.
- Add the decorations. While the coating is still wet, press two candy eyeballs into each truffle for the eyes. Add two small pieces of black licorice string on each side for whiskers. If you’re using pink frosting for a nose, dab a tiny dot below the eyes. Use a toothpick to adjust anything that shifts. The coating sets in about 5-10 minutes at room temperature.
- Let them set completely. Once all the truffles are decorated, let them sit at room temperature until the coating is firm and shiny. You can also pop them back in the fridge for 10 minutes to speed things up. Then they’re ready to serve!
A quick note: if your coating starts to thicken while you’re working, just reheat it in the microwave for 15 seconds. And if you end up with a few truffles that look more like lumpy potatoes than cats, don’t worry. They’ll still taste amazing.
Cooking Tips & Techniques
I’ve made these truffles about five times now, and let me tell you, I’ve learned a few things the hard way. Here are my best tips to make your batch perfect on the first try.
Keep your hands cold. The Oreo mixture gets sticky fast, especially if your hands are warm. I like to run my hands under cold water before shaping each truffle, then dry them off. It makes a huge difference. You can also chill the mixture for 10 minutes before shaping if it’s being stubborn.
Don’t skip the chill step. I know it’s tempting to rush, but dipping warm truffles into melted coating is a recipe for disaster. The truffles will start to fall apart, and the coating will get crumbly and weird. Trust me on this—I ended up with a bowl of black sludge my first time. Let them chill for the full 30 minutes.
Thin your coating. Candy melts can be thick right out of the bag. Adding a little coconut oil or shortening makes them much easier to work with. It also gives the coating a beautiful, glossy finish that looks professional. If your coating is too thick, the truffles will have clumpy, uneven layers.
Work in small batches. Only take a few truffles out of the fridge at a time. If you take them all out at once, they’ll warm up and get soft. I usually work with 4-5 at a time, keeping the rest chilled until I’m ready for them.
Fix bare spots with a toothpick. After dipping, you might notice a small area that didn’t get coated. Just dab a little melted coating on with a toothpick to cover it. Nobody will ever know.
Use a piping bag for the nose. If you’re adding pink noses, a tiny piping bag (or even a zip-top bag with the corner snipped off) gives you way more control than a toothpick. Just squeeze a tiny dot—less is more here.
Variations & Adaptations
One of the best things about this recipe is how easy it is to customize. Here are some of my favorite variations.
White Cat Truffles: Use white candy melts instead of black, and add pink candy melts for the ears and nose. These look like adorable little white cats and are perfect if you’re not into the spooky vibe. I made these for a non-Halloween party once, and they were a huge hit.
Pumpkin Spice Version: Add 1 teaspoon of pumpkin pie spice to the Oreo mixture before shaping. Use orange candy melts for the coating, and add a small green candy melt on top for a stem. These taste like fall in a bite.
Gluten-Free Option: Use gluten-free chocolate sandwich cookies instead of regular Oreos. The texture will be slightly different, but they still taste great. Check the label on your candy melts to make sure they’re gluten-free too.
Vegan Version: Use a vegan cream cheese alternative and dairy-free chocolate sandwich cookies. Most dark chocolate candy melts are naturally dairy-free, but double-check the package. I’ve made these for a vegan friend, and she said they were the best Halloween treat she’d had in years.
Peanut Butter Twist: Add 2 tablespoons of creamy peanut butter to the Oreo mixture before shaping. It adds a salty, nutty flavor that pairs perfectly with the chocolate. Just be aware that the mixture will be a little softer, so chill it longer before dipping.
My personal favorite variation? I once added a pinch of cayenne pepper to the Oreo mixture for a spicy kick. It sounds weird, I know, but the heat sneaks up on you after the sweetness, and it’s surprisingly addictive. Just go easy on the cayenne—a little goes a long way.
Serving & Storage Suggestions
These truffles are best served cold, straight from the fridge. The coating stays firm and snappy, and the inside stays creamy. I like to arrange them on a black or orange platter for Halloween, with a few fake spiderwebs scattered around for effect. They look amazing on a dessert table next to cupcakes and cookies.
For serving at a party, I recommend taking them out of the fridge about 10 minutes before guests arrive. This takes the chill off just enough without making them soft. If you’re serving them outside on a warm day, keep the platter on ice or bring them out in small batches.
Storage: Store the truffles in an airtight container in the refrigerator. They’ll stay fresh for up to 2 weeks, though I doubt they’ll last that long. Layer them between sheets of parchment paper so the decorations don’t get smudged.
Freezer: These freeze beautifully. Place the truffles in a single layer on a baking sheet and freeze until solid, about 2 hours. Then transfer them to a freezer-safe bag or container. They’ll keep for up to 3 months. Thaw in the refrigerator overnight before serving.
Reheating: You don’t need to reheat these, but if you want a slightly softer center, let them sit at room temperature for 15-20 minutes before eating. The flavors actually develop more over time—I think they taste even better on day two.
Nutritional Information & Benefits
Let’s be honest—these are a treat, not a health food. But here’s the estimated breakdown per truffle (based on a batch of 24):
| Nutrient | Amount per Truffle |
|---|---|
| Calories | 180 |
| Total Fat | 10g |
| Saturated Fat | 5g |
| Carbohydrates | 22g |
| Sugar | 15g |
| Protein | 2g |
That said, there are a few redeeming qualities. The cream cheese adds a small amount of calcium and protein. Dark chocolate (if you use it) is rich in antioxidants. And honestly? Sometimes the best thing you can do for your mental health is eat a cute cat-shaped truffle and smile. So go ahead, enjoy one (or three). Halloween only comes once a year.
These are not suitable for vegans or those with dairy allergies unless you use the substitutions mentioned above. They contain gluten, dairy, and soy.
Conclusion
So there you have it—Black Cat Oreo Truffles that are spooky, cute, and almost embarrassingly easy to make. Every time I make these, I think about Aunt Maggie and her crooked-eyed truffles, and I smile. That’s what I love most about this recipe. It’s not just about the taste, though the taste is pretty incredible. It’s about the memory you’re creating while you shape those little ears and press in those tiny eyes. Maybe you’re making them with your kids, or for a party, or just because you wanted to do something fun on a Tuesday night. Whatever the reason, these truffles deliver.
I’d love to hear how yours turn out! Did you try any of the variations? Did your cats come out looking perfect or hilariously derpy? Drop a comment below and share your photos—I genuinely get so excited seeing what you all create. And if you’re looking for more easy Halloween treats, check out my spiderweb dip or these mummy hot dogs for a full spooky spread. Happy Halloween, and happy truffle-making!
Frequently Asked Questions
Can I use Double Stuf Oreos for this recipe?
I don’t recommend it. The extra cream filling makes the mixture too soft and sticky, which makes shaping the cats really difficult. Stick with regular Oreos for the best texture.
How do I keep the candy coating from cracking?
Make sure your truffles are fully chilled but not frozen solid. If they’re too cold, the coating can crack as it sets. Also, adding a little coconut oil to the melted coating helps keep it flexible.
Can I make these ahead of time?
Absolutely! These truffles actually taste better after a day in the fridge. You can make them up to 2 weeks ahead and store them in an airtight container in the refrigerator.
My truffle mixture is too sticky. What did I do wrong?
This usually happens if your cream cheese is too warm or if you used Double Stuf Oreos. Try chilling the mixture for 15 minutes before shaping, or add a few more crushed Oreos to absorb the extra moisture.
Can I use white chocolate instead of candy melts?
You can, but white chocolate is harder to work with because it’s more sensitive to heat. If you use white chocolate, add a little coconut oil and melt it very slowly. Candy melts are more forgiving and give a smoother finish.
PrintEasy Black Cat Oreo Truffles: Best Halloween Treat

These Black Cat Oreo Truffles are a simple, no-bake Halloween treat made with just five ingredients. Shaped by hand into adorable black cats, they’re perfect for parties and guaranteed to disappear fast.
- Prep Time: 30 minutes
- Cook Time: 0 minutes
- Total Time: 1 hour 30 minutes (includes chilling time)
- Yield: 24 truffles 1x
- Category: Dessert
- Cuisine: American
Ingredients
- 1 package (14.3 oz) Oreo cookies
- 8 oz block cream cheese, softened
- 1 package (12 oz) black candy melts
- 1 tablespoon coconut oil or shortening (optional)
- Candy eyeballs (small, about 6mm)
- Black licorice strings (cut into 1-inch pieces)
- Optional: pink candy melts or frosting (for noses)
Instructions
- Crush the Oreos: Place the entire package of Oreos (cream and all) into a food processor. Pulse until you have fine, sand-like crumbs. No big pieces should remain. If using the bag method, seal the cookies in a zip-top bag and crush with a rolling pin until evenly crushed. This should take about 2-3 minutes.
- Mix the dough: In a large bowl, combine the crushed Oreos with the softened cream cheese. Use a spatula or your hands to mix until everything is fully incorporated. The mixture should be dark, uniform, and hold together when pressed. If it feels too dry, add a teaspoon of milk. Too sticky? Add a few more crushed Oreos.
- Shape the cats: Scoop out about 1 tablespoon of the mixture and roll it into a ball between your palms. Then, gently pinch one side to form a pointed ear shape. Repeat on the other side to make two ears. You’re basically making a round ball with two little triangles on top. Don’t stress over perfection—cats come in all shapes and sizes. Place each shaped truffle on a parchment-lined baking sheet. This step takes about 10-15 minutes for a full batch.
- Chill the truffles: Pop the baking sheet into the refrigerator for at least 30 minutes. This firms them up so they don’t fall apart when you dip them in the coating. If you’re in a hurry, you can stick them in the freezer for 15 minutes, but don’t leave them longer or they’ll get too hard.
- Melt the candy coating: Place the black candy melts in a microwave-safe bowl. Microwave in 30-second intervals, stirring well after each one, until fully melted and smooth. Stir in the coconut oil or shortening if using. Be careful not to overheat—candy melts can seize up if they get too hot.
- Dip the truffles: Using a fork, carefully lower one chilled truffle into the melted coating. Spoon the coating over the top to cover it completely. Lift the truffle out and gently tap the fork on the edge of the bowl to let the excess drip off. Place it back on the parchment paper. Repeat with the remaining truffles. Work quickly, because the coating starts to set fast.
- Add the decorations: While the coating is still wet, press two candy eyeballs into each truffle for the eyes. Add two small pieces of black licorice string on each side for whiskers. If you’re using pink frosting for a nose, dab a tiny dot below the eyes. Use a toothpick to adjust anything that shifts. The coating sets in about 5-10 minutes at room temperature.
- Let them set completely: Once all the truffles are decorated, let them sit at room temperature until the coating is firm and shiny. You can also pop them back in the fridge for 10 minutes to speed things up. Then they’re ready to serve!
Notes
Keep your hands cold to prevent the mixture from getting sticky. Don’t skip the chill step—dipping warm truffles will cause them to fall apart. Thin the candy coating with a little coconut oil for a glossy finish. Work in small batches, keeping the rest chilled. Fix any bare spots with a toothpick dipped in melted coating. For the pink noses, use a piping bag or a zip-top bag with the corner snipped off for better control.
Nutrition
- Serving Size: 1 truffle
- Calories: 180
- Sugar: 15
- Fat: 10
- Saturated Fat: 5
- Carbohydrates: 22
- Protein: 2
Keywords: Halloween treats, Oreo truffles, black cat truffles, no-bake dessert, easy Halloween recipe, Oreo balls, candy melts, cream cheese truffles


