My seven-year-old stood in the kitchen doorway, watching me wrestle with a carving knife and a pumpkin that seemed to have developed a mind of its own. She asked why I couldn’t just arrange the veggies in a pumpkin shape on a platter instead. I started to explain why that wouldn’t work — then stopped. She was right. Why was I making this so complicated?
That moment of being wrong — honestly, completely wrong — changed how I approach holiday snacks forever. I had been so focused on the tradition of carving that I forgot the whole point was getting my kids to eat vegetables. Let me tell you, watching her little face light up when I said “you know what, let’s try it your way” was worth every bruised ego I had.
The first attempt was a mess. Carrot sticks poking out at odd angles, cherry tomatoes rolling off the sides, and a stem made from a celery stalk that looked more like a sad antenna. But my daughter didn’t care. She ate more raw veggies that afternoon than she had in the entire previous month. Maybe you’ve been there — that moment when you realize the “right” way isn’t always the best way.
This Easy Halloween Veggie Tray shaped like a pumpkin has become our family’s go-to for Halloween parties, school events, and even just regular Tuesday snack times. It’s the kind of recipe that makes you feel like a genius parent without actually doing much work. And honestly? I’m glad she called me out on my stubbornness. Sometimes the best ideas come from the people we’re trying to teach.
Why You’ll Love This Recipe
This isn’t just another veggie platter that sits untouched while kids grab candy. I’ve tested this at three different Halloween parties and two school events — it gets devoured every single time. Here’s what makes it special:
- Quick & Easy: You can put this together in under 15 minutes. No carving, no special tools, no stress. I’ve made it in between helping with costume emergencies and answering the door for trick-or-treaters.
- Simple Ingredients: Everything comes from the regular grocery store. No fancy organic produce required — I’ve used both store-brand and name-brand veggies with the same great results.
- Perfect for Halloween: It’s festive without being scary for little ones. The pumpkin shape is friendly and inviting, which makes picky eaters more willing to try something new.
- Crowd-Pleaser: My kids argue over who gets to arrange the “face” pieces. Even my nephew who “hates vegetables” ate three carrot sticks shaped like pumpkin ribs.
- Unbelievably Delicious: There’s something about the shape and arrangement that makes vegetables taste better — at least according to my six-year-old. I think it’s the dip factor.
What makes this different from other veggie trays is the presentation. Instead of a boring rectangle platter, you get a pumpkin that actually looks like a pumpkin. The secret is in how you layer the veggies — starting from the center and working outward. I learned this trick after my first failed attempt, and now it works perfectly every time.
This recipe is comfort food reimagined — healthier, faster, but with the same soul-soothing satisfaction of sharing food with people you love. Perfect for impressing other parents without stressing yourself out, or turning a simple snack into something memorable.
What Ingredients You Will Need
This recipe uses simple, everyday vegetables to create a festive pumpkin shape. Most of these are pantry staples in my house, especially during fall when we’re trying to sneak in extra nutrients before the holiday candy overload.
- For the pumpkin base:
- 1 large bag of baby carrots (about 16 ounces) — these form the main body of the pumpkin
- 1 large cucumber, sliced into rounds — adds green color and crunch
- 1 red bell pepper, sliced into strips — for the pumpkin’s “ribs” and facial features
- 1 yellow bell pepper, sliced into strips — adds contrast and sweetness
- 1 orange bell pepper, sliced into strips — blends with the carrots for depth
- 1 celery stalk with leaves — for the pumpkin stem (leave the leaves on!)
- For the dip:
- 1 cup ranch dressing (I prefer homemade, but store-bought works great)
- 1/2 cup Greek yogurt (adds protein and creaminess)
- 1 tablespoon dried dill (optional, but adds freshness)
- 1 teaspoon garlic powder
- 1/2 teaspoon onion powder
- For decoration (optional but fun):
- Black olives, sliced — for pumpkin face features
- Cherry tomatoes — can be used for eyes or mouth
- Broccoli florets — for “vines” around the stem
- Snap peas — for extra green texture
I recommend using baby carrots for the base because they’re uniform in size and easier to arrange. If you only have whole carrots, just peel and cut them into 2-inch sticks. For the dip, Hidden Valley ranch is my go-to when I’m short on time, but I’ve also made this with homemade buttermilk ranch that takes it to another level.
For substitutions, you can swap the ranch for hummus or guacamole if you’re feeding a dairy-free crowd. The Greek yogurt can be replaced with dairy-free sour cream. In summer, I sometimes add fresh dill from my garden instead of dried — it makes the dip taste brighter.
Equipment Needed
You don’t need anything fancy for this recipe. Here’s what I use:
- Large round platter or cutting board — at least 12 inches in diameter. I use a wooden board that belonged to my grandmother, but any large plate works.
- Sharp knife — for cutting peppers and cucumbers. A chef’s knife is best, but a paring knife works too.
- Cutting board — for prepping vegetables. I recommend a plastic one for easy cleanup.
- Small bowl — for the dip. A ramekin or small cereal bowl works perfectly.
- Vegetable peeler — only if you’re using whole carrots instead of baby carrots.
- Paper towels — for drying veggies after washing. Wet veggies slide around and make the shape harder to maintain.
If you don’t have a large round platter, a rectangular baking sheet works fine — just arrange the veggies in a pumpkin shape in the center. I’ve even used a pizza pan in a pinch. For the dip bowl, a small mason jar lid flipped upside down creates a cute mini bowl. Budget tip: check dollar stores for festive Halloween platters that you can use year after year.
Preparation Method
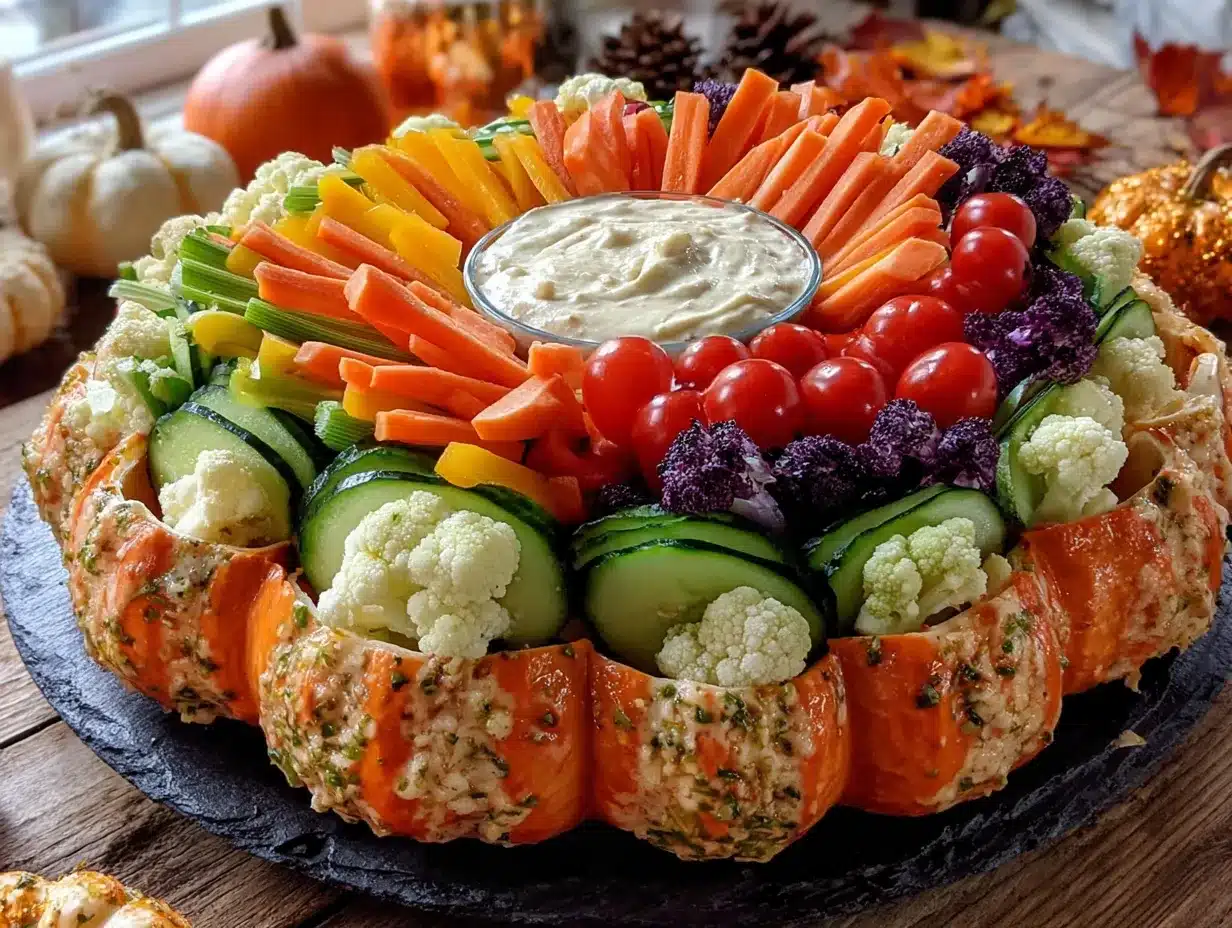
Let me walk you through how I make this Easy Halloween Veggie Tray. It’s straightforward, but a few tricks make it look professional.
- Wash and dry all vegetables thoroughly. This is crucial — wet veggies won’t stay in place. I pat everything dry with paper towels and let them sit for a few minutes on the counter. (I learned this the hard way after my first tray slid apart within minutes.)
- Prepare the dip. In a small bowl, mix together 1 cup ranch dressing, 1/2 cup Greek yogurt, 1 tablespoon dried dill, 1 teaspoon garlic powder, and 1/2 teaspoon onion powder. Stir until smooth. Taste and adjust seasonings — I sometimes add a pinch of salt if it needs it. Set aside in the center of your platter. This will be the “center” of your pumpkin.
- Create the pumpkin outline. Arrange cucumber slices in a circle around the dip bowl, about 2 inches away from it. This forms the outer edge of your pumpkin. Overlap them slightly so they create a solid green ring. (I use about 12-15 slices depending on the size of my platter.)
- Build the pumpkin body. Starting from the dip bowl and working outward, arrange baby carrots in rows that radiate from the center. Think of them like pumpkin ribs. Place them close together so they form a solid orange surface. I usually do 4-5 rows of carrots, depending on how big I want the pumpkin to be.
- Add the pepper “ribs.” Between the rows of carrots, place strips of red and orange bell pepper. These add color contrast and make the pumpkin look more three-dimensional. I alternate colors — red, orange, yellow — to create visual interest.
- Create the pumpkin face. This is the fun part! Use black olive slices for eyes and a mouth. I cut the olives into small circles for eyes and arrange them in a happy face pattern. For the mouth, I use a combination of olive slices and cherry tomato halves. My kids love making silly faces — we’ve done happy, surprised, and even a “scary” face that looked more like a confused potato.
- Add the stem. Place the celery stalk with leaves at the top of the pumpkin, sticking out from behind the carrot rows. The leaves should point upward to look like a real pumpkin stem. I sometimes use two celery stalks for a thicker stem.
- Fill in gaps. Look at your pumpkin from all angles. Any bare spots? Fill them with extra baby carrots or pepper strips. I usually have a few extra veggies on hand for this purpose.
- Add decorative touches. Arrange broccoli florets around the stem to look like vines. Scatter snap peas around the edges for extra green. This step is optional but makes the tray look more intentional and festive.
- Final check. Step back and admire your work. Make any adjustments — I always end up shifting a few carrots that went rogue. Serve immediately or cover with plastic wrap and refrigerate for up to 2 hours before serving.
The whole process takes about 15 minutes once you get the hang of it. The first time you make it, allow 20 minutes to account for rearranging. Trust me, you’ll get faster with practice.
Cooking Tips & Techniques
After making this Easy Halloween Veggie Tray about a dozen times, I’ve picked up some tricks that make it easier and more impressive.
Start with the dip bowl first. This was my biggest lesson. If you arrange the veggies first and try to add the bowl afterward, everything shifts and you’ll spend ten minutes fixing it. Place the bowl in the center, then build outward.
Dry your veggies well. I cannot stress this enough. Wet vegetables slide around like they’re on ice. I wash everything, then lay them out on a clean kitchen towel for 10 minutes before assembling. This also helps the dip stick better to the veggies.
Use uniform vegetable sizes. Baby carrots are perfect because they’re all roughly the same size. If you’re cutting your own carrots, try to make them about 2 inches long and 1/2 inch thick. Consistency makes the pumpkin look professional.
Overlap your layers. Don’t be afraid to pile veggies on top of each other. The pumpkin shape looks best when it has some height. I overlap the carrot rows by about half an inch to create depth.
Make the face last. The face pieces (olives, tomatoes) are the most delicate. Adding them last means they won’t get knocked out of place while you’re arranging the rest of the pumpkin.
Common mistake: Making the pumpkin too big for your platter. Trust me, I’ve done this. Measure your platter before you start and plan accordingly. A 12-inch platter is perfect for a medium pumpkin that serves 6-8 people.
Timing tip: I prep all the vegetables the night before and store them in separate bags in the fridge. Assembly takes 10 minutes the next day. This is a lifesaver for Halloween parties when you’re already running around.
Variations & Adaptations
This recipe is incredibly flexible. Here are some variations I’ve tried and loved:
Dairy-Free Version: Swap the ranch dressing for a dairy-free version or use hummus as the dip. I’ve made this with roasted red pepper hummus and it was a huge hit. The Greek yogurt can be replaced with dairy-free sour cream or omitted entirely.
Low-Carb Option: Replace the baby carrots with cucumber sticks or jicama strips. The shape won’t be as orange, but you can add extra yellow bell pepper to maintain the pumpkin color. My keto friends love this version.
Seasonal Twist: In spring, I make a “flower” version using the same technique but with a sunflower shape. In summer, I use cherry tomatoes and yellow squash for a sunburst pattern. The technique is the same — just change the colors.
Protein-Packed Version: Add cheese cubes or rolled deli meat around the edges. I sometimes add cheddar cheese cubes that look like pumpkin seeds scattered around the base. My kids go crazy for this version.
Spicy Version: Mix hot sauce into the ranch dip for an adult version. I use sriracha or chipotle hot sauce. Just keep the spicy dip separate if kids are eating — I learned this after my son took a big bite of “spicy ranch” and cried for ten minutes.
My personal favorite variation: I make a “monster” version for my son’s birthday party in October. Instead of a happy face, I use olive slices to create a funny monster face with crooked teeth and googly eyes made from mozzarella balls with olive pupils. It’s ridiculous and the kids love it.
Serving & Storage Suggestions
This Easy Halloween Veggie Tray is best served cold or at room temperature. I usually take it out of the fridge about 15 minutes before serving so the flavors can come alive. The dip should be cold, but the vegetables taste better when they’re not ice-cold.
Presentation tip: Place the tray on a bed of fresh kale or lettuce leaves for extra color. I sometimes add small Halloween-themed decorations around the edges — plastic spiders, fake cobwebs, or little pumpkin candies (kept separate from the veggies, of course).
What to serve with it: This tray pairs beautifully with other Halloween snacks. I often serve it alongside spooky Halloween popcorn mix for a sweet-and-savory combo. It also goes well with easy Halloween pizza mummies for a full party spread. For drinks, apple cider or sparkling water with orange slices keeps the theme going.
Storage: If you have leftovers (rare in my house, but it happens), cover the entire tray tightly with plastic wrap and refrigerate. The veggies will stay fresh for up to 2 days. The dip can be stored separately in an airtight container for up to 5 days.
Reheating: This is served cold, so no reheating needed! If the veggies look a little wilted after refrigeration, refresh them by placing them in ice water for 5 minutes, then pat dry before serving again.
Flavor development: The dip actually tastes better after sitting in the fridge overnight. The garlic and dill have time to meld together. I always make the dip a day ahead if I have time.
Nutritional Information & Benefits
This veggie tray is packed with nutrients, which makes me feel better about the candy that inevitably follows. Here’s the approximate breakdown per serving (based on 8 servings):
- Calories: 180-220 (depending on dip amount)
- Protein: 5-7 grams
- Fiber: 4-6 grams
- Vitamin A: 180% of daily value (from carrots)
- Vitamin C: 120% of daily value (from bell peppers)
- Calcium: 8% of daily value (from Greek yogurt in dip)
The carrots are rich in beta-carotene, which supports eye health and immune function. Bell peppers contain more vitamin C than oranges, which is great for fighting off fall colds. The Greek yogurt in the dip adds protein and probiotics for gut health.
Dietary considerations: This recipe is naturally gluten-free and nut-free. For a dairy-free version, use a dairy-free ranch and skip the Greek yogurt. For a vegan version, use vegan ranch and replace the yogurt with vegan sour cream or additional ranch.
Potential allergens: Dairy (in ranch and yogurt), but easily substituted as mentioned above. Always check labels on store-bought ranch for hidden allergens.
From a wellness perspective, I love that this recipe gets kids excited about vegetables. It’s not about forcing nutrition — it’s about making healthy food fun. When my kids help arrange the face, they’re more likely to eat everything on the tray. That’s a win in my book.
Conclusion
This Easy Halloween Veggie Tray has become more than just a recipe in our house — it’s a tradition. Every October, my daughter reminds me about that day in the kitchen when she suggested I use a bowl instead of a carving knife. We laugh about it now, and she takes pride in showing her friends “her” recipe.
The beauty of this tray is that it works for everyone. Picky eaters will eat the veggies because they’re fun. Parents will appreciate how quick it is to make. Party guests will be impressed by the presentation. And you’ll feel good about serving something healthy at a holiday known for sugar overload.
I encourage you to make this your own. Change the face to match your family’s personality. Use different dips. Add your kids’ favorite vegetables. The technique is flexible, and that’s what makes it so great.
I’d love to hear how yours turns out. Drop a comment below with your pumpkin face creations — bonus points if you share a photo! And if you try a fun variation, let me know so I can test it in my kitchen. Happy Halloween, and happy snacking!
Frequently Asked Questions
Can I make this veggie tray ahead of time?
Yes! You can assemble the entire tray up to 4 hours before serving. Just cover it tightly with plastic wrap and keep it refrigerated. Add the dip bowl just before serving to keep it fresh. If you’re really pressed for time, prep all the vegetables the night before and assemble in the morning.
What if I don’t have a round platter?
No problem! Use a rectangular baking sheet or a large dinner plate. Just arrange the veggies in a pumpkin shape in the center. You can also use a pizza pan or even a clean cutting board. The shape doesn’t have to be perfect — that’s part of the charm.
How do I keep the vegetables from sliding around?
Dry them thoroughly after washing. I pat everything with paper towels and let them sit for 5-10 minutes before assembling. You can also place a thin layer of lettuce leaves under the veggies for grip. Another trick is to use a slightly damp paper towel under the platter to keep it from sliding on the counter.
Can I use different vegetables?
Absolutely! This recipe is very flexible. Try using broccoli florets, cauliflower, snap peas, cherry tomatoes, or jicama sticks. Just keep the orange and green color scheme for the pumpkin look. For a rainbow effect, add purple cabbage or yellow squash.
What’s the best dip for this tray?
Ranch dressing is the classic choice, but hummus, guacamole, or Greek yogurt dip all work great. For a healthier option, try a yogurt-based herb dip. For a festive twist, make a “pumpkin spice” dip by mixing pumpkin puree into cream cheese — it sounds weird but tastes amazing with the veggies.
PrintEasy Halloween Veggie Tray: Kid-Approved Pumpkin Shape
A fun and festive Halloween veggie tray shaped like a pumpkin that gets kids excited to eat their vegetables. Quick to assemble with simple ingredients, it’s perfect for parties, school events, or everyday snacking.
- Prep Time: 15 minutes
- Cook Time: 0 minutes
- Total Time: 15 minutes
- Yield: 8 servings 1x
- Category: Appetizer
- Cuisine: American
Ingredients
- 1 large bag baby carrots (about 16 ounces)
- 1 large cucumber, sliced into rounds
- 1 red bell pepper, sliced into strips
- 1 yellow bell pepper, sliced into strips
- 1 orange bell pepper, sliced into strips
- 1 celery stalk with leaves
- 1 cup ranch dressing
- 1/2 cup Greek yogurt
- 1 tablespoon dried dill (optional)
- 1 teaspoon garlic powder
- 1/2 teaspoon onion powder
- Black olives, sliced (for decoration)
- Cherry tomatoes (for decoration)
- Broccoli florets (for decoration, optional)
- Snap peas (for decoration, optional)
Instructions
- Wash and dry all vegetables thoroughly. Pat dry with paper towels and let sit for a few minutes.
- Prepare the dip: In a small bowl, mix together 1 cup ranch dressing, 1/2 cup Greek yogurt, 1 tablespoon dried dill, 1 teaspoon garlic powder, and 1/2 teaspoon onion powder. Stir until smooth. Set aside in the center of your platter.
- Create the pumpkin outline: Arrange cucumber slices in a circle around the dip bowl, about 2 inches away from it. Overlap them slightly to form a solid green ring.
- Build the pumpkin body: Starting from the dip bowl and working outward, arrange baby carrots in rows that radiate from the center. Place them close together to form a solid orange surface.
- Add the pepper ‘ribs’: Between the rows of carrots, place strips of red and orange bell pepper. Alternate colors for visual interest.
- Create the pumpkin face: Use black olive slices for eyes and a mouth. Arrange them in a happy face pattern. Use olive slices and cherry tomato halves for the mouth.
- Add the stem: Place the celery stalk with leaves at the top of the pumpkin, sticking out from behind the carrot rows. Leaves should point upward.
- Fill in gaps: Look at the pumpkin from all angles and fill any bare spots with extra baby carrots or pepper strips.
- Add decorative touches: Arrange broccoli florets around the stem to look like vines. Scatter snap peas around the edges for extra green.
- Final check: Step back and admire your work. Make any adjustments. Serve immediately or cover with plastic wrap and refrigerate for up to 2 hours before serving.
Notes
Dry vegetables thoroughly to prevent sliding. Start with the dip bowl in the center and build outward. Use uniform vegetable sizes for a professional look. Overlap layers to create depth. Make the face last to avoid disturbing it. Prep vegetables the night before for quicker assembly.
Nutrition
- Serving Size: 1 serving
- Calories: 200
- Sugar: 8
- Sodium: 350
- Fat: 12
- Saturated Fat: 2
- Carbohydrates: 18
- Fiber: 5
- Protein: 6
Keywords: Halloween veggie tray, pumpkin veggie tray, kid-friendly vegetables, Halloween snack, vegetable platter, easy appetizer


