My oldest child declared chicken thighs “gross” for three solid years. Three years. He’d push them around his plate, make faces, and deliver dramatic verdicts about the texture. I tried everything—braising, roasting, even hiding them in stews. Nothing worked. Then one Tuesday night, with a new air fryer sitting on my counter and a pack of thighs I’d bought on sale, I decided to make a batch just for myself. I seasoned them simply, popped them in the basket, and went about my business. Ten minutes later, I walked back into the kitchen to find my chicken-thigh-hater standing at the counter, reaching into the air fryer basket with greasy fingers. “These are good,” he said, mouth full. “Can you make these every night?”
That moment changed everything in my kitchen. I mean, honestly—I’d spent years trying to convince this kid that dark meat had value, and the air fryer did it in one session. The skin turned impossibly crispy without any deep-frying fuss. The meat stayed juicy and tender. And the whole thing came together faster than I could make a box of mac and cheese. Maybe you’ve been there, stuck between wanting to serve affordable, flavorful dinners and needing to please a crew of picky critics. Let me tell you, these crispy air fryer chicken thighs solved that problem for good.
What keeps me coming back to this recipe isn’t just the victory over my picky eater—it’s how genuinely good these turn out. The skin crackles when you bite into it. The meat pulls apart easily. And the seasoning, a simple mix you probably already have in your cabinet, creates this crust that makes you wonder why you ever bothered with complicated marinades. I’ve made these at least twice a week for the past four months, and nobody at my table has complained once. Not even the kid who swore he hated chicken thighs.
Why You’ll Love This Recipe
These crispy air fryer chicken thighs have earned a permanent spot in my weekly meal rotation, and I think they’ll earn one in yours too. Here’s why this recipe works so well for real families on real budgets:
- Ready in Under 30 Minutes : From fridge to table in about 25 minutes. That’s faster than ordering takeout and way cheaper. Perfect for those after-school chaos hours when everyone’s hungry and you need dinner on the table yesterday.
- Simple Pantry Ingredients : You don’t need any fancy sauces or hard-to-find spices. Salt, pepper, garlic powder, paprika—things you probably already have. The grocery bill stays low, and the flavor stays high.
- Perfect for Picky Eaters : The crispy exterior appeals to kids who usually shy away from darker meat. My kids call them “chicken nuggets but better.” The texture is familiar enough to feel safe but special enough to feel like a treat.
- Budget-Friendly Dinner Solution : Chicken thighs cost significantly less than breasts, especially when you buy them in bulk or on sale. This recipe stretches your grocery dollar without making anyone feel like they’re eating on a budget.
- Leftovers That Actually Reheat Well : I tested this extensively. Day-old thighs reheated in the air fryer for three minutes come back almost as crispy as fresh. That means tomorrow’s lunch is already sorted.
What makes this version different from every other chicken thigh recipe out there? It’s the technique. Instead of using a wet marinade that steams the skin, we pat the thighs completely dry and season them with a cornstarch-spiked rub. That cornstarch is the secret weapon—it pulls moisture away from the skin and creates that ultra-crispy crust you usually only get from deep frying. No flipping halfway through. No complicated breading station. Just dry, season, and cook.
This recipe isn’t just good for air fryer chicken—it’s the kind of meal that makes you feel like you’ve hacked the system. You get restaurant-quality crispy skin, juicy meat, and a happy table without spending an hour in the kitchen or a fortune at the grocery store. That’s a win in my book.
What Ingredients You Will Need
This recipe uses simple, everyday ingredients to deliver big flavor. Most of these are probably in your kitchen right now, which makes this perfect for those “what’s for dinner?” panic moments.
- Bone-in, skin-on chicken thighs (4-6 thighs, about 2 pounds) — The bone keeps the meat moist during cooking, and the skin is what gets that amazing crispy texture. I prefer thighs that are roughly the same size so they cook evenly. Look for packages on sale and freeze what you don’t use.
- Cornstarch (1 tablespoon) — This is the crispy secret. Cornstarch absorbs surface moisture better than flour alone and creates a lighter, crunchier crust. Don’t skip it—I learned this the hard way after making a batch that came out sad and soggy.
- Garlic powder (1 teaspoon) — Adds savory depth without burning in the air fryer. Fresh garlic would burn at these temperatures, so stick with the powder here.
- Paprika (1 teaspoon) — Regular or smoked both work great. Smoked paprika adds a subtle campfire flavor that my family loves. If you only have sweet paprika, that works perfectly too.
- Onion powder (½ teaspoon) — Rounds out the savory notes. It’s subtle but you’ll miss it if you leave it out.
- Salt (1 teaspoon) — I use fine sea salt for even distribution. If you’re using kosher salt, increase to about 1½ teaspoons.
- Black pepper (½ teaspoon) — Freshly ground is best, but pre-ground works fine in a pinch.
- Olive oil spray (or any cooking spray) — Just a light spritz helps the seasoning stick and encourages browning. Avocado oil spray works great too and has a higher smoke point.
Optional additions: Sometimes I add ½ teaspoon of cayenne for heat, or a teaspoon of dried thyme or oregano for an herby twist. If I’m feeling fancy, I’ll sprinkle a little parmesan cheese over the thighs in the last two minutes of cooking—it creates this incredible crispy cheese crust that adults and kids both go crazy for.
Ingredient swap notes: If you only have boneless, skinless thighs, you can still make this recipe—just reduce the cooking time to about 12-14 minutes and expect a different texture. The skin is where most of the crispiness comes from, so boneless versions will be more tender than crispy. For a gluten-free option, this recipe is already gluten-free as written, but double-check your cornstarch label if you’re cooking for someone with celiac disease.
Equipment Needed
You don’t need much for this recipe, which is part of its beauty. Here’s what you’ll want to have ready:
- Air fryer (any size works, but larger baskets mean less crowding) — I use a 5.8-quart model and can fit about 5 thighs comfortably. If your air fryer is smaller, cook in batches. Crowding the basket is the number one reason chicken thighs don’t get crispy.
- Tongs — For flipping the hot thighs without burning your fingers. Silicone-tipped tongs won’t scratch your air fryer basket.
- Paper towels — Essential for drying the chicken thoroughly. This step matters more than you think.
- Medium bowl — For mixing the seasoning and tossing the chicken. Any bowl works, but wide ones make coating easier.
- Meat thermometer (optional but recommended) — Chicken thighs are done at 165°F, but I prefer taking them to 175-180°F for more tender meat. A thermometer takes the guesswork out.
- Cutting board and knife — For trimming any excess skin or fat before cooking. A sharp knife makes this quick work.
If you don’t own an air fryer yet, I’d recommend starting with a mid-range basket model. You don’t need the most expensive one on the market—I’ve made excellent chicken thighs in a $40 air fryer from a discount store. The key is making sure it gets hot enough (400°F) and has decent air circulation.
Preparation Method
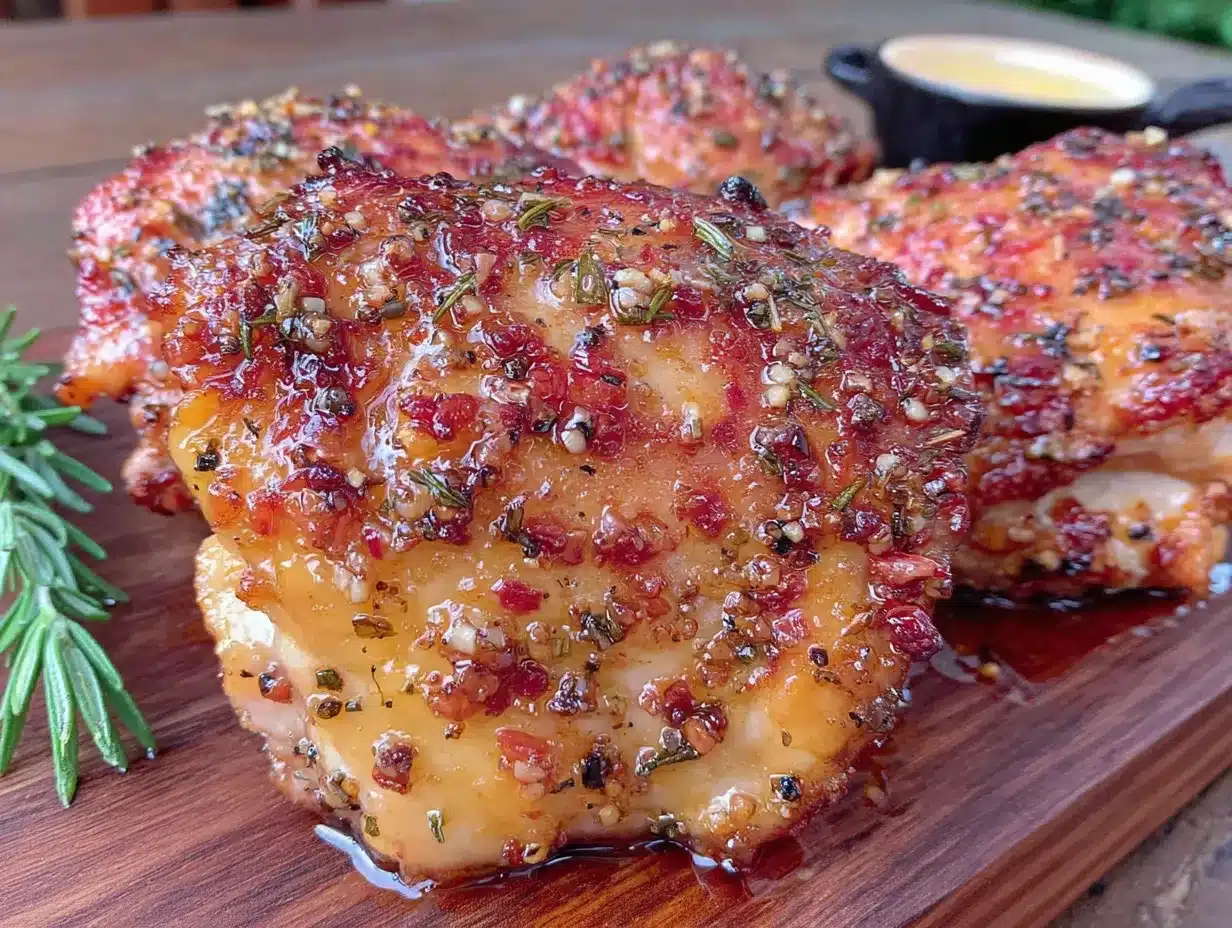
- Preheat your air fryer to 400°F (200°C). Most air fryers need about 3-5 minutes to preheat. Don’t skip this step—putting chicken into a cold air fryer messes with the cooking time and the crispiness. While it’s heating, move on to step two.
- Pat the chicken thighs completely dry. This is the most important step in the whole recipe. Take your paper towels and press firmly on each thigh, absorbing every bit of surface moisture you can find. Flip them over and do the other side. If the paper towels come away wet, keep drying. Wet skin steams instead of crisps, and nobody wants steamed chicken skin.
- Mix the seasoning. In your medium bowl, combine the cornstarch, garlic powder, paprika, onion powder, salt, and pepper. Whisk or stir until everything is evenly distributed. The cornstarch should look fully incorporated—no white clumps hiding in the mix.
- Coat the chicken. Add the dried chicken thighs to the bowl with the seasoning mixture. Use your hands to toss and rub the seasoning into every surface of the chicken. Don’t be gentle here—really work it into the skin. Make sure you get the underside too. The mixture should cling to the chicken like a dry rub.
- Spray the air fryer basket. A quick spritz of cooking spray prevents sticking and helps the bottom of the thighs crisp up too. If your basket is non-stick, you might get away without this, but I never risk it.
- Arrange the thighs in the basket. Place them skin-side down in a single layer. This is crucial—if any thighs are overlapping or touching, they won’t crisp properly. Leave a little space between each piece for air to circulate. If your air fryer is small, cook in batches. I know it’s tempting to cram them all in, but trust me on this one.
- Spritz the tops with oil. Give the exposed side of the thighs a light spray of olive oil. This helps the seasoning brown and crisp up beautifully. Don’t drench them—just a quick mist.
- Cook for 12 minutes. Set your timer and let the air fryer work its magic. During this time, resist the urge to open the basket. Every time you open it, heat escapes and cooking time increases.
- Flip the thighs. After 12 minutes, use your tongs to carefully flip each thigh over so the skin side is now facing up. They should look golden and starting to crisp on the bottom. If they look pale, give them another 2 minutes before flipping.
- Spritz again and cook for 8-12 more minutes. Give the skin side another light spray of oil. Return the basket to the air fryer and cook until the skin is deep golden brown and crispy. The exact time depends on your air fryer and the size of your thighs. Start checking at 8 minutes.
- Check for doneness. The internal temperature should reach at least 165°F, but I aim for 175-180°F for the most tender, fall-apart meat. If you don’t have a thermometer, pierce the thickest part of a thigh with a knife—the juices should run clear, and the meat should pull away from the bone easily.
- Rest for 5 minutes. This step is hard to remember when everyone’s hungry, but it matters. Let the thighs rest on a cutting board or plate before serving. The juices redistribute during this time, making every bite more flavorful and moist.
Visual cues throughout: At the 12-minute flip point, the underside should be golden with some darker spots starting to form. The skin side should look dry and set but not yet deeply colored. By the end of cooking, the skin should be a deep amber-brown with a crackled appearance. You should hear a slight crunch when you press on it with your tongs.
Cooking Tips & Techniques
I’ve made this recipe at least forty times now, and I’ve learned some things the hard way. Here’s what I wish someone had told me from the start:
Dry the chicken like you mean it. The first few times I made these, I was too casual with the paper towels. I’d give each thigh a quick pat and call it done. The result was good chicken, but not great crispy chicken. Now I use three or four paper towels per batch and really press the moisture out. The difference is night and day. If you have time, leave the seasoned thighs uncovered in the fridge for an hour before cooking—this dries the skin even further and gives you the crispiest possible result.
Don’t crowd the basket. I learned this lesson when I tried to cook eight thighs at once in a small air fryer. The ones in the middle came out steamed instead of crispy, and I had to finish them in the oven. Air fryers work by circulating hot air around the food. If there’s no space for air to move, you’re basically steaming your dinner. Cook in batches if you need to. The extra 10 minutes is worth it.
Temperature matters more than time. Different air fryers run at different temperatures. My friend’s air fryer runs 25 degrees hotter than mine, so her chicken cooks faster. Trust your thermometer and your eyes more than the recipe timer. If the skin isn’t crispy at the suggested time, keep cooking in 2-minute increments until it is.
One flip is enough. I used to flip my chicken every 5 minutes because I was paranoid about burning. All that opening and closing just made the cooking take longer. One flip at the halfway point is all you need. Let the air fryer do its job without interference.
Let leftovers cool completely before storing. This is a small thing that makes a big difference. If you put warm chicken thighs into a container, the steam gets trapped and softens the crispy skin. Let them cool on a wire rack until they reach room temperature, then store them in the fridge. When you reheat them in the air fryer at 375°F for 3-4 minutes, the crispiness comes right back.
Variations & Adaptations
One of the best things about this recipe is how easily it adapts to different tastes and dietary needs. Here are some variations I’ve tried and loved:
Spicy Honey Garlic Version: Mix 2 tablespoons of honey with 1 tablespoon of soy sauce and ½ teaspoon of red pepper flakes. After the chicken is cooked and crispy, brush the mixture over the skin and return to the air fryer for 2 more minutes. The heat caramelizes the honey and creates this sticky, spicy-sweet coating that my kids actually love more than the original. Just watch it closely—honey burns fast in the air fryer.
Lemon Herb Adaptation: Add 1 teaspoon of dried oregano, ½ teaspoon of dried thyme, and the zest of one lemon to the seasoning mix. Squeeze fresh lemon juice over the cooked chicken before serving. This version feels lighter and brighter, perfect for spring dinners or when you’re tired of heavy winter food. I serve this with roasted potatoes and a simple green salad.
BBQ Chicken Thighs: Cook the chicken as directed, but during the last 5 minutes, brush each thigh with your favorite barbecue sauce. Return to the air fryer and let the sauce caramelize. The key is adding the sauce at the end—if you add it too early, the sugar in the sauce burns before the chicken is done. This version disappears fastest at my house, especially when I use a smoky Kansas City-style sauce.
Dairy-Free and Gluten-Free: This recipe is naturally both, as long as you use a cornstarch that’s certified gluten-free. The olive oil spray should also be checked if you’re cooking for someone with severe allergies. Everything else is naturally free of common allergens.
Oven Method: If you don’t have an air fryer, you can still get great results. Preheat your oven to 425°F and place the seasoned thighs on a wire rack set inside a baking sheet. Bake for 35-40 minutes, flipping once halfway through. The wire rack is essential—it lets air circulate under the chicken so the bottom crisps up too. It’s not quite as crispy as the air fryer version, but it’s close enough that my family doesn’t complain.
Serving & Storage Suggestions
Serving: These crispy air fryer chicken thighs are best served immediately, while the skin is still crackling hot. I usually let them rest for 5 minutes on a cutting board, then transfer them to a platter. The skin stays crispy for about 15-20 minutes after cooking, so you have a little window to get everything else on the table.
For sides, I keep it simple. Mashed potatoes are my go-to—the creamy texture contrasts perfectly with the crispy chicken. Roasted vegetables like broccoli or green beans work great too. If I’m feeling lazy, I’ll microwave a bag of frozen peas and call it a vegetable serving. Nobody complains.
For a complete meal that feels special, serve these thighs with buttery rice, a crisp salad with lemon vinaigrette, and some warm crusty bread. The leftovers (if there are any) make amazing chicken salad the next day—just chop the cold meat and mix with mayo, celery, and a little lemon juice.
Storage: Let any leftover chicken thighs cool completely to room temperature. Place them in an airtight container and refrigerate for up to 4 days. Don’t stack them on top of each other if you can help it—the weight can crush the crispy skin. I like to line the container with paper towels to absorb any excess moisture.
Reheating: The air fryer is your best friend here. Reheat thighs at 375°F for 3-4 minutes, and they’ll come back almost as crispy as fresh. The microwave works in a pinch, but the skin will be soft rather than crispy. If you’re reheating in the oven, 350°F for 10 minutes on a wire rack works well.
Freezing: These freeze beautifully. Cool the cooked thighs completely, then wrap each one individually in plastic wrap and place them in a freezer bag. They’ll keep for up to 3 months. To reheat, thaw in the refrigerator overnight, then reheat in the air fryer at 375°F for 5-6 minutes. The texture won’t be quite as perfect as fresh, but it’s still way better than any frozen chicken product from the store.
Nutritional Information & Benefits
Here’s the estimated nutritional breakdown for one chicken thigh (based on a recipe that yields 5 thighs):
| Nutrient | Amount Per Serving |
|---|---|
| Calories | 285 |
| Protein | 22g |
| Fat | 19g |
| Saturated Fat | 5g |
| Carbohydrates | 3g |
| Fiber | 0g |
| Sugar | 0g |
| Sodium | 520mg |
Chicken thighs are actually a nutritional powerhouse, especially for families. They contain more iron and zinc than chicken breasts, which is great for growing kids and active adults. The higher fat content also means they’re more satiating—you’ll feel full and satisfied with one or two thighs instead of needing three or four.
This recipe is naturally low in carbohydrates and contains no added sugar. It’s suitable for keto, paleo, and low-carb diets as written. The main allergen to note is that some commercial cornstarch may be processed in facilities that handle wheat, so check labels if you’re cooking for someone with celiac disease.
I’m not a nutritionist, but I’ve learned that feeding my family real food with simple ingredients is almost always the right choice. These chicken thighs let me serve a delicious, satisfying dinner without processed ingredients or hidden additives. That feels good.
Conclusion
These crispy air fryer chicken thighs have genuinely changed how my family eats dinner. What started as a “fine, I’ll make this just for myself” experiment turned into our most-requested meal. The kid who hated chicken thighs now asks if we can have them for his birthday dinner. That’s not something I ever expected to write.
The beauty of this recipe is how forgiving it is. You can tweak the seasonings, swap the cooking method, adjust the spice level—and it still turns out great. It’s the kind of recipe that builds confidence in the kitchen, especially if you’re new to air frying or cooking chicken at home. There’s no complicated technique to master, no expensive equipment to buy, no hard-to-find ingredients to hunt down. Just good chicken, cooked simply, enjoyed together.
I’d love to hear how these turn out for you. Did your kids love them? Did you try a variation that blew your mind? Drop a comment below and let me know. And if you’re looking for more family-friendly dinner ideas, check out my recipe for creamy garlic chicken —it’s another weeknight winner that comes together fast and pleases everyone at the table.
Until next time, happy cooking—and don’t forget to save room for seconds.
Frequently Asked Questions
Can I use boneless, skinless chicken thighs for this recipe?
Yes, you can, but the results will be different. Boneless thighs cook faster (about 12-14 minutes total) and won’t have the same crispy skin texture. They’ll be tender and flavorful but more like juicy chicken bites than crispy-skinned thighs. If you use boneless, skip the flipping step and just cook them skin-side up the whole time.
Why is my chicken skin not getting crispy?
This usually happens for one of three reasons: the chicken wasn’t dried thoroughly before seasoning, the basket was too crowded, or the air fryer wasn’t hot enough. Make sure you’re patting the skin completely dry with paper towels, leaving space between each thigh in the basket, and preheating to 400°F. If you’re still having trouble, try adding an extra teaspoon of cornstarch to the seasoning mix.
Can I make this recipe in advance for meal prep?
Absolutely. Cook the chicken as directed, let it cool completely, and store it in the refrigerator for up to 4 days. The key to maintaining crispiness is reheating in the air fryer rather than the microwave. I often cook a double batch on Sunday and use the leftovers for quick lunches or busy weeknight dinners throughout the week.
How do I know when the chicken thighs are fully cooked?
The safest way is to use a meat thermometer. Chicken thighs are safe to eat at 165°F, but I prefer cooking them to 175-180°F for more tender meat. Without a thermometer, pierce the thickest part of the thigh with a knife—the juices should run clear, and the meat should easily pull away from the bone. The skin should be deep golden brown and crispy to the touch.
Can I cook frozen chicken thighs in the air fryer?
Yes, but you’ll need to adjust the cooking time and technique. Add about 5-8 minutes to the total cooking time, and make sure to pat the thawed chicken dry before seasoning. If you’re cooking from frozen without thawing first, expect a less crispy result because the frozen moisture will create steam as it cooks. For best results, thaw completely in the refrigerator overnight before cooking.
Pin This Recipe!

Easy Kid-Approved Crispy Air Fryer Chicken Thighs

These crispy air fryer chicken thighs are ready in under 30 minutes with simple pantry ingredients. The cornstarch-spiked rub creates an ultra-crispy crust, and the meat stays juicy and tender—perfect for picky eaters and busy weeknights.
- Prep Time: 10 minutes
- Cook Time: 20 minutes
- Total Time: 30 minutes
- Yield: 4-6 servings 1x
- Category: Main Course
- Cuisine: American
Ingredients
- 4–6 bone-in, skin-on chicken thighs (about 2 pounds)
- 1 tablespoon cornstarch
- 1 teaspoon garlic powder
- 1 teaspoon paprika (regular or smoked)
- ½ teaspoon onion powder
- 1 teaspoon fine sea salt (or 1½ teaspoons kosher salt)
- ½ teaspoon black pepper (freshly ground preferred)
- Olive oil spray (or any cooking spray)
Instructions
- Preheat your air fryer to 400°F (200°C).
- Pat the chicken thighs completely dry with paper towels, pressing firmly to absorb all surface moisture.
- In a medium bowl, combine cornstarch, garlic powder, paprika, onion powder, salt, and pepper. Stir until evenly mixed.
- Add the dried chicken thighs to the bowl and toss with your hands to coat every surface with the seasoning mixture.
- Spray the air fryer basket lightly with cooking spray.
- Arrange the thighs skin-side down in a single layer in the basket, leaving space between each piece.
- Spritz the tops of the thighs lightly with olive oil spray.
- Cook for 12 minutes. Do not open the basket during this time.
- Using tongs, carefully flip each thigh so the skin side is facing up.
- Spritz the skin side again with oil and cook for another 8-12 minutes, until the skin is deep golden brown and crispy.
- Check for doneness: internal temperature should reach at least 165°F (preferably 175-180°F for tender meat). Juices should run clear when pierced.
- Let the thighs rest for 5 minutes before serving.
Notes
For extra crispiness, leave seasoned thighs uncovered in the fridge for 1 hour before cooking. Do not crowd the basket—cook in batches if needed. One flip at the halfway point is enough. Let leftovers cool completely before storing to maintain crispiness. Reheat in air fryer at 375°F for 3-4 minutes.
Nutrition
- Serving Size: 1 chicken thigh
- Calories: 285
- Sodium: 520
- Fat: 19
- Saturated Fat: 5
- Carbohydrates: 3
- Protein: 22
Keywords: air fryer chicken thighs, crispy chicken thighs, kid-friendly chicken, easy chicken dinner, budget-friendly chicken, gluten-free chicken, keto chicken


