The neighbor’s kid’s birthday party was in three hours and I’d completely forgotten. Everyone else would be bringing elaborate themed cupcakes, homemade pizzas shaped like dinosaurs, and those fancy fruit skewers that look like rainbows. I had a block of cheddar, a bag of baby carrots, and a vague sense of panic. Honestly, I stood in my kitchen staring at the fridge like it owed me money. My daughter was already asking if we could just buy something on the way, and I was this close to agreeing.
Then I spotted the red bell pepper hiding behind the milk. And the cucumber I’d bought for salads. And a lonely handful of cherry tomatoes. It hit me—I had the makings of a rainbow, just sitting there. I grabbed a wooden board, started slicing, and tried to make it look intentional rather than desperate. I mean, I was just throwing things together, hoping for the best. The cheese cubes were a little uneven, the veggies were cut in a hurry, and I definitely forgot to arrange them by color at first. It was a mess, but a colorful one.
You know that feeling when you show up to a party with something you threw together last minute, and you’re half-embarrassed? That was me. I set the Easy Rainbow Veggie and Cheese Snack Tray on the table next to the elaborate spreads, and I braced myself for polite nods. But the kids swarmed it. The parents kept reaching for more. Someone asked for the recipe, and I had to admit there wasn’t one—it was just veggies and cheese on a board. But that’s the thing, isn’t it? Sometimes the simplest ideas win. This snack tray stayed with me because it proved you don’t need fancy skills or a ton of time to make something people actually love. It’s just colorful, crunchy, and completely unstressful—and honestly, that’s exactly what we all need.
Why You’ll Love This Recipe
Let me tell you why this Easy Rainbow Veggie and Cheese Snack Tray has become my go-to for every party, playdate, and lazy Sunday. I’ve tested it at five different gatherings now, and it never fails. It’s not just another veggie platter—it’s the one that actually gets eaten. Here’s what makes it stand out:
- Quick & Easy: This comes together in under 15 minutes. Seriously. No cooking, no baking, just slicing and arranging. Perfect for those moments when you need something fast.
- Simple Ingredients: You don’t need a specialty grocery store. I’ve made this with whatever veggies I had on hand, and it always works. Bell peppers, cucumbers, cherry tomatoes, carrots—whatever’s in your crisper drawer.
- Perfect for Parties: Great for birthday parties, potlucks, game days, or even a healthy after-school snack. It’s colorful enough to impress without any actual effort.
- Crowd-Pleaser: I’ve watched picky eaters go back for seconds. The rainbow colors make it fun for kids, and the cheese adds that savory satisfaction adults crave.
- Unbelievably Delicious: The crunch of fresh veggies paired with creamy cheese cubes is a texture combo that just works. Add a simple dip, and it’s next-level comfort food.
What makes this different from every other veggie tray? It’s the rainbow arrangement. Instead of just dumping everything on a plate, taking two extra minutes to organize by color turns it into something visually stunning. It’s not just food—it’s a centerpiece. And honestly, it’s the kind of recipe that makes you close your eyes after the first bite because the freshness is that good. It’s comfort food reimagined—healthier, faster, but with the same soul-soothing satisfaction. Perfect for impressing guests without stress, or turning a simple snack into something memorable.
What Ingredients You Will Need
This recipe uses simple, wholesome ingredients to deliver bold flavor and satisfying texture without the fuss. Most of these are pantry staples or easy to find at any grocery store. I’ve organized them by color to make the rainbow concept easy to follow.
- Red: Cherry tomatoes (halved if large), red bell pepper (sliced into strips), or radishes (thinly sliced). I prefer cherry tomatoes for their sweetness.
- Orange: Carrot sticks (peeled and cut into 3-inch pieces), orange bell pepper (sliced), or butternut squash (raw, thinly sliced—optional). Carrots are my go-to for crunch.
- Yellow: Yellow bell pepper (sliced into strips), yellow cherry tomatoes, or corn kernels (raw, off the cob). Yellow bell pepper adds a mild sweetness.
- Green: Cucumber (sliced into rounds or half-moons), broccoli florets (raw), snap peas, or green bell pepper. I love English cucumbers for their thin skin.
- Blue/Purple: Purple cabbage (thinly sliced), purple carrots (if you can find them), or purple bell pepper. Purple cabbage is the easiest to find and adds a gorgeous pop.
- Cheese: 8 ounces of cheddar cheese (cubed), 4 ounces of mozzarella pearls, or 4 ounces of pepper jack (cubed). I recommend sharp cheddar for its bold flavor—it stands up well to the veggies.
- Optional Dip: Ranch dressing, hummus, or a yogurt-based herb dip. A simple ranch is always a crowd-pleaser.
For the best texture, look for firm vegetables without any soft spots. I’ve used baby carrots in a pinch, but full-size carrots cut into sticks have a better crunch. If you’re making this for a party with dietary restrictions, swap the cheese with dairy-free cubes or skip it entirely—the veggies are still delicious on their own. In summer, I sometimes add fresh berries for extra color, but stick to the veggie rainbow for the classic version.
Equipment Needed
You don’t need much for this recipe, which is part of the beauty. Here’s what I use:
- Cutting board: A large wooden or plastic board works. I prefer a wooden board for serving because it looks nicer.
- Chef’s knife: A sharp 8-inch knife makes slicing veggies quick and even. A dull knife will crush your tomatoes—trust me, I learned that the hard way.
- Vegetable peeler: For carrots and cucumbers if you want to remove the skin. I leave the skin on cucumbers for extra color.
- Serving platter or wooden board: A large rectangular board or a round platter works best for the rainbow arrangement. I use a 12×18 inch wooden board.
- Small bowls: For the dip, if you’re including one. I like ceramic ramekins.
If you don’t have a wooden board, a large baking sheet lined with parchment paper works perfectly. I’ve done that for potlucks and it looks surprisingly elegant. For the knife, a good quality one is worth the investment—it makes prep faster and safer. I bought a basic Victorinox chef’s knife for $20 and it’s lasted years. Just keep it sharp with a honing rod.
Preparation Method
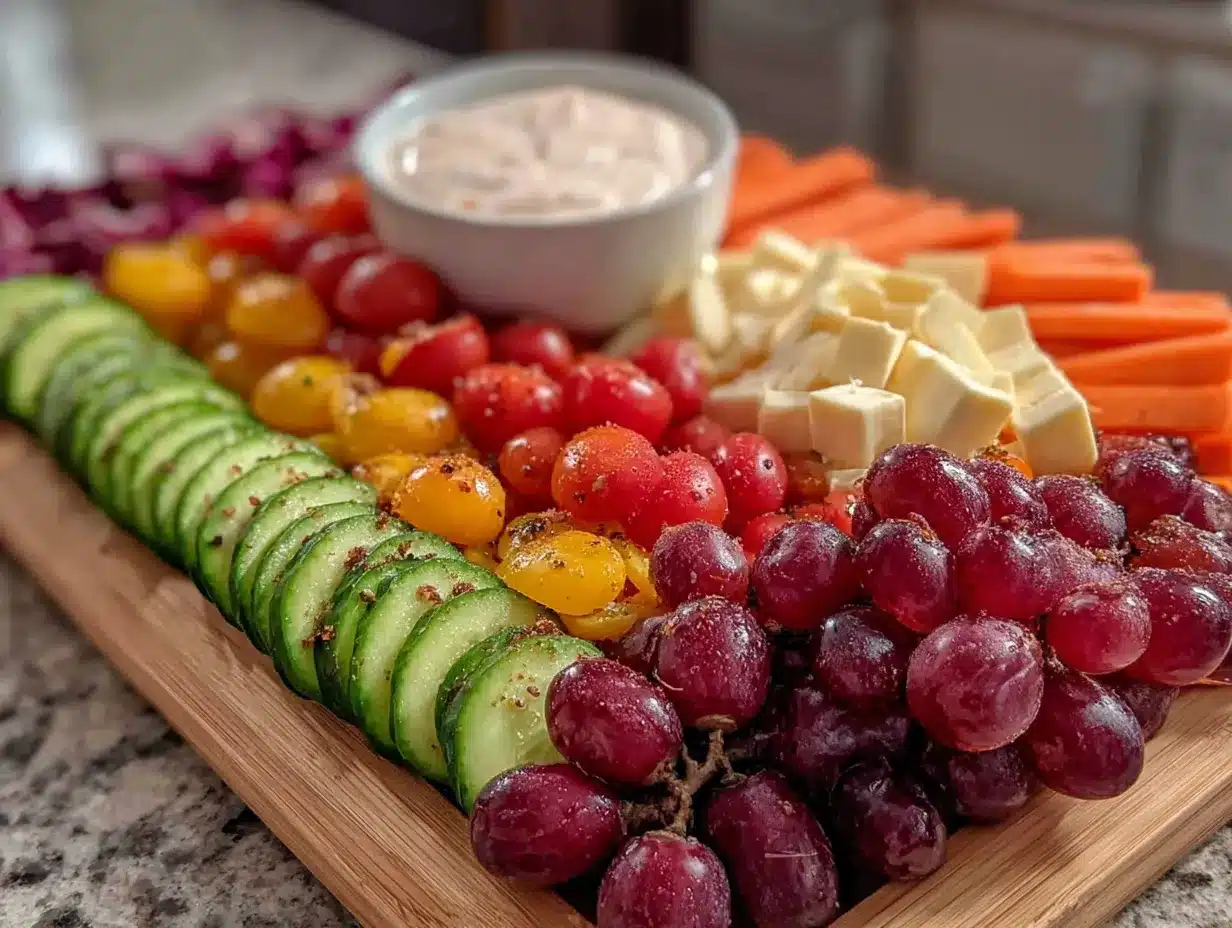
Let’s get to the fun part. This takes about 15 minutes from start to finish, and I’ll walk you through every step. The key is to prep all your veggies first, then arrange them.
- Wash all vegetables: Rinse the bell peppers, tomatoes, cucumber, carrots, and any other veggies under cold water. Pat them dry with a clean towel. Wet veggies make the board soggy, so dry them well.
- Prep the red veggies: Halve the cherry tomatoes. Slice the red bell pepper into thin strips, about ½ inch wide. If using radishes, slice them into thin rounds. Set aside in a small bowl.
- Prep the orange veggies: Peel the carrots, then cut them into 3-inch sticks, about ½ inch thick. If using orange bell pepper, slice into strips. Set aside.
- Prep the yellow veggies: Slice the yellow bell pepper into strips. If using yellow cherry tomatoes, halve them. Set aside.
- Prep the green veggies: Slice the cucumber into rounds, about ¼ inch thick. Cut broccoli into small florets. If using snap peas, leave them whole. Set aside.
- Prep the blue/purple veggies: Thinly slice the purple cabbage into ribbons. If using purple carrots, cut into sticks. Set aside.
- Cut the cheese: Cube the cheddar into ½-inch pieces. Keep mozzarella pearls whole. If using pepper jack, cube it the same size as the cheddar. Set aside.
- Arrange the rainbow: Start at the top left of your board. Place the red veggies in a row, slightly overlapping. Below them, add the orange veggies. Continue with yellow, green, and then blue/purple at the bottom right. The goal is a gradient effect.
- Add the cheese: Scatter the cheese cubes throughout the board, tucking them between the veggie rows. Don’t overcrowd—you want each color to still be visible.
- Place the dip: If using dip, put it in a small bowl and set it in the center or at one end of the board. This gives guests a focal point.
- Final touch: Step back and look at your board. Rearrange any colors that look messy. The visual appeal is what makes this special, so take an extra minute to adjust.
One tip I learned after my first attempt: don’t overthink the arrangement. It doesn’t have to be perfect—just close enough to a rainbow that people get the idea. The first time I made this, I put the purple in the wrong spot and no one cared. They just ate it. Also, if you’re short on time, you can prep the veggies up to a day ahead and store them in separate bags in the fridge. Just arrange them right before serving.
Cooking Tips & Techniques
I’ve made this Easy Rainbow Veggie and Cheese Snack Tray at least a dozen times, and I’ve learned a few things the hard way. Here are my best tips:
- Cut uniform sizes: This is the biggest game-changer. If your carrot sticks are twice as thick as your cucumber slices, the board looks uneven. Aim for similar thickness across all veggies—about ¼ to ½ inch. It makes the rainbow effect much cleaner.
- Don’t skip the drying step: I once washed my veggies and arranged them while they were still wet. The board turned into a puddle within 20 minutes. Pat everything dry with paper towels, especially tomatoes and cucumbers.
- Use a mix of textures: Combine crunchy veggies like carrots with softer ones like tomatoes. The variety keeps people coming back for more. I also like to include something juicy, like cucumber, for contrast.
- Keep cheese separate until serving: If you’re prepping ahead, store the cheese in a separate container in the fridge. Cheese can make the veggies soggy if they sit together too long. Add the cheese right before serving.
- Make it interactive: For kids, I sometimes arrange the veggies in actual rainbow arcs instead of straight rows. They love picking out each color. It turns snack time into a game.
One failure I’ll admit: I once used pre-shredded cheese because I was lazy. It looked terrible. Cubing your own cheese is worth the extra two minutes. The cubes hold their shape and look more intentional on the board. Also, if you’re serving this at a party, set it out about 15 minutes before guests arrive so the cheese comes to room temperature—it tastes better that way.
Variations & Adaptations
This recipe is endlessly adaptable. Here are some variations I’ve tried and loved:
- Dietary Adaptation (Vegan): Skip the cheese and add marinated artichoke hearts, olives, or roasted chickpeas for protein. The veggies are already plant-based, so it’s an easy swap. I’ve served this at a vegan potluck and it was a hit.
- Seasonal Variation (Summer): Add fresh berries like strawberries or blueberries to the rainbow. They add sweetness and a pop of color. In summer, I also use heirloom tomatoes in different colors for the red and yellow sections.
- Flavor Variation (Spicy): Swap the cheddar for pepper jack cheese and add jalapeño slices to the green section. The heat contrasts nicely with the cool cucumber. My husband loves this version for game days.
- Kid-Friendly Adaptation: Use cookie cutters to cut the cheese into fun shapes like stars or animals. I’ve done this for my daughter’s playdates and the kids go crazy for it. Also, add a small bowl of their favorite dip, like ketchup or ranch.
- Low-Carb Adaptation: Replace carrots with more cucumber and bell peppers. Add celery sticks and radishes for crunch. This version is keto-friendly and still colorful.
I personally love the spicy variation—it’s unexpected and keeps things interesting. The pepper jack cheese melts slightly at room temperature, which is a nice contrast to the cold veggies. Just be careful with the jalapeños if you’re serving kids.
Serving & Storage Suggestions
This snack tray is best served cold or at room temperature. I usually take it out of the fridge about 15 minutes before serving to let the cheese soften slightly. For presentation, I like to place the board in the center of the table with small plates and napkins nearby. It’s a grab-and-go style appetizer, so no utensils needed.
For complementary dishes, this pairs beautifully with a simple pasta salad, grilled chicken skewers, or a bowl of soup. The freshness of the veggies balances heavier dishes. For drinks, a crisp white wine or a light beer works well for adults. For kids, lemonade or sparkling water is perfect.
Storage is straightforward. If you have leftovers, separate the veggies from the cheese and store them in airtight containers in the fridge. The veggies will stay fresh for up to 2 days, but the cheese is best eaten within 3 days. I don’t recommend freezing this—the veggies will turn mushy when thawed.
For reheating, you don’t really need to. Just let the leftovers come to room temperature for about 10 minutes before eating. The flavors actually develop a bit overnight—the veggies marinate slightly in their own juices, making them even tastier. I’ve snacked on leftovers the next day and they were just as good.
Nutritional Information & Benefits
Here’s an approximate breakdown per serving (based on 8 servings, with cheese and veggies):
| Nutrient | Amount Per Serving |
|---|---|
| Calories | 180 |
| Protein | 8g |
| Fat | 12g |
| Carbohydrates | 12g |
| Fiber | 4g |
| Sugar | 6g |
| Sodium | 280mg |
The health benefits here are solid. Bell peppers are packed with vitamin C—one red bell pepper has more than an orange. Carrots are great for eye health thanks to beta-carotene. Cucumbers are hydrating and low in calories. The cheese adds calcium and protein, making this a balanced snack. It’s naturally gluten-free and can be made dairy-free by skipping the cheese. The only potential allergen is dairy from the cheese, so just be mindful if you’re serving someone with a lactose intolerance. Honestly, this is one of those rare snacks that feels indulgent but is actually good for you.
Conclusion
So there you have it—my Easy Rainbow Veggie and Cheese Snack Tray that started as a panic move and became a party staple. It’s proof that you don’t need a complicated recipe or hours in the kitchen to make something people genuinely love. The colors make it fun, the crunch makes it satisfying, and the simplicity makes it stress-free. I hope you give it a try, whether it’s for a birthday party, a lazy afternoon snack, or just to brighten up your kitchen table.
Customize it however you want—swap in your favorite veggies, try different cheeses, or add a dip that speaks to you. That’s the beauty of this recipe. It’s a template, not a rulebook. I’d love to hear how it turns out for you. Drop a comment below and tell me your favorite veggie combo, or share a photo of your rainbow board. And if you’ve got a party coming up, this is your sign to keep it simple. You’ve got this.
Frequently Asked Questions
Can I make this snack tray ahead of time?
Yes, you can prep the veggies up to 24 hours in advance. Just store them in separate airtight bags in the fridge. Add the cheese and arrange everything on the board right before serving to keep it fresh and crisp.
What if I don’t have all the rainbow colors?
No worries! Use whatever veggies you have. Even three or four colors look beautiful. The key is to arrange them in a gradient order, even if it’s a shorter rainbow. I’ve made it with just red, yellow, and green and it still looked great.
Can I use pre-cut vegetables from the store?
Absolutely, but they won’t be as fresh. Pre-cut veggies tend to be drier and less crunchy. If you’re short on time, they work in a pinch. Just make sure to pat them dry before arranging to avoid a soggy board.
How do I keep the veggies from drying out?
Cover the board loosely with plastic wrap if you’re not serving it immediately. For longer storage, keep the veggies in sealed bags in the fridge until you’re ready to arrange them. The moisture from the veggies themselves will keep them crisp for a few hours.
What dips go best with this snack tray?
Ranch dressing is a classic choice, but hummus, tzatziki, or a simple yogurt herb dip work wonderfully. For a healthier option, try a balsamic vinaigrette or a tahini-based sauce. I personally love a garlic herb yogurt dip—it complements the fresh veggies perfectly.
Pin This Recipe!
Easy Rainbow Veggie and Cheese Snack Tray: Best Fun Party Appetizer
A colorful, no-cook snack tray that comes together in under 15 minutes. Perfect for parties, playdates, or a healthy after-school snack, this rainbow arrangement of fresh veggies and cheese cubes is as visually stunning as it is delicious.
- Prep Time: 15 minutes
- Cook Time: 0 minutes
- Total Time: 15 minutes
- Yield: 8 servings 1x
- Category: Appetizer
- Cuisine: American
Ingredients
- 1 cup cherry tomatoes, halved if large
- 1 red bell pepper, sliced into strips
- 1 cup carrot sticks (about 3-inch pieces)
- 1 orange bell pepper, sliced into strips (optional)
- 1 yellow bell pepper, sliced into strips
- 1 cup cucumber rounds (about ¼-inch thick)
- 1 cup broccoli florets
- 1 cup snap peas
- 1 cup purple cabbage, thinly sliced
- 8 ounces sharp cheddar cheese, cubed (½-inch pieces)
- 4 ounces mozzarella pearls
- 4 ounces pepper jack cheese, cubed (optional)
- Ranch dressing, hummus, or yogurt-based herb dip (optional)
Instructions
- Wash all vegetables under cold water and pat dry thoroughly.
- Halve cherry tomatoes; slice red bell pepper into ½-inch strips.
- Peel carrots and cut into 3-inch sticks, about ½-inch thick. Slice orange bell pepper into strips if using.
- Slice yellow bell pepper into strips.
- Slice cucumber into ¼-inch rounds; cut broccoli into small florets; leave snap peas whole.
- Thinly slice purple cabbage into ribbons.
- Cube cheddar and pepper jack into ½-inch pieces; keep mozzarella pearls whole.
- Arrange veggies on a large board in rainbow order: red (top left), orange, yellow, green, blue/purple (bottom right), slightly overlapping for a gradient effect.
- Scatter cheese cubes throughout the board, tucking between veggie rows.
- Place dip in a small bowl and set in the center or at one end of the board.
- Step back and adjust any messy areas for visual appeal.
Notes
Prep veggies up to 24 hours ahead and store in separate bags in the fridge. Add cheese just before serving to prevent sogginess. For a vegan version, skip the cheese and add marinated artichoke hearts, olives, or roasted chickpeas. For a spicy twist, use pepper jack cheese and add jalapeño slices. Cut veggies into uniform sizes (¼ to ½ inch) for a cleaner rainbow effect. Pat veggies dry thoroughly to avoid a soggy board.
Nutrition
- Serving Size: 1 serving (about 1 c
- Calories: 180
- Sugar: 6
- Sodium: 280
- Fat: 12
- Saturated Fat: 7
- Carbohydrates: 12
- Fiber: 4
- Protein: 8
Keywords: rainbow veggie tray, veggie and cheese platter, easy party appetizer, healthy snack, no-cook appetizer, colorful snack board


