I was standing in the middle of the party supply aisle last November—you know the one, where the glittery Thanksgiving napkins hang right next to the plastic turkey centerpieces—when a bag of pretzel sticks tumbled off the shelf and landed at my feet. And just like that, I was eight years old again, sitting cross-legged on Aunt Carol’s shag carpet, watching her arrange cheese cubes into the shape of a Christmas tree. She passed away three years ago, and I’d spent every holiday since trying to figure out what made her snack boards so magical. It wasn’t the fancy cheese—it was the way she let us kids build our own little sections, like we were architects of our own dinner. I grabbed that bag of pretzels off the floor, and I knew exactly what I needed to make for this year’s Friendsgiving. Honestly, I think I heard her laugh from somewhere. Maybe you’ve had that moment where a random grocery store aisle suddenly feels like a time machine.
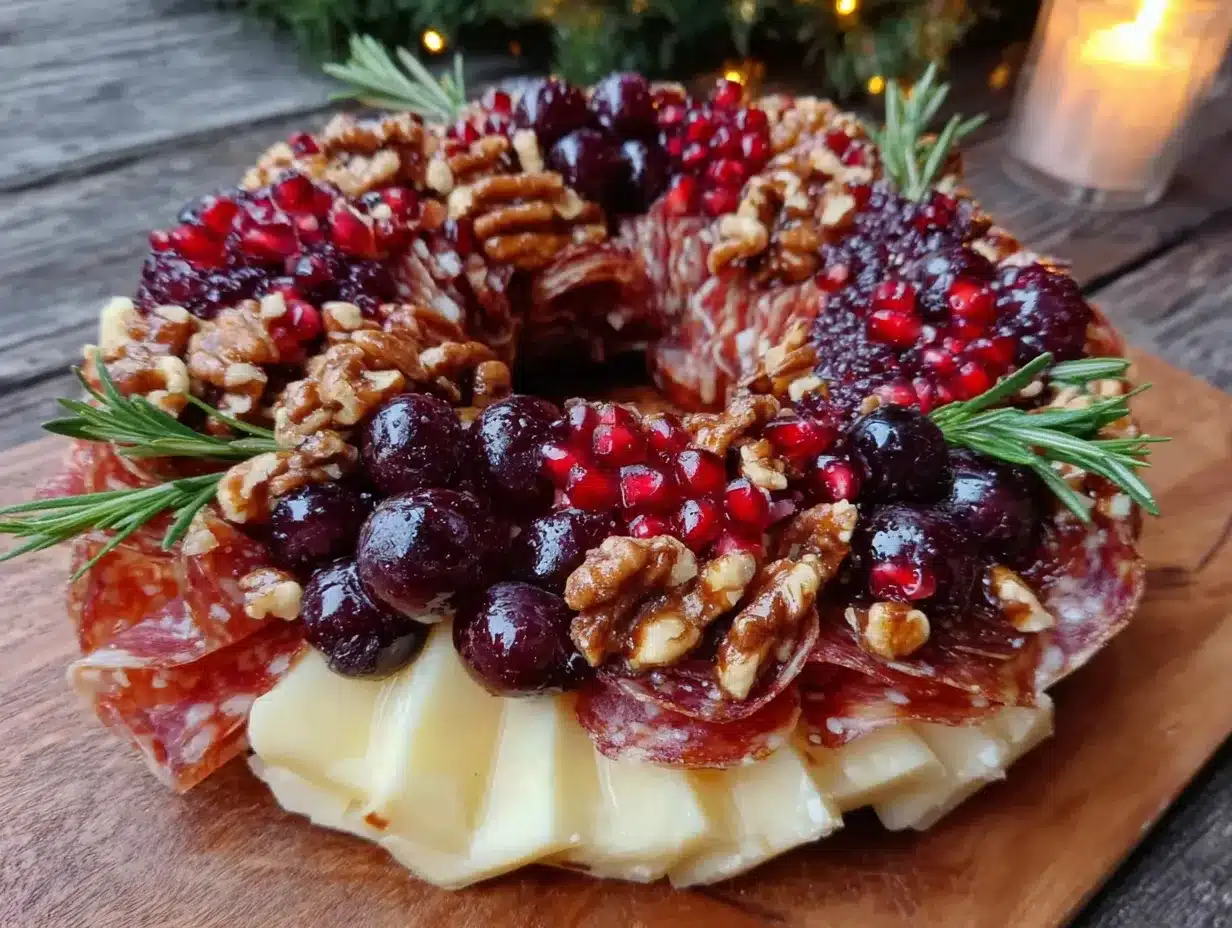
This Kid-Friendly Friendsgiving Charcuterie Wreath Board is my attempt to bottle that feeling. It’s not just a pretty centerpiece—it’s a hands-on activity that gets even the pickiest eaters excited about the dinner table. I’ve tested this with my own crew, and let me tell you, watching a five-year-old carefully place a grape next to a cheese cube is pure magic. It’s the kind of recipe that makes you feel like a holiday hero without spending all day in the kitchen.
Why You’ll Love This Recipe
Let’s be real for a second—Friendsgiving can get stressful when you’re feeding a mix of adults and tiny humans. This board solves that problem before it starts. Here’s why it’s become my go-to for every November gathering:
- Kid-Approved Design: The wreath shape makes it feel like a craft project, not a grown-up snack table. Kids actually want to eat from it because they helped build it.
- Budget-Friendly Ingredients: No fancy imported cheeses or pricey cured meats here. We’re using affordable, easy-to-find items that won’t blow your grocery budget.
- 30-Minute Assembly: From fridge to table in half an hour. I’ve timed it. You can absolutely do this while your kids are watching their morning cartoons.
- Picky Eater Approved: The individual sections mean kids can grab what they recognize. My nephew who only eats goldfish crackers? He found his happy place here.
- Leftovers That Reheat Well: Okay, not the grapes. But the meats, cheeses, and crackers? Perfect for lunch boxes the next day.
This isn’t just another charcuterie board you’ve seen on Pinterest. I’ve tweaked the layout so little hands can reach everything without knocking over the whole arrangement. The wreath shape creates natural compartments that keep foods separated—no more cheese touching the grapes drama. Plus, it’s designed to feed a crowd without needing constant refills. I’ve brought this to three different Friendsgiving gatherings now, and every single time, someone asks for the recipe before the first cup of cider is empty.
There’s something about gathering around a wreath-shaped board that makes people slow down. Kids point, grab, and giggle. Adults sneak bites while pretending to arrange things. It turns a regular dinner into a memory, and honestly, that’s what Friendsgiving is really about.
What Ingredients You Will Need
This recipe uses simple, everyday ingredients that you can find at any grocery store. I’ve kept it budget-friendly because feeding a crowd shouldn’t cost a fortune. Here’s what you’ll need to build your wreath:
For the Base
- 1 large round wooden cutting board or serving platter (12-16 inches in diameter) — I use a thrifted cheese board I found for $4
- Fresh rosemary sprigs (about 6-8 sprigs) — these create the “wreath” greenery look
- Fresh cranberries (½ cup) — for pops of red color between sections
For the Cheese Section
- 8 ounces cheddar cheese, cut into small cubes (about 1-inch) — I prefer sharp cheddar for flavor, but mild works great for kids
- 8 ounces mozzarella pearls or small fresh mozzarella balls — these are perfect for little fingers
- 4 ounces cream cheese, softened — you can spread this on crackers or pretzels
For the Meat Section
- 8 ounces turkey pepperoni — lower in fat than regular pepperoni, and kids love the shape
- 8 ounces ham slices, rolled into small pinwheels — I get the pre-sliced deli ham for convenience
- 6 ounces salami, cut into bite-sized strips or small rounds
For the Fruits and Veggies
- 1 cup red grapes, washed and separated into small clusters
- 1 cup green grapes, washed and separated
- 1 cup baby carrots — these add crunch and color
- 1 cup cherry tomatoes — halved if serving very small children
- ½ cup dried apricots or dried cranberries — for a sweet, chewy option
For the Crunchy Section
- 2 cups pretzel sticks — the classic stick shape works best for the wreath design
- 1 cup cheese crackers (like Goldfish or cheddar bunnies) — total kid-pleaser
- 1 cup mini rice cakes or plain crackers — for a lighter option
Optional Add-Ins
- ¼ cup sunflower seeds — for extra crunch (check for allergies first)
- Dark chocolate chips (½ cup) — a surprise sweet spot in the middle
- Small cookies (like animal crackers or mini gingerbread) — for a festive touch
I recommend using store-brand items for most of this—honestly, kids can’t tell the difference between name-brand cheddar and the generic block. For the cream cheese, Philadelphia works best for spreading, but any brand will do. If you’re feeding toddlers, cut the cherry tomatoes and grapes into quarters to prevent choking hazards. And here’s a tip I learned the hard way: don’t wash the grapes until right before you assemble, or they’ll make the crackers soggy.
Equipment Needed
You don’t need fancy tools for this board. Here’s what I use every time:
- Large round wooden cutting board or platter (12-16 inches) — a pizza pan works in a pinch
- Small bowls or ramekins (2-3) — for the cream cheese, chocolate chips, or any dip you want to add
- Cheese knife or small spreader — for the cream cheese
- Tongs — for serving, though kids usually use their hands
- Paper towels — for patting grapes and tomatoes dry
I’ve made this on a rectangular baking sheet when I couldn’t find my round board, and it worked fine. The shape just won’t be as wreath-like. If you don’t have a cheese knife, a butter knife does the job. Honestly, the most important tool is a hungry group of kids and adults ready to dig in.
Preparation Method
Here’s how to build your Kid-Friendly Friendsgiving Charcuterie Wreath Board. I’ve broken it down into simple steps so you can even have the kids help:
- Prep your ingredients (10 minutes): Wash and dry all fruits and vegetables. Pat them completely dry with paper towels—wet grapes make everything slide around. Cut the cheddar cheese into 1-inch cubes. Roll the ham slices into tight pinwheels and secure with a toothpick if needed. Slice the salami into bite-sized strips. Set everything in separate bowls so assembly goes faster.
- Create the wreath base (5 minutes): Place your cutting board on a flat surface. Arrange the fresh rosemary sprigs in a circular ring around the outer edge of the board, leaving the center empty. The rosemary should look like a green wreath frame. Tuck a few cranberries between the rosemary sprigs for color—this is a great job for little helpers.
- Build the cheese section (5 minutes): Starting at the top of the wreath, create a cluster of cheddar cubes and mozzarella pearls. Arrange them in a small pile, leaving space between each piece so kids can grab them easily. Place the softened cream cheese in a small ramekin or directly on the board in its own little spot. I like to put the cream cheese near the pretzels because they’re perfect for dipping.
- Add the meat section (5 minutes): To the right of the cheese, create a cluster of turkey pepperoni, ham pinwheels, and salami strips. Arrange them in a fan pattern or small piles. The pepperoni circles are especially fun for kids to pick up—they look like tiny coins.
- Fill in the fruits and veggies (5 minutes): Around the wreath, create small clusters of red grapes, green grapes, baby carrots, and cherry tomatoes. Space them out so there’s a variety in every section. I like to put the grapes near the cheese because they pair well together. The carrots add a nice crunch and bright orange color that pops against the green rosemary.
- Add the crunchy section (5 minutes): Fill in the remaining gaps with pretzel sticks, cheese crackers, and mini rice cakes. Arrange the pretzel sticks in a small bundle, sticking up slightly, so they look like little logs in a campfire. The cheese crackers can be scattered around for easy grabbing.
- Finish with optional add-ins (2 minutes): Place the sunflower seeds in a small ramekin or scatter them in a tiny pile. Add the dark chocolate chips in their own cluster—I put them near the pretzels for a sweet-and-salty combo. If you’re using cookies, arrange them artfully on the edge of the board.
- Fill the center (3 minutes): The middle of the wreath should be empty, but you can place a small bowl of dip (like ranch dressing or honey mustard) or a cluster of extra grapes and cheese cubes. I sometimes put a small candle in the center for a festive touch—just make sure it’s out of reach of little hands.
- Final check (2 minutes): Step back and look at your wreath. Are there any empty spots? Fill them with extra cranberries or a few more crackers. Make sure the colors are balanced—red, green, orange, yellow, and brown should all be visible. The board should look full and abundant, like a holiday feast.
Here’s a tip I learned from my third attempt: don’t overthink the arrangement. Kids don’t care if the cheese cubes are perfectly spaced. They care that there’s food they can grab and eat. If something falls over, just push it back into place. The wreath shape is forgiving, and honestly, the slightly messy boards look more inviting anyway.
Cooking Tips & Techniques
I’ve made this board about a dozen times now, and I’ve picked up a few tricks along the way. Here’s what I wish someone had told me:
Don’t assemble too early. I made the mistake of building the whole board two hours before guests arrived. The crackers got soft, the grapes leaked juice, and the rosemary started wilting. Now I assemble no more than 30 minutes before serving. If you need to prep ahead, chop everything and store it in separate containers in the fridge. Assemble right before people arrive.
Use the rosemary strategically. Fresh rosemary is sturdy and smells amazing, but it can be prickly. I place it around the outer edge where kids are less likely to grab it directly. If you’re serving very young children, you can use edible flowers or kale leaves instead—they’re softer and still look festive.
Keep the board at room temperature. Cheese and meats taste better when they’re not ice-cold. Take everything out of the fridge 15-20 minutes before assembling. The cream cheese spreads much easier when it’s softened. Just don’t leave it out longer than two hours for food safety.
Double up on kid favorites. I learned this the hard way at my first Friendsgiving. The goldfish crackers disappeared in five minutes while the dried apricots sat untouched. Now I make sure to include extra portions of the most popular items. If your kids love pepperoni, buy two bags. Trust me on this.
Use toothpicks for small items. For the ham pinwheels and salami strips, a toothpick makes them easier to grab. Plus, kids think food on a stick is automatically more fun. Just be careful with toddlers—remove the toothpicks before serving to little ones.
Variations & Adaptations
This board is incredibly flexible. Here are some ways to make it your own:
Dietary Variations
- Gluten-Free: Use gluten-free pretzels, rice cakes, and crackers. Most cheeses and meats are naturally gluten-free, just check the labels on processed items.
- Dairy-Free: Swap the cheese for dairy-free alternatives (violife makes great cheddar-style cubes). Use hummus or guacamole instead of cream cheese.
- Nut-Free: Skip the sunflower seeds if there are allergies. Most of this board is naturally nut-free, which is great for school events.
Seasonal Twists
- Fall Friendsgiving: Add mini pumpkin-shaped crackers, dried apple rings, and cinnamon-spiced almonds.
- Winter Holiday: Use star-shaped cookie cutters to cut cheese into holiday shapes. Add candy canes broken into pieces for a sweet crunch.
- Spring Celebration: Swap the rosemary for fresh mint or basil. Add strawberries and cucumber slices for a lighter feel.
Flavor Customizations
- Spicy Section: Add jalapeño cheddar cubes or spicy salami for the adults. Keep it separate from the kid-friendly sections.
- Sweet Tooth: Create a dedicated dessert section with chocolate-covered pretzels, marshmallows, and mini cookies.
- Savory Lovers: Include olives, pickles, and roasted red pepper strips for a tangy kick.
I once made a Halloween version with orange cheddar, black olive “spiders,” and pretzel “broomsticks.” The kids went absolutely wild for it. Don’t be afraid to get creative—the wreath shape works with almost any theme.
Serving & Storage Suggestions
This board is best served at room temperature, right after assembly. Here’s how to make the most of it:
Serving Tips: Place the board in the center of your table so everyone can reach. I like to put it on a lazy Susan so kids can spin it to find their favorite foods. Provide small plates and napkins—trust me, you’ll need them. For drinks, apple cider or sparkling water pairs beautifully with the savory and sweet flavors.
Storage: If you have leftovers (which is rare in my house), separate the components into airtight containers. The cheese and meats will keep in the fridge for 3-4 days. The grapes and cherry tomatoes should be eaten within 2 days. Crackers and pretzels can be stored in a ziplock bag at room temperature for up to a week.
Reheating: You don’t really reheat a charcuterie board, but the cream cheese spreads better if you let it sit at room temperature for 10 minutes. The ham and salami are fine cold—they actually taste better that way. If you want to repurpose leftovers, chop the cheese and meats into a lunchbox snack or toss them into a salad.
Flavor Development: Here’s a little secret—the cheese and meats actually taste better the next day. The flavors meld together in the fridge, and the cheddar gets a little sharper. I’ve been known to save a small container of “board leftovers” just for my lunch the next day.
Nutritional Information & Benefits
This board is designed to be balanced and satisfying. Here’s a rough estimate per serving (assuming 8 servings):
- Calories: Approximately 350-400 per serving
- Protein: 15-20 grams (from cheese and meats)
- Carbohydrates: 25-30 grams (from fruits, crackers, and pretzels)
- Fat: 20-25 grams (mostly from cheese and meats)
- Fiber: 3-5 grams (from grapes, carrots, and dried fruit)
Health Benefits: The cheese provides calcium and protein for growing bodies. Grapes and carrots offer vitamins A and C. The whole-grain crackers (if you choose them) add fiber. Even the pretzels provide quick energy for active kids. It’s not a health food, but it’s a balanced snack that beats processed party fare.
Dietary Considerations: This board contains dairy, gluten (from crackers and pretzels), and potential allergens. Check labels if serving at a school or daycare event. You can easily make it gluten-free or dairy-free with substitutions.
Allergen Note: The sunflower seeds and some crackers may contain traces of nuts. Always check packaging and ask guests about allergies before serving.
Conclusion
This Kid-Friendly Friendsgiving Charcuterie Wreath Board has become a tradition in my house, and I hope it becomes one in yours too. It’s the kind of recipe that brings people together—literally, around a table, reaching for the same grapes and laughing about who grabbed the last cheese cube. It’s not fancy or complicated, but it’s full of heart.
I love this recipe because it reminds me of Aunt Carol’s shag carpet and her belief that food should be fun. She never used a recipe for her snack boards—she just threw together whatever she had and let us kids arrange it however we wanted. That’s the spirit I try to capture here. Don’t stress about perfection. Let your kids help. Let them eat the pepperoni before dinner. That’s what Friendsgiving is all about.
I’d love to hear how your wreath turns out! Leave a comment below with your favorite addition or a photo of your board. Tag me on Pinterest so I can see your creation—I’m always looking for new ideas. And if you have a picky eater who actually ate a grape? That’s a win worth celebrating. Happy Friendsgiving, friends.
Frequently Asked Questions
Can I make this board the night before?
I don’t recommend assembling the full board more than 30 minutes before serving. The crackers get soft and the grapes can make everything soggy. But you can absolutely prep all the ingredients the night before—wash and dry the fruit, cut the cheese, roll the ham pinwheels—and store them in separate containers in the fridge. Assemble right before your guests arrive for the best texture and presentation.
How do I keep the wreath shape intact?
The rosemary sprigs are your best friend here. Arrange them in a circular ring first, then build your ingredient clusters around them. The rosemary acts like a natural barrier that keeps the wreath shape visible even after people start grabbing food. If you don’t have rosemary, you can use kale leaves or even a ring of small lettuce leaves.
What if my kids are really picky eaters?
This board is designed with picky eaters in mind! The individual sections mean kids can grab only what they recognize. I recommend including at least two or three items you know they already love—whether that’s cheese crackers, grapes, or plain ham. Let them help arrange their own section of the board. When kids feel involved, they’re more likely to try new things.
Can I use this for a classroom party or school event?
Absolutely! Just be mindful of food allergies. Check with the teacher or event organizer about any restrictions before you start. I recommend skipping the sunflower seeds and checking that all crackers and pretzels are nut-free. You can also make a smaller version on a paper plate for individual servings—kids love having their own mini wreath.
How do I transport this board without everything sliding around?
I learned this one the hard way after a car ride disaster. Assemble the board on a large, flat tray with raised edges. If you’re driving, place a damp paper towel under the board to keep it from sliding. Cover the whole thing with plastic wrap, pressing it gently against the food to keep everything in place. Re-fluff the arrangement when you arrive—it takes about two minutes to fix any shifted items.
Pin This Recipe!
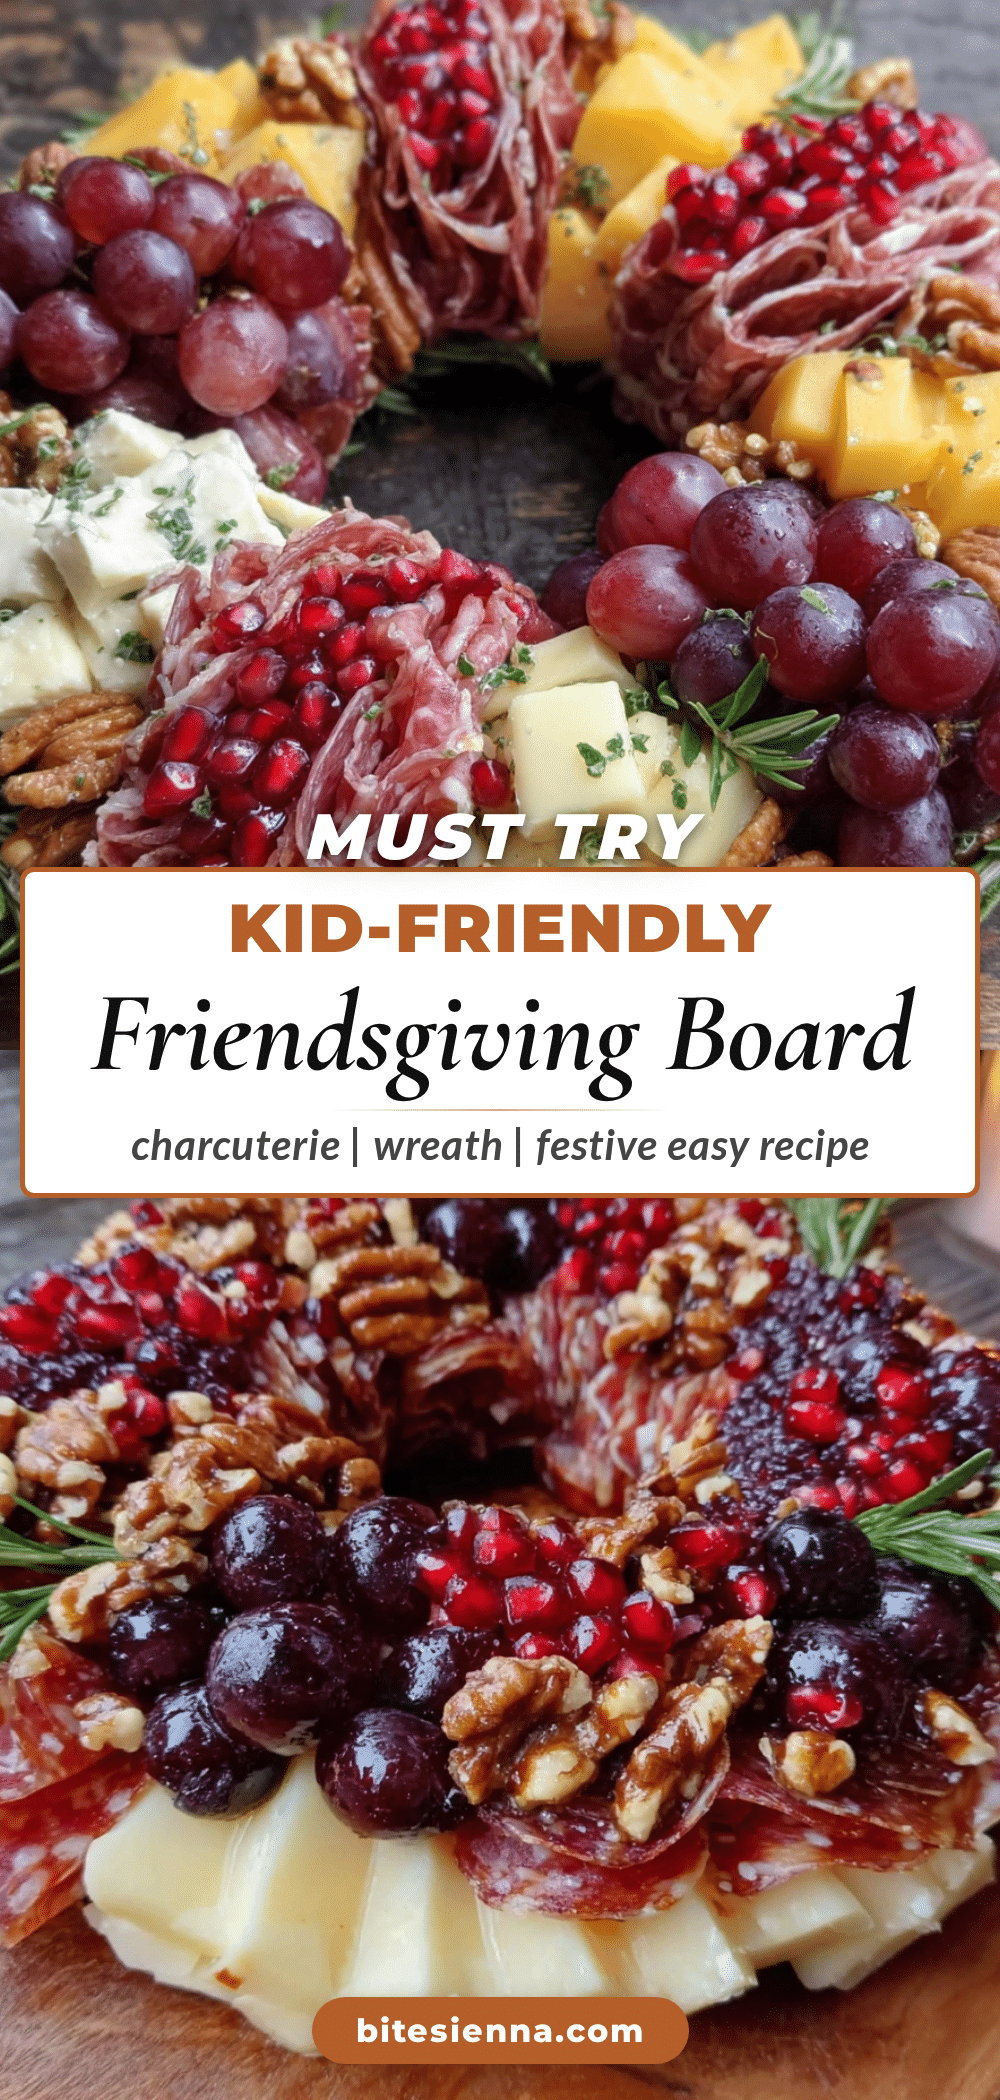
Kid-Friendly Friendsgiving Charcuterie Wreath Board
A fun, hands-on charcuterie board shaped like a wreath, perfect for Friendsgiving gatherings with kids. It features simple, budget-friendly ingredients and a 30-minute assembly time.
- Prep Time: 10 minutes
- Cook Time: 0 minutes
- Total Time: 30 minutes
- Yield: 8 servings 1x
- Category: Appetizer
- Cuisine: American
Ingredients
- 1 large round wooden cutting board or serving platter (12–16 inches in diameter)
- 6–8 fresh rosemary sprigs
- ½ cup fresh cranberries
- 8 ounces cheddar cheese, cut into 1-inch cubes
- 8 ounces mozzarella pearls or small fresh mozzarella balls
- 4 ounces cream cheese, softened
- 8 ounces turkey pepperoni
- 8 ounces ham slices, rolled into small pinwheels
- 6 ounces salami, cut into bite-sized strips or small rounds
- 1 cup red grapes, washed and separated into small clusters
- 1 cup green grapes, washed and separated
- 1 cup baby carrots
- 1 cup cherry tomatoes, halved if serving very small children
- ½ cup dried apricots or dried cranberries
- 2 cups pretzel sticks
- 1 cup cheese crackers (like Goldfish or cheddar bunnies)
- 1 cup mini rice cakes or plain crackers
- ¼ cup sunflower seeds (optional)
- ½ cup dark chocolate chips (optional)
- Small cookies like animal crackers or mini gingerbread (optional)
Instructions
- Prep your ingredients (10 minutes): Wash and dry all fruits and vegetables. Pat them completely dry with paper towels. Cut the cheddar cheese into 1-inch cubes. Roll the ham slices into tight pinwheels and secure with a toothpick if needed. Slice the salami into bite-sized strips. Set everything in separate bowls.
- Create the wreath base (5 minutes): Place your cutting board on a flat surface. Arrange the fresh rosemary sprigs in a circular ring around the outer edge of the board, leaving the center empty. Tuck a few cranberries between the rosemary sprigs for color.
- Build the cheese section (5 minutes): Starting at the top of the wreath, create a cluster of cheddar cubes and mozzarella pearls. Arrange them in a small pile, leaving space between each piece. Place the softened cream cheese in a small ramekin or directly on the board in its own little spot.
- Add the meat section (5 minutes): To the right of the cheese, create a cluster of turkey pepperoni, ham pinwheels, and salami strips. Arrange them in a fan pattern or small piles.
- Fill in the fruits and veggies (5 minutes): Around the wreath, create small clusters of red grapes, green grapes, baby carrots, and cherry tomatoes. Space them out so there’s a variety in every section.
- Add the crunchy section (5 minutes): Fill in the remaining gaps with pretzel sticks, cheese crackers, and mini rice cakes. Arrange the pretzel sticks in a small bundle, sticking up slightly.
- Finish with optional add-ins (2 minutes): Place the sunflower seeds in a small ramekin or scatter them in a tiny pile. Add the dark chocolate chips in their own cluster. If using cookies, arrange them artfully on the edge of the board.
- Fill the center (3 minutes): The middle of the wreath should be empty, but you can place a small bowl of dip (like ranch dressing or honey mustard) or a cluster of extra grapes and cheese cubes. Optionally, place a small candle in the center (out of reach of children).
- Final check (2 minutes): Step back and look at your wreath. Fill any empty spots with extra cranberries or a few more crackers. Ensure colors are balanced—red, green, orange, yellow, and brown should all be visible.
Notes
Assemble no more than 30 minutes before serving to prevent crackers from getting soft. Use rosemary strategically around the outer edge to avoid prickles for young children. Keep the board at room temperature for best flavor. Double up on kid favorites like goldfish crackers. Use toothpicks for small items but remove for toddlers.
Nutrition
- Serving Size: 1 serving (approxima
- Calories: 375
- Sugar: 15
- Sodium: 800
- Fat: 22
- Saturated Fat: 10
- Carbohydrates: 28
- Fiber: 4
- Protein: 18
Keywords: charcuterie board, Friendsgiving, kid-friendly, wreath, appetizer, holiday, party snack


