I had claimed to hate candy corn for years. Like, a solid decade of wrinkling my nose at it every October, making sure everyone knew I was “too good” for those waxy little triangles. Then last Halloween, I found my husband standing over the kitchen counter at 11 p.m., eating pieces of this Candy Corn Layered Sugar Cookie Bark straight off the parchment paper. He wasn’t even using his hands — just bending over and biting into it like some kind of raccoon. And the thing is, he’s the one who swore candy corn was “inedible garbage” back when we first started dating. I don’t know who made it first or why, but that moment of catching him in the act changed everything for me.
Honestly, I wasn’t even trying to convert anyone. I’d picked up a bag of candy corn on a whim at the grocery store — it was on sale for like a dollar, and something about the orange and yellow just screamed “fall” to me. I thought I’d throw together a quick dessert for a neighborhood potluck, something that looked fancy but took zero effort. The sugar cookie bark base was my lazy shortcut, and the candy corn was just there for decoration. But when I saw him hunched over that counter, crumbs on his shirt, muttering “this is actually really good” between bites, I knew I had stumbled onto something.
Maybe you’ve been there — you judge a food for years based on nothing but reputation, and then one version of it just hits different. That’s this bark. It’s not trying to be sophisticated or gourmet. It’s just buttery, salty-sweet, crunchy, and honestly kind of addictive. The candy corn softens just slightly as it bakes into the cookie layer, losing that weird hard snap and turning into these little chewy pockets of sweetness. I keep making it because it proves that sometimes the simplest things are the ones that surprise you most.
Why You’ll Love This Recipe
Let me tell you why this Candy Corn Layered Sugar Cookie Bark has earned a permanent spot in my fall baking rotation. I’ve tested it about six times now — yes, purely for “research purposes” — and every single batch disappeared faster than I expected. Here’s what makes it special:
- Only 3 Ingredients: You read that right. Sugar cookie dough, white chocolate chips, and candy corn. That’s it. No eggs, no butter, no fancy extracts. Your pantry probably already has everything you need.
- Ready in 30 Minutes: From start to finish, this comes together in under half an hour. Perfect for those afternoons when the kids suddenly need a class treat tomorrow morning and you haven’t even started.
- Foolproof for Beginners: If you can press dough into a pan and sprinkle things on top, you can make this. I’m not kidding. My nine-year-old nephew made it by himself last weekend.
- Budget-Friendly Fall Treat: Candy corn is cheap — like, embarrassingly cheap. This whole bark costs less than a pumpkin spice latte to make, and it feeds way more people.
- Picky Eater Approved: Even the candy corn skeptics in your house will eat this. The baking process transforms the texture completely, and the white chocolate mellows everything out.
What makes this different from other candy bark recipes is the layering technique. Instead of just melting chocolate and tossing candy on top, you actually press the candy corn into the warm cookie base. This creates these gorgeous stripes of color that run through the whole bark, not just sitting on the surface. Plus, the candy corn gets this slight toastiness from the oven that completely changes how it tastes. It’s not your childhood candy corn anymore — it’s something better.
This recipe is the kind that makes you close your eyes after the first bite. It’s comfort food in its purest form — sweet, buttery, and completely unpretentious. Perfect for Halloween parties, fall movie nights, or just a Tuesday when you need something pretty to look at while you drink your coffee.
What Ingredients You Will Need
This recipe uses three simple ingredients to create something that looks way more complicated than it actually is. Each one plays a specific role in the texture and flavor, so here’s what to look for when you’re shopping.
- 1 package (16.5 oz) refrigerated sugar cookie dough (I prefer Pillsbury for consistent results, but any brand works — just make sure it’s the slice-and-bake style, not the tub)
- 1 ½ cups white chocolate chips (I like Ghirardelli for smooth melting, but store brand works fine — just avoid “white morsels” that contain palm oil, they don’t melt as smoothly)
- 1 ½ cups candy corn (any brand, but Brach’s is the classic — look for fresh bags that aren’t rock-hard yet)
A few notes on ingredient selection. For the sugar cookie dough, I’ve tested this with both name brand and store brand, and honestly, they both work great. The key is letting it sit at room temperature for about 10 minutes before you try to press it into the pan. Cold dough is stubborn and will crack on you. If you’re feeling ambitious, you can make homemade sugar cookie dough, but the refrigerated stuff gives you that perfect soft-baked texture that works so well for bark.
White chocolate chips are non-negotiable here — don’t substitute milk chocolate or dark chocolate. The sweetness of the white chocolate balances the candy corn’s honey flavor perfectly, and the pale color lets the orange and yellow stripes pop. If you’re dairy-free, there are some good vegan white chocolate chips out there. I’ve used Enjoy Life brand before, and they melt nicely.
For the candy corn, here’s a tip I learned the hard way: check the date on the bag. Stale candy corn gets this weird, hard, almost chalky texture that doesn’t soften properly in the oven. Fresh candy corn has a slight give when you squeeze it, and it smells sweet, not like wax. If your candy corn has been sitting in the pantry since last Halloween, just buy a new bag. Trust me on this one.
You can also get creative with the candy corn varieties. I’ve tried the autumn mix with the little pumpkins and the brown-tipped pieces, and it looks gorgeous. The chocolate candy corn is good too, but it changes the color scheme a bit. For the classic orange-yellow-white look, stick with regular candy corn.
Equipment Needed
You don’t need much for this recipe, which is part of why I love it. Here’s what you’ll need to have on hand:
- 9×13 inch baking pan — standard size works perfectly; if you use a smaller pan, the bark will be thicker and need a few extra minutes in the oven
- Parchment paper — absolutely essential for easy removal; I’ve tried foil and wax paper, and nothing works as cleanly as parchment
- Rolling pin or flat-bottomed glass — for pressing the dough evenly into the pan; your hands work too, but the dough might stick
- Spatula or offset spatula — for spreading the melted white chocolate; a butter knife works in a pinch
- Microwave-safe bowl — for melting the white chocolate; glass or ceramic works best
- Cooling rack — helps the bark set up faster, but a flat surface works too
If you don’t have a rolling pin, seriously, just use a clean glass. I’ve done it plenty of times. And if you don’t have parchment paper, you can grease the pan really well with butter or cooking spray, but the bark will be harder to get out in one piece. Parchment paper is like a dollar at the grocery store — worth every penny.
Preparation Method
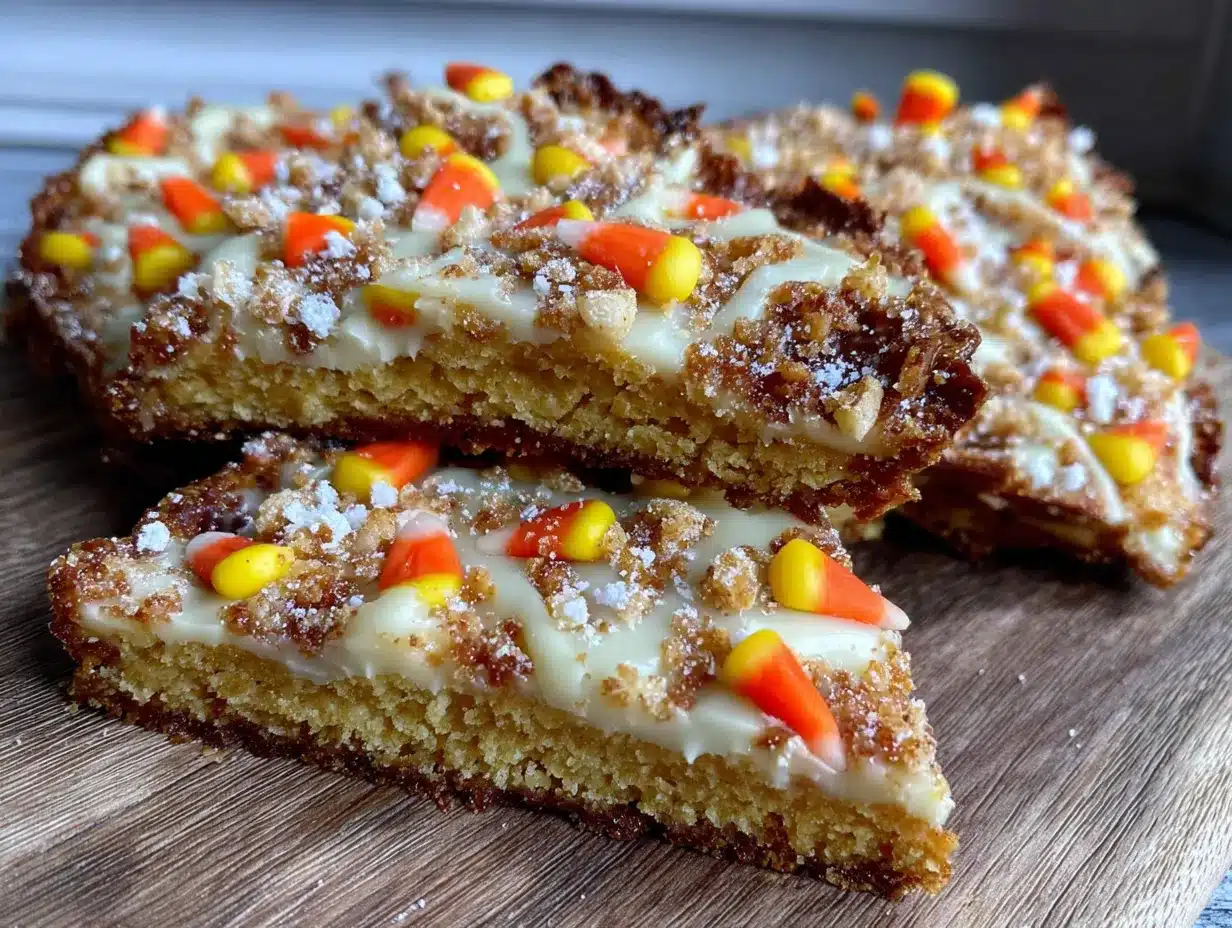
Alright, let’s get to the fun part. Here’s how to make this Candy Corn Layered Sugar Cookie Bark step by step. I’ve included all the little details that make the difference between good bark and “I can’t stop eating this” bark.
- Preheat your oven to 350°F (175°C). Line your 9×13 inch baking pan with parchment paper, leaving some overhang on the long sides. This creates little handles that make lifting the finished bark out so much easier. Press the parchment into the corners well so it stays put.
- Let the sugar cookie dough sit at room temperature for 10 minutes. I know you’re excited, but don’t skip this step. Cold dough is stiff and cracks when you try to press it. Warm dough is pliable and cooperative. While you wait, wash your hands — you’re about to get messy.
- Press the cookie dough into the prepared pan. Break the dough into pieces and scatter them evenly across the bottom of the pan. Use your fingertips to press it down, working from the center outward. The dough should be about ¼ inch thick. Don’t worry if it’s not perfectly even — rustic is part of the charm. If the dough sticks to your fingers, lightly dust them with flour.
- Bake the cookie base for 12-15 minutes. You want it golden brown around the edges but still slightly soft in the center. The center should look set but not dark. Every oven runs differently, so start checking at 12 minutes. My oven takes exactly 14 minutes — I’ve timed it.
- Remove the pan from the oven and immediately sprinkle the candy corn over the hot cookie base. Work quickly here — the residual heat will help the candy corn adhere. Distribute the pieces evenly, pressing them gently into the soft cookie with your fingertips. Don’t worry if some pieces sink a little; that’s actually what you want. The colors will create these beautiful layered stripes as the candy corn melts slightly.
- Return the pan to the oven for 2-3 more minutes. This step is crucial. The candy corn needs just enough heat to soften and meld with the cookie, but not so much that it completely melts into a puddle. You’ll know it’s ready when the candy corn looks slightly glossy and gives slightly when you touch it. Watch it carefully — candy corn can go from perfect to burnt in about 30 seconds.
- Remove the pan from the oven and let it cool on a wire rack for 10 minutes. Don’t rush this. The bark needs to cool enough that the white chocolate won’t immediately melt when you spread it on top.
- While the bark cools, melt the white chocolate chips. Place them in a microwave-safe bowl and microwave in 30-second intervals, stirring well between each interval. White chocolate burns easily, so don’t walk away. It usually takes me about 1 minute 30 seconds total. The chocolate should be smooth and glossy when you’re done. If it looks grainy, you overheated it — start over with fresh chips.
- Pour the melted white chocolate over the slightly cooled bark. Use your spatula to spread it evenly, covering the entire surface. Don’t overwork it — just smooth it out gently. The white chocolate will pick up some of the candy corn colors as you spread, creating this gorgeous marbled effect.
- Let the bark set completely. This takes about 1-2 hours at room temperature, or 30 minutes in the refrigerator. I prefer room temperature because the chocolate sets more evenly. If you’re in a hurry, the fridge works fine — just don’t leave it in there too long or the bark might absorb moisture and get sticky.
- Once set, lift the bark out of the pan using the parchment paper handles. Place it on a cutting board. Use a sharp knife to cut it into irregular pieces — think rustic bark shapes, not perfect squares. The jagged edges look more natural and honestly, they’re more fun to eat.
Cooking Tips & Techniques
After making this bark about six times in the last month, I’ve learned a few things the hard way. Here are my best tips for getting it right every time.
Don’t overbake the cookie base. This is the number one mistake I made on my first attempt. The bark should be soft and chewy, not crispy and hard. You want the edges just golden and the center still pale. Remember, it continues to cook from residual heat after you pull it out of the oven. When in doubt, underbake slightly.
Press the candy corn in while the cookie is hot. If you wait too long, the cookie cools and the candy corn just sits on top, falling off when you cut the bark. You want those little triangles embedded in the cookie layer. Work quickly and press firmly but gently — you’re not trying to bury them, just nestle them in.
Watch the white chocolate like a hawk. I burned my first batch of white chocolate because I got distracted by my phone. It went from perfectly smooth to a grainy, clumpy mess in about 15 seconds. White chocolate has a lower melting point than regular chocolate, so use low power and stir frequently. If it starts to seize, add a teaspoon of coconut oil or vegetable shortening and stir vigorously — sometimes you can save it.
Let the bark cool completely before cutting. I know it’s tempting to cut into it while it’s still warm, but you’ll end up with a messy, smeared disaster. The white chocolate needs to be fully set to get clean cuts. If you’re impatient like me, pop it in the fridge for 30 minutes. Just make sure it’s completely cool before you refrigerate it, or condensation will form on the surface.
Use a sharp knife and wipe it clean between cuts. This makes such a difference in the final presentation. The white chocolate can get sticky and drag, leaving messy edges. A clean knife gives you those beautiful, crisp pieces that look like they came from a bakery.
Variations & Adaptations
One of the best things about this recipe is how easy it is to customize. Here are some variations I’ve tried and loved:
Chocolate Drizzle Version: After spreading the white chocolate, drizzle melted dark chocolate or milk chocolate over the top. Use a fork to create thin lines, then drag a toothpick through them to create a marbled pattern. It adds a nice contrast to all that sweetness and looks really fancy for holiday gifts.
Halloween Sprinkle Bark: Before the white chocolate sets, sprinkle on some Halloween-themed sprinkles — orange and black jimmies, little eyeballs, or bat shapes. The sprinkles stick to the chocolate and make it extra festive. My kids go crazy for this version.
Salty Sweet Variation: Sprinkle flaky sea salt over the white chocolate while it’s still wet. The salt cuts through the sweetness and makes the candy corn flavor pop. I use Maldon sea salt, but any flaky salt works. Don’t use regular table salt — it’s too fine and will dissolve.
Fall Harvest Mix: Replace half the candy corn with autumn mix — the little pumpkins, acorns, and leaves. It gives the bark more texture and visual interest. The different shapes look gorgeous when you cut into the bark and see all the colors.
Gluten-Free Option: Use a gluten-free sugar cookie dough. Most major brands make one now, and it works exactly the same. The candy corn and white chocolate are naturally gluten-free, so this adaptation is super easy. I’ve tested it with the Pillsbury gluten-free dough, and honestly, I couldn’t tell the difference.
Peanut Butter Twist: Drizzle melted peanut butter over the white chocolate before it sets. The peanut butter and candy corn combination is surprisingly good — salty, sweet, and nutty all at once. Just warm the peanut butter in the microwave for 15 seconds to make it drizzle-able.
Serving & Storage Suggestions
This bark is best served at room temperature. The cookie base stays soft and chewy, the white chocolate has that perfect snap, and the candy corn pieces are tender but not mushy. If you’ve refrigerated it, let it sit out for about 10 minutes before serving to take the chill off.
For presentation, I like to arrange the pieces on a wooden cutting board or a white platter — the orange and yellow really pop against a neutral background. You can stack them in a pyramid for a dramatic look, or scatter them casually for a more rustic feel. A few whole candy corn pieces scattered around the platter ties it all together.
This bark pairs beautifully with hot apple cider, pumpkin spice lattes, or even a cold glass of milk. It’s sweet enough to be dessert on its own, but it also works great on a Halloween dessert table alongside other treats like caramel apples or pumpkin cookies.
Storage: Keep the bark in an airtight container at room temperature for up to 5 days. Layer pieces between sheets of parchment paper so they don’t stick together. Don’t refrigerate it unless you have to — the white chocolate can develop condensation and get sticky. If you live in a warm climate, store it in a cool, dark place.
Freezing: This bark freezes beautifully. Place the pieces in a single layer on a baking sheet and freeze for 1 hour, then transfer to a freezer-safe bag or container. It’ll keep for up to 3 months. Thaw at room temperature for about 15 minutes before serving. The texture stays exactly the same — I’ve tested it.
The flavors actually get better after a day or two. The candy corn flavor melds with the cookie and white chocolate, creating this unified sweetness that’s somehow more than the sum of its parts. Not that it ever lasts that long in my house.
Nutritional Information & Benefits
Let’s be real — this is a treat, not a health food. But here’s the nutritional breakdown for one serving (about 1/12 of the recipe):
| Nutrient | Amount per Serving |
|---|---|
| Calories | 285 |
| Total Fat | 12g |
| Saturated Fat | 6g |
| Carbohydrates | 42g |
| Sugar | 32g |
| Protein | 3g |
| Sodium | 180mg |
On the bright side, this bark is nut-free, egg-free, and can easily be made gluten-free. It’s also a great option for people with peanut allergies since it doesn’t contain any peanut products (unless you add the peanut butter variation).
From a wellness perspective, I believe in balance. This recipe is about joy and celebration — it’s not something you eat every day. It’s for Halloween parties, fall gatherings, and those moments when you need a little sweetness in your life. One piece satisfies that craving without going overboard. And honestly, making it yourself means you know exactly what’s in it, which is always better than store-bought options with preservatives and artificial ingredients.
Conclusion
If you’ve made it this far, I hope you’re feeling inspired to try this Candy Corn Layered Sugar Cookie Bark for yourself. It’s one of those recipes that looks impressive but takes almost no effort — my favorite kind of baking. Whether you’re a longtime candy corn lover or a skeptic like I used to be, this bark has a way of winning people over.
I love this recipe because it reminds me that sometimes the simplest things are the best. No complicated techniques, no fancy ingredients — just three things that come together to create something genuinely delicious. It’s the kind of recipe that makes you look like a baking hero with almost zero effort, and honestly, we all deserve that sometimes.
I’d love to hear how yours turns out! Leave a comment below and let me know if you tried any variations, if your family loved it, or if you caught anyone eating it straight off the counter at midnight. Share your photos on Pinterest and tag me — I love seeing your creations. Happy baking, friends!
Frequently Asked Questions
Can I use homemade sugar cookie dough instead of refrigerated?
Absolutely! Just make sure your dough is firm enough to press into the pan. If it’s too soft, chill it for 20 minutes before pressing. You’ll need about 16-18 ounces of dough for a 9×13 pan.
Why did my white chocolate seize up?
White chocolate is sensitive to heat and moisture. If you microwaved it too long or got even a drop of water in the bowl, it can seize into a grainy mess. Always use a dry bowl, microwave in short bursts, and stir well between each interval.
Can I use candy corn that’s been sitting in my pantry for a year?
I wouldn’t recommend it. Old candy corn gets hard and dry, and it won’t soften properly in the oven. The texture will be weird and crunchy instead of tender. Fresh candy corn makes a big difference in this recipe.
How do I get clean cuts without the bark cracking?
Use a sharp chef’s knife and let the bark come to room temperature before cutting. Cold bark is more likely to crack. Cut with a gentle sawing motion rather than pressing straight down. Wipe the knife clean between cuts for the neatest edges.
Can I double this recipe for a larger crowd?
Yes! Double all the ingredients and use a half-sheet pan (18×13 inches). You’ll need to increase the baking time slightly — start checking at 15 minutes for the cookie base. The rest of the process stays the same.
Pin This Recipe!

Candy Corn Layered Sugar Cookie Bark: Easy 3-Ingredient Recipe

This easy 3-ingredient candy corn layered sugar cookie bark is a buttery, salty-sweet, crunchy treat that transforms candy corn into chewy pockets of sweetness. Perfect for Halloween parties, fall movie nights, or a quick dessert that looks fancy with zero effort.
- Prep Time: 10 minutes
- Cook Time: 17 minutes
- Total Time: 27 minutes
- Yield: 12 servings 1x
- Category: Dessert
- Cuisine: American
Ingredients
- 1 package (16.5 oz) refrigerated sugar cookie dough (slice-and-bake style)
- 1 ½ cups white chocolate chips
- 1 ½ cups candy corn
Instructions
- Preheat your oven to 350°F (175°C). Line a 9×13 inch baking pan with parchment paper, leaving overhang on the long sides.
- Let the sugar cookie dough sit at room temperature for 10 minutes.
- Press the cookie dough into the prepared pan, breaking it into pieces and scattering evenly. Press to about ¼ inch thick.
- Bake the cookie base for 12-15 minutes, until golden brown around the edges but still slightly soft in the center.
- Remove the pan from the oven and immediately sprinkle the candy corn evenly over the hot cookie base, pressing gently into the soft cookie.
- Return the pan to the oven for 2-3 more minutes, until the candy corn looks slightly glossy and softens.
- Remove from oven and let cool on a wire rack for 10 minutes.
- While the bark cools, melt the white chocolate chips in a microwave-safe bowl in 30-second intervals, stirring well between each, until smooth and glossy.
- Pour the melted white chocolate over the slightly cooled bark and spread evenly with a spatula.
- Let the bark set completely at room temperature for 1-2 hours, or 30 minutes in the refrigerator.
- Once set, lift the bark out of the pan using the parchment paper handles. Cut into irregular pieces with a sharp knife.
Notes
Don’t overbake the cookie base; it should be soft and chewy. Press candy corn into hot cookie immediately after baking. Watch white chocolate carefully to avoid burning. Let bark cool completely before cutting for clean edges. Use fresh candy corn for best texture.
Nutrition
- Serving Size: 1 piece (1/12 of rec
- Calories: 285
- Sugar: 32
- Sodium: 180
- Fat: 12
- Saturated Fat: 6
- Carbohydrates: 42
- Protein: 3
Keywords: candy corn, sugar cookie bark, Halloween dessert, 3-ingredient recipe, fall treat, easy dessert, white chocolate bark


