This was supposed to be pumpkin bread. I had the whole thing planned out—a simple, no-fuss loaf to get us through a rainy Tuesday afternoon. But somewhere between wrestling a bag of flour from the back of the pantry and answering my daughter’s urgent question about why her stuffed elephant needed a bath, I grabbed the wrong measuring cup. Instead of the liquid one, I scooped my pumpkin puree into a dry measure, and by the time I realized, the batter was too stiff, too thick, and completely wrong for a loaf pan. Honestly, I stood there staring at this dense, sticky dough thinking, “Well, I’ve ruined dinner and snack time in one fell swoop.” The kitchen was a mess, the timer was beeping for no reason, and my neighbor’s dog started barking at the rain. I almost scraped the whole thing into the trash.
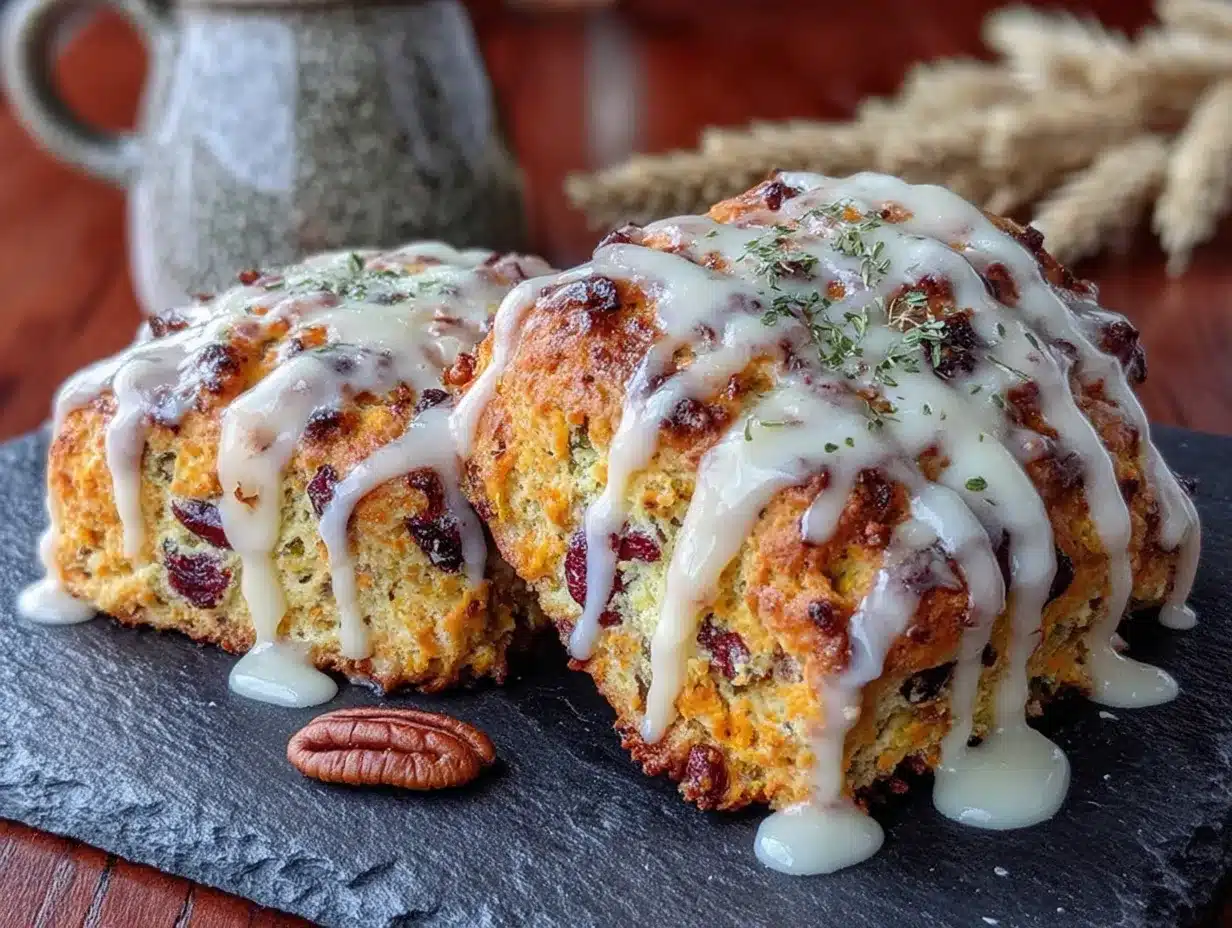
But then I thought about the scones at that little café downtown—the ones my husband always orders with his coffee. They’re crumbly and sweet, not too fancy, and perfect for dipping. So, I patted this failed pumpkin bread dough into a circle on my floured counter, sliced it into wedges like a pizza, and threw them in the oven. I figured, what’s the worst that could happen? Maybe they’d be hockey pucks, but at least I’d tried. What came out of that oven was nothing like the plan—and better. The edges were golden and crisp, the centers were tender and soft, and that accidental dryness turned into a perfect crumb that soaked up maple glaze like a dream. My kids ate three each before I could even pour myself a cup of coffee. You know that feeling when a kitchen disaster turns into a new family tradition? That’s exactly what happened here.
These cozy maple pecan pumpkin scones are now the thing my family requests every time the leaves start to turn. They’re the happy accident I never knew we needed, and I keep making them because they remind me that sometimes the best recipes come from letting go of the plan. Maybe you’ve been there—staring at a bowl of something that went sideways, wondering if you should just order pizza. Don’t. Pat it into a scone, drizzle it with maple, and watch everyone smile.
Why You’ll Love This Recipe
I’ve tested this recipe at least a dozen times to get it just right, and every single batch has disappeared in under 24 hours. That’s not an exaggeration—my neighbor even knocked on the door once to ask if I was “baking those pumpkin things again.” Here’s why these scones have become a family favorite in our home and why I bet they will in yours too.
- Quick & Easy: From mixing bowl to cooling rack in under 45 minutes. These come together fast, which is a lifesaver on busy mornings or when you need a last-minute treat for a playdate.
- Simple Ingredients: You probably have most of these in your pantry right now. No fancy extracts or hard-to-find spices—just good old-fashioned staples that won’t blow your grocery budget.
- Perfect for Fall Mornings or Cozy Weekends: These scones scream sweater weather and hot cider. They’re great for brunch, a school bake sale, or just a quiet Saturday with a book.
- Crowd-Pleaser: My kids love them, my husband takes them to work, and even my picky nephew asked for seconds. The maple glaze is the real star—it’s sweet but not cloying, and the pecans add a little crunch that makes everyone happy.
- Unbelievably Delicious: The texture is spot-on—flaky on the outside, soft on the inside, and that pumpkin-maple combo is pure comfort. It’s the kind of scone that makes you close your eyes after the first bite, I promise.
What makes these different from other pumpkin scone recipes is the technique. I use cold butter (straight from the fridge) and a gentle hand when mixing, which gives you that perfect crumb without any tough edges. Plus, the maple glaze isn’t just a drizzle—it soaks into the warm scone just enough to make every bite taste like a cozy hug. This isn’t just another version; it’s the one I turn to again and again, and I think you will too.
What Ingredients You Will Need
This recipe uses simple, wholesome ingredients to deliver bold flavor and satisfying texture without the fuss. Most of these are pantry staples, so you can whip up a batch anytime the craving hits. Let’s break them down so you know exactly what to grab.
- All-Purpose Flour: 2 ½ cups (312g). This gives the scones structure without making them tough. I prefer Gold Medal or King Arthur for consistent results, but any brand works fine.
- Granulated Sugar: ⅓ cup (66g). Just enough sweetness to balance the pumpkin and maple. You can reduce it slightly if you’re watching sugar, but don’t skip it entirely—it helps with browning.
- Baking Powder: 1 tablespoon. Make sure it’s fresh! Old baking powder will give you flat, dense scones. If you’re unsure, test a teaspoon in hot water—it should fizz vigorously.
- Pumpkin Pie Spice: 1 ½ teaspoons. You can use store-bought or make your own with cinnamon, nutmeg, ginger, and cloves. I like the blend from McCormick, but homemade is easy too.
- Salt: ½ teaspoon. Don’t skip this—it enhances all the other flavors and keeps the scones from tasting flat.
- Cold Unsalted Butter: ½ cup (1 stick, 113g), cubed. This is crucial. The butter needs to be cold so it creates little pockets of steam in the oven, giving you flaky layers. I cube it and stick it back in the fridge while I prep everything else.
- Canned Pumpkin Puree: ¾ cup (170g). Not pumpkin pie filling! Just plain puree. Libby’s is my go-to because it’s thick and not watery, which helps keep the dough from getting sticky.
- Heavy Cream: ¼ cup (60ml), plus a little extra for brushing. The cream adds richness and tenderness. You can use whole milk in a pinch, but the scones won’t be as soft.
- Maple Syrup: 3 tablespoons (45ml) for the dough. Use real maple syrup, not pancake syrup. The flavor is deeper and more authentic. I love Grade A Dark Amber for its bold taste.
- Vanilla Extract: 1 teaspoon. Pure vanilla makes a difference, but imitation works in a bind.
- Chopped Pecans: ½ cup (55g). Toast them lightly for extra flavor—just a few minutes in a dry pan until they smell nutty. You can leave them out if someone has a nut allergy, but they add such a nice crunch.
For the Maple Glaze:
- Powdered Sugar: 1 cup (120g), sifted. Sifting prevents lumps and gives you a smooth, glossy finish.
- Maple Syrup: 2 tablespoons (30ml). Again, real maple syrup is best.
- Heavy Cream or Milk: 1-2 tablespoons (15-30ml). Add slowly until you reach a thick but pourable consistency. You want it to drizzle off a spoon, not run like water.
- Pinch of Salt: Just a tiny one—it balances the sweetness beautifully.
Substitution Tips: For a dairy-free version, use cold coconut oil or vegan butter in place of the regular butter, and substitute oat milk or almond milk for the heavy cream. The texture will be slightly different—a bit more crumbly—but still delicious. If you’re gluten-sensitive, a 1:1 gluten-free baking flour blend works well; just add an extra tablespoon of cream to help the dough come together.
Equipment Needed
You don’t need a fancy kitchen to make these scones, and that’s part of the beauty. Here’s what you’ll want on hand:
- Large Mixing Bowl: For combining your dry ingredients. Any bowl works, but a wide one makes it easier to cut in the butter.
- Pastry Cutter or Two Forks: A pastry cutter is my favorite tool for cutting cold butter into flour—it’s quick and gives you even pieces. If you don’t have one, two forks work just fine, or you can use your fingertips (just work fast so the butter doesn’t warm up).
- Baking Sheet: Line it with parchment paper for easy cleanup. I’ve used silicone baking mats too, and they work great.
- Bench Scraper or Sharp Knife: For cutting the dough into wedges. A bench scraper is nice because it doesn’t drag through the dough, but a knife does the job.
- Pastry Brush: For brushing the tops with cream before baking. A silicone one is easy to clean, but a regular brush works too.
- Wire Rack: For cooling the scones. This helps the glaze set properly without getting soggy on the bottom.
If you don’t have a pastry cutter, honestly, don’t worry. I’ve used a cheese grater to grate frozen butter into the flour before, and it worked like a charm. Just a little tip I picked up from a cooking class years ago. And if you’re on a budget, a basic baking sheet and a knife are all you really need—the rest is just convenience.
Preparation Method
Let’s get baking! This method is straightforward, but I’ll walk you through each step with a few tricks I’ve learned along the way.
- Preheat and Prep: Preheat your oven to 400°F (200°C). Line a baking sheet with parchment paper. This high heat is what gives scones their golden, crisp edges, so don’t be tempted to lower it.
- Mix Dry Ingredients: In a large bowl, whisk together 2 ½ cups (312g) all-purpose flour, ⅓ cup (66g) granulated sugar, 1 tablespoon baking powder, 1 ½ teaspoons pumpkin pie spice, and ½ teaspoon salt. Make sure everything is evenly combined—you don’t want a pocket of baking powder in one bite.
- Cut in the Butter: Add your cold, cubed butter (½ cup, 113g) to the flour mixture. Using a pastry cutter or two forks, cut the butter into the flour until it resembles coarse crumbs with some pea-sized butter pieces remaining. This should take about 2-3 minutes. The little chunks of butter are what create flaky layers, so don’t overdo it. I used to think I needed to get it super fine, but my scones were always dense until I learned to leave some bigger bits.
- Combine Wet Ingredients: In a separate small bowl, whisk together ¾ cup (170g) pumpkin puree, ¼ cup (60ml) heavy cream, 3 tablespoons (45ml) maple syrup, and 1 teaspoon vanilla extract. Stir until smooth. The mixture should be thick but pourable.
- Bring It Together: Pour the wet ingredients into the dry ingredients and stir with a fork or rubber spatula just until combined. The dough will look shaggy and a little dry—that’s okay. Fold in ½ cup (55g) chopped pecans gently. Avoid overmixing, or your scones will be tough. If the dough feels too dry to come together, add a teaspoon more cream, but only if absolutely necessary.
- Shape the Dough: Turn the dough out onto a lightly floured surface. Pat it into a circle about ¾-inch thick (2cm). Don’t use a rolling pin—your hands are gentler and won’t overwork the gluten. Use a bench scraper or sharp knife to cut the circle into 8 wedges, like a pizza. Transfer the wedges to your prepared baking sheet, spacing them about 2 inches apart.
- Brush and Bake: Brush the tops of the scones with a little extra heavy cream. This helps them brown beautifully. Bake for 15-18 minutes, or until the edges are golden and the tops are firm to the touch. Your kitchen will smell like fall—it’s the best part. Let them cool on the baking sheet for 5 minutes, then transfer to a wire rack.
- Make the Glaze: While the scones cool slightly, whisk together 1 cup (120g) sifted powdered sugar, 2 tablespoons (30ml) maple syrup, and 1-2 tablespoons (15-30ml) heavy cream. Add the cream slowly until you get a thick, drizzly consistency. Stir in a tiny pinch of salt.
- Glaze and Serve: Drizzle the glaze over the warm scones. Don’t drown them—just a nice, even drizzle that pools in the cracks. The warmth will help the glaze set slightly, creating a lovely sheen. Serve warm or at room temperature.
Troubleshooting Tip: If your scones spread out too much in the oven, your butter was too warm or your dough was overmixed. Next time, chill the shaped wedges on the baking sheet for 15 minutes before baking. This firms up the butter and helps them hold their shape.
Cooking Tips & Techniques
Over the years, I’ve had my fair share of scone failures—flat ones, dry ones, ones that tasted more like hockey pucks than pastries. Here’s what I’ve learned so you don’t have to make the same mistakes.
Keep Everything Cold: This is the number one rule for flaky scones. Cold butter creates steam pockets as it melts in the oven, which gives you those beautiful layers. I pop my butter cubes in the freezer for 10 minutes before I start, and I even chill my mixing bowl if the kitchen is warm. It makes a difference, I swear.
Don’t Overmix: I know it’s tempting to keep stirring until the dough looks smooth, but stop as soon as it comes together. Overmixing develops the gluten, which leads to tough, dense scones. Shaggy is good. Trust the shaggy.
Use a Light Hand: When you pat the dough into a circle, press gently. You’re not making a pizza crust—just coaxing it into shape. If the dough cracks a little, that’s fine. Those cracks become craggy edges that are perfect for catching glaze.
Bake on the Middle Rack: For even browning, place your baking sheet in the center of the oven. If your oven runs hot, check the scones at 15 minutes. I once forgot and left mine in for 20 minutes—they were edible, but dry. Learn from my distraction!
Glaze While Warm: The glaze sinks into the scone just a little when it’s still warm, creating that perfect balance of sweet topping and tender crumb. If you wait until they’re completely cool, the glaze just sits on top. Both are delicious, but warm glazing is my preference.
Multitasking Tip: While the scones bake, clean up your workspace and make the glaze. That way, by the time they’re cool enough to handle, you’re ready to drizzle. It makes the whole process feel effortless.
Variations & Adaptations
One of the best things about this recipe is how easy it is to tweak. Here are a few variations I’ve tried and loved.
- Chocolate Chip Pumpkin Scones: Fold in ½ cup (90g) of semi-sweet chocolate chips along with the pecans. The chocolate pairs beautifully with the pumpkin and maple—my kids actually prefer this version. Just reduce the pecans to ¼ cup if you want both.
- Dairy-Free Option: Substitute the butter with cold coconut oil (use ½ cup, solid state) and swap the heavy cream for full-fat oat milk or canned coconut milk. The texture is a bit more crumbly, but the flavor is still fantastic. I made these for a friend with a dairy allergy, and she asked for the recipe immediately.
- Spiced Cranberry Pecan: Add ½ cup (60g) dried cranberries to the dough along with the pecans. The tartness cuts through the sweetness of the glaze perfectly. This is my go-to for Thanksgiving morning—it feels festive without being fussy.
- Gluten-Free Adaptation: Use a 1:1 gluten-free baking flour blend (I like Bob’s Red Mill). Add an extra tablespoon of cream to help the dough bind, since gluten-free flours tend to be thirstier. The scones will be a little more delicate, so handle them gently.
- Savory Twist: Skip the sugar and maple syrup, and add ½ teaspoon black pepper and ¼ cup shredded sharp cheddar cheese instead. Omit the glaze and brush with melted butter after baking. These savory pumpkin scones are amazing with soup or chili—a total surprise hit at our house.
I once tried a version with candied ginger instead of pecans, and honestly, it was a bit too spicy for my family. But if you love ginger, go for it! The beauty of this recipe is that it’s forgiving. You can play around and find your favorite combination.
Serving & Storage Suggestions
These scones are best served warm, straight from the oven with the glaze still slightly soft. But they’re also delicious at room temperature, which makes them perfect for packing in lunchboxes or taking to a potluck.
Serving Ideas: Pair a scone with a hot cup of coffee or chai tea for a cozy afternoon treat. For brunch, arrange them on a platter with fresh apple slices and a dollop of whipped cream. They’re also great alongside a bowl of butternut squash soup—the sweetness of the scone balances the savory soup beautifully.
Storage: Store leftover scones in an airtight container at room temperature for up to 3 days. If you stack them, place a sheet of parchment paper between layers to keep the glaze from sticking. I’ve found they actually taste even better on day two—the flavors meld together, and the texture softens slightly.
Freezing: You can freeze the unbaked scones! Shape the dough into wedges, place them on a baking sheet, and freeze until solid (about 1 hour). Then transfer to a freezer bag. When you’re ready to bake, place the frozen scones on a lined baking sheet and bake at 400°F (200°C) for 18-20 minutes, adding a few extra minutes as needed. No need to thaw. This is a lifesaver for busy mornings—just pop them in the oven and you have fresh scones in no time.
Reheating: To revive day-old scones, warm them in a 300°F (150°C) oven for 5-7 minutes. Avoid the microwave—it makes them soggy. If you’re in a rush, a toaster oven works great too.
Flavor Development: Honestly, I think these scones are even better the next day. The maple glaze soaks into the crumb overnight, making every bite incredibly moist and flavorful. So don’t worry if you have leftovers—they’re a treat in their own right.
Nutritional Information & Benefits
Here’s an approximate nutritional breakdown per scone (based on 8 servings with glaze):
- Calories: ~320
- Fat: 16g
- Carbohydrates: 42g
- Fiber: 2g
- Sugar: 20g
- Protein: 4g
- Vitamin A: 60% DV (from pumpkin)
Pumpkin is packed with vitamin A, which is great for eye health and immune function. It also adds moisture to the scones without needing extra fat, so you get a tender crumb with a little nutritional boost. Pecans provide healthy fats and a touch of protein, plus they add that satisfying crunch. And real maple syrup contains antioxidants and minerals like zinc and manganese—though let’s be honest, we’re eating these for the taste, not the health benefits!
Dietary Notes: This recipe contains gluten, dairy, and nuts. For a nut-free version, simply omit the pecans and add an extra tablespoon of flour to balance the dry ingredients. For a lower-sugar option, reduce the glaze to a light dusting of powdered sugar or skip it entirely—the scones are still delicious on their own.
I personally love that these scones feel indulgent without being over-the-top. They’re a treat, but they also have a little substance—kind of like a cozy sweater for your taste buds.
Conclusion
These cozy maple pecan pumpkin scones started as a mistake, but they’ve become one of my most-requested recipes. They’re everything I want in a fall treat—warm, spiced, sweet, and just a little bit nutty. Whether you serve them for breakfast, brunch, or an afternoon snack, they bring a sense of comfort that’s hard to beat.
I hope you’ll give them a try and make them your own. Add chocolate chips if that’s your thing, or swap the pecans for walnuts. The recipe is forgiving, and the result is always delicious. Honestly, the best part is watching someone take that first bite and seeing their eyes light up. That’s why I keep baking them.
If you make these scones, I’d love to hear about it! Leave a comment below and let me know how they turned out, or share a photo on Pinterest with your own twist. Happy baking, friends—may your kitchen smell like maple and pumpkin all season long.
Frequently Asked Questions
Can I make these scones without a pastry cutter?
Absolutely! You can use two forks to cut the butter into the flour, or even your fingertips. Just work quickly so the butter stays cold. Some people even grate frozen butter on a box grater and mix it in with a fork. Whatever works for you!
Why did my scones turn out dry?
Dry scones usually come from overmixing the dough or baking them too long. Mix just until the ingredients come together, and start checking for doneness at 15 minutes. Also, make sure you’re measuring your flour correctly—scoop it into the measuring cup with a spoon and level it off, rather than digging the cup into the bag.
Can I use fresh pumpkin instead of canned?
Yes, but you’ll need to roast and puree it first, then drain off any excess liquid. Fresh pumpkin tends to be more watery than canned, which can make the dough too sticky. If using fresh, try squeezing the puree in a clean kitchen towel to remove some moisture before adding it to the recipe.
How do I store leftover maple glaze?
Store any extra glaze in an airtight container in the refrigerator for up to a week. Let it come to room temperature before using, and whisk in a tiny splash of cream or milk if it’s too thick. You can also drizzle it over pancakes or waffles for an extra treat!
Can I double this recipe?
Definitely! This recipe doubles beautifully. Just make sure you have a large enough mixing bowl and use two baking sheets. If baking both sheets at once, rotate them halfway through the baking time for even browning. You can also freeze half the unbaked scones for later, as mentioned above.
Pin This Recipe!

Cozy Maple Pecan Pumpkin Scones – Easy Family Recipe

These cozy maple pecan pumpkin scones are a happy accident turned family tradition. Flaky on the outside, tender on the inside, and drizzled with a sweet maple glaze, they’re perfect for fall mornings or cozy weekends.
- Prep Time: 15 minutes
- Cook Time: 18 minutes
- Total Time: 33 minutes
- Yield: 8 servings 1x
- Category: Dessert
- Cuisine: American
Ingredients
- 2 ½ cups (312g) all-purpose flour
- ⅓ cup (66g) granulated sugar
- 1 tablespoon baking powder
- 1 ½ teaspoons pumpkin pie spice
- ½ teaspoon salt
- ½ cup (1 stick, 113g) cold unsalted butter, cubed
- ¾ cup (170g) canned pumpkin puree (not pumpkin pie filling)
- ¼ cup (60ml) heavy cream, plus extra for brushing
- 3 tablespoons (45ml) maple syrup (real maple syrup)
- 1 teaspoon vanilla extract
- ½ cup (55g) chopped pecans, lightly toasted
- For the Maple Glaze:
- 1 cup (120g) powdered sugar, sifted
- 2 tablespoons (30ml) maple syrup (real maple syrup)
- 1–2 tablespoons (15-30ml) heavy cream or milk
- Pinch of salt
Instructions
- Preheat your oven to 400°F (200°C). Line a baking sheet with parchment paper.
- In a large bowl, whisk together 2 ½ cups (312g) all-purpose flour, ⅓ cup (66g) granulated sugar, 1 tablespoon baking powder, 1 ½ teaspoons pumpkin pie spice, and ½ teaspoon salt.
- Add the cold, cubed butter (½ cup, 113g) to the flour mixture. Using a pastry cutter or two forks, cut the butter into the flour until it resembles coarse crumbs with some pea-sized butter pieces remaining (about 2-3 minutes).
- In a separate small bowl, whisk together ¾ cup (170g) pumpkin puree, ¼ cup (60ml) heavy cream, 3 tablespoons (45ml) maple syrup, and 1 teaspoon vanilla extract until smooth.
- Pour the wet ingredients into the dry ingredients and stir with a fork or rubber spatula just until combined. The dough will look shaggy and a little dry. Fold in ½ cup (55g) chopped pecans gently. Avoid overmixing.
- Turn the dough out onto a lightly floured surface. Pat it into a circle about ¾-inch thick (2cm). Use a bench scraper or sharp knife to cut the circle into 8 wedges. Transfer the wedges to the prepared baking sheet, spacing them about 2 inches apart.
- Brush the tops of the scones with a little extra heavy cream. Bake for 15-18 minutes, or until the edges are golden and the tops are firm to the touch. Let them cool on the baking sheet for 5 minutes, then transfer to a wire rack.
- While the scones cool slightly, whisk together 1 cup (120g) sifted powdered sugar, 2 tablespoons (30ml) maple syrup, and 1-2 tablespoons (15-30ml) heavy cream. Add the cream slowly until you get a thick, drizzly consistency. Stir in a tiny pinch of salt.
- Drizzle the glaze over the warm scones. Serve warm or at room temperature.
Notes
Keep all ingredients cold for flaky scones. Do not overmix the dough. For best results, chill the shaped wedges on the baking sheet for 15 minutes before baking if your kitchen is warm. The scones can be frozen unbaked for up to 3 months; bake from frozen, adding a few extra minutes.
Nutrition
- Serving Size: 1 scone
- Calories: 320
- Sugar: 20
- Sodium: 280
- Fat: 16
- Saturated Fat: 8
- Carbohydrates: 42
- Fiber: 2
- Protein: 4
Keywords: pumpkin scones, maple pecan scones, fall scones, easy scone recipe, pumpkin recipe, maple glaze, breakfast scones