When they closed down in late October, I actually stood in the rain outside their window for twenty minutes. It wasn’t just about the coffee or the muffins, though those were decent enough. It was about the dessert case. Specifically, those dense, creamy bars that smelled like Thanksgiving before it even arrived. The place was called “The Daily Grind,” tucked between a dry cleaner and a bookstore that always had that dusty, old-paper smell. I’m not supposed to play favorites with recipes, but honestly, those bars were my holy grail.
After three years of trying to guess the ratio of cream cheese to pumpkin puree, I finally got it. The first few attempts were disasters. One batch was so watery it looked like pumpkin soup in a crust. Another one was so dense it could have been used as a brick. But then, on a rainy Tuesday in November, something clicked. I added a pinch of salt I had forgotten to use before, and suddenly, the texture transformed. It was smooth. Silky. Exactly like that first bite I remembered so vividly.
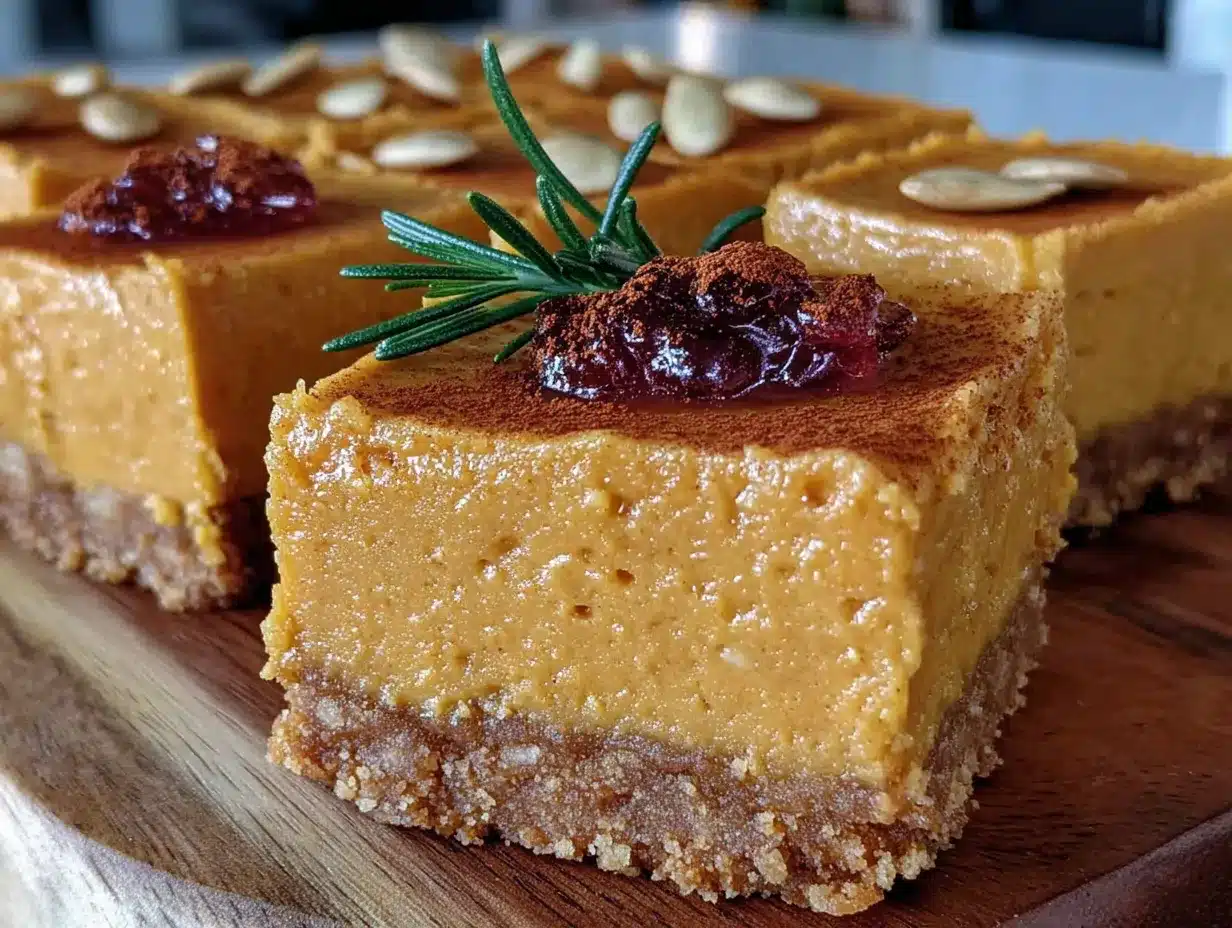
Maybe you’ve been there, standing in front of a closed shop, feeling that specific kind of loss for a simple food item. You know that feeling when you realize you can’t just buy it anymore, so you have to make it yourself? That’s where this story starts. I spent months tweaking, tasting, and failing until I created a version that doesn’t just remind me of The Daily Grind—it beats it. These Creamy No-Bake Pumpkin Cheesecake Bars are the result of that obsession. They are rich, they hold their shape, and they taste like autumn wrapped in a blanket.
I mean, let me tell you, the first time I served these to my friends, they didn’t even ask if I baked them. They just ate them in silence, which is the highest compliment you can get. There’s something magical about no-bake desserts in the fall. You don’t want to heat up your kitchen when the weather is turning crisp outside. This recipe respects that. It’s quick, it’s easy, and it delivers that luxurious texture without turning your apartment into a sauna. If you’re looking for a way to capture that cozy fall vibe without the stress, you’re going to love this recreation. It’s better than the original, and it’s entirely yours to make.
Why You’ll Love This Recipe
Let’s be real for a second. Most no-bake cheesecakes are a letdown. They’re often too soft, too sweet, or they taste like they came out of a tub. But this Creamy No-Bake Pumpkin Cheesecake Bars recipe is different because I’ve tested it until my taste buds gave up. I’ve made this at least fifteen times to get the consistency just right. The secret isn’t just in the ingredients; it’s in the technique. By using full-fat cream cheese and chilling it properly, you get a bar that slices cleanly without falling apart. It’s sturdy enough to pack for a picnic but soft enough to melt in your mouth.
- Quick & Easy: This comes together in under thirty minutes of active prep time. No standing over a hot oven, no cooling racks, and no waiting for a cake to set for hours before you can even touch it. It’s perfect for busy weeknights or last-minute cravings when you need something sweet but don’t want to spend hours in the kitchen.
- Simple Ingredients: You likely already have everything in your kitchen. Cream cheese, sugar, vanilla, pumpkin puree, and graham crackers. No fancy grocery trips needed. If you have a can of pumpkin and some cream cheese, you’re halfway done. It’s pantry-friendly and stress-free.
- Perfect for Fall Gatherings: Whether it’s a Thanksgiving potluck, a Halloween party, or just a cozy Tuesday night, these bars fit right in. They are a crowd-pleaser that always gets rave reviews from kids and adults alike. The pumpkin flavor is warm and comforting without being overpowering.
- Unbelievably Delicious: The texture and flavor combo is next-level comfort food. The contrast between the buttery, crumbly crust and the smooth, spiced cheesecake filling is what makes this recipe special. It’s not just good; it’s the kind of dessert that makes you close your eyes after the first bite. It’s comfort food reimagined—simpler, faster, but with the same soul-soothing satisfaction as a homemade pie.
What makes this version stand out from the rest is the balance. Too much pumpkin makes it soggy, and too little makes it bland. I’ve found the sweet spot where the pumpkin flavor shines but doesn’t dominate. It’s creamy, tangy, and perfectly spiced with cinnamon and nutmeg. This isn’t just another version; it’s the best version. It’s designed to impress guests without the stress of baking, making it the ultimate fall dessert hack.
What Ingredients You Will Need
This recipe uses simple, wholesome ingredients to deliver bold flavor and satisfying texture without the fuss. The beauty of no-bake desserts is that the quality of your ingredients really shines through since there isn’t a lot of heat to mask imperfections. I recommend using high-quality pumpkin puree, not pumpkin pie filling, which is loaded with sugar and spices. You want the pure stuff so you can control the sweetness and spice levels yourself. Also, don’t skimp on the cream cheese. Full-fat is non-negotiable here if you want that rich, creamy texture.
- For the Crust:
- Graham Cracker Crumbs: About 1 ½ cups. You can make your own by crushing whole graham crackers in a food processor, or buy pre-made crumbs for convenience. I prefer making my own because they taste fresher.
- Unsalted Butter: 6 tablespoons, melted. Using unsalted butter lets you control the salt content. If you only have salted, just reduce the pinch of salt in the filling.
- Granulated Sugar: 2 tablespoons. This adds a little sweetness to the crust so it isn’t bland.
- Cinnamon: ½ teaspoon. Adds warmth and depth to the buttery crust.
- For the Cheesecake Filling:
- Cream Cheese: 16 ounces (2 blocks), softened to room temperature. This is the most important ingredient. If it’s cold, you’ll get lumps. I recommend Kroger or Great Value full-fat blocks; avoid the tub spreadable kind.
- Powdered Sugar: 1 cup. This dissolves easily into the cream cheese, unlike granulated sugar which might leave a gritty texture.
- Pumpkin Puree: ½ cup. Make sure it’s 100% pure pumpkin. Check the label!
- Vanilla Extract: 1 teaspoon. Use real vanilla, not imitation, for a better flavor.
- Pumpkin Pie Spice: 1 ½ teaspoons. This blend usually includes cinnamon, ginger, nutmeg, and cloves. If you don’t have it, you can mix your own.
- Salt: A generous pinch. This is crucial to balance the sweetness and enhance the pumpkin flavor.
- For the Topping (Optional):
- Heavy Cream: ½ cup, whipped to soft peaks. Adds airiness and richness.
- Maple Syrup: 1 tablespoon. Adds a subtle depth of flavor that pairs well with pumpkin.
If you need substitutions, you can use gluten-free graham crackers for the crust. For a dairy-free option, try using coconut cream cheese alternatives, though the texture will be slightly different. In summer, you could swap the pumpkin spice for apple cider spice, but for this fall recipe, stick with the pumpkin. The key is to keep everything cold during assembly to ensure the bars set properly.
How Do I Make Sure the Crust Sticks Together?
The key is the butter-to-crumb ratio. You want the crumbs to be fully coated in butter, looking like wet sand when you squeeze it. If it’s too dry, press it harder or add a teaspoon more butter. If it’s too wet, add more crumbs. This ensures the bars hold their shape when sliced.
Can I Use Canned Pumpkin Pie Filling Instead of Puree?
No, please don’t. Pumpkin pie filling already contains sugar and spices. If you use it, your cheesecake will be overly sweet and the spice balance will be off. Always use 100% pure pumpkin puree for the best results.
Equipment Needed
You don’t need a lot of fancy tools to make these Creamy No-Bake Pumpkin Cheesecake Bars, but having the right equipment makes the process much smoother. A 9×13 inch baking pan is essential. I prefer glass or ceramic pans because they conduct heat evenly, but metal works fine too. Line the pan with parchment paper, leaving an overhang on the sides. This is the most important tip for easy removal; you’ll lift the entire block of cheesecake out of the pan in one go.
A hand mixer or stand mixer is highly recommended for the filling. While you can do it by hand with a strong arm, it takes much longer and you’re more likely to end up with lumps. A mixer ensures the cream cheese is perfectly smooth before you add the pumpkin. If you don’t have a mixer, a whisk and a lot of elbow grease will work, but be patient.
You’ll also need a food processor or zip-top bag and rolling pin if you’re making your own graham cracker crumbs. It’s worth the effort for the fresher taste. Finally, a sharp knife is crucial for clean slices. Dip it in hot water and wipe it dry between each cut. This prevents the creamy filling from sticking to the blade and ruining your presentation. I once tried slicing with a dull knife and ended up with a pile of pumpkin mush—don’t make that mistake!
Preparation Method
Getting these bars right is all about order and temperature. Follow these steps carefully to achieve that perfect, sliceable texture.
- Prepare the Pan (5 minutes): Line your 9×13 inch baking pan with parchment paper. Leave a generous overhang on the long sides so you can lift the bars out later. Spray it lightly with non-stick spray for extra insurance. This step is critical for easy removal.
- Make the Crust (5 minutes): In a medium bowl, combine 1 ½ cups graham cracker crumbs, 2 tablespoons granulated sugar, ½ teaspoon cinnamon, and 6 tablespoons melted butter. Stir until the mixture resembles wet sand. Press this mixture firmly and evenly into the bottom of your prepared pan. Use the bottom of a glass to pack it down tightly. If the crust isn’t tight, the bars will crumble. Place the pan in the refrigerator while you make the filling.
- Beat the Cream Cheese (2 minutes): In a large mixing bowl, beat 16 ounces of softened cream cheese on medium-high speed until it is completely smooth and creamy. This should take about two minutes. Scrape down the sides of the bowl to ensure there are no lumps. If you skip this, your filling will be grainy.
- Add Sugar and Vanilla (1 minute): Add 1 cup of powdered sugar and 1 teaspoon of vanilla extract to the cream cheese. Beat on low speed until combined, then increase to medium-high and beat for another minute until fluffy. The mixture should look pale and airy.
- Incorporate Pumpkin and Spices (2 minutes): Add ½ cup of pumpkin puree, 1 ½ teaspoons of pumpkin pie spice, and a generous pinch of salt. Beat on low speed just until the ingredients are combined. Do not overmix at this stage, or you might incorporate too much air, which can make the bars too light and unstable. The mixture should be thick and smooth.
- Assemble the Bars (5 minutes): Remove the crust from the refrigerator. Spread the pumpkin cheesecake filling evenly over the crust. Use a spatula to smooth the top. You want it to be as flat as possible for even slicing. If you have the optional whipped cream topping, gently fold ½ cup of whipped heavy cream with 1 tablespoon of maple syrup into the pumpkin mixture before spreading. This adds a lighter, airier texture.
- Chill the Bars (4+ hours): Cover the pan with plastic wrap or foil. Refrigerate for at least four hours, but overnight is best. The bars need time to set so they hold their shape when cut. If you try to cut them too soon, they will be messy.
- Slice and Serve: Once set, lift the bars out of the pan using the parchment paper overhang. Place on a cutting board. Use a sharp knife dipped in hot water to slice into squares. Wipe the knife clean between cuts. Enjoy immediately or store in the refrigerator.
Watch out for the common mistake of using cold cream cheese. It’s the enemy of smoothness. Also, don’t rush the chilling process. Patience pays off with a better texture.
Why Do My Bars Fall Apart When I Slice Them?
This usually happens if the bars weren’t chilled long enough or if the crust wasn’t packed tightly enough. Ensure you chill them for at least four hours, preferably overnight. Also, make sure your knife is sharp and dipped in hot water for clean cuts.
Cooking Tips & Techniques
Having made this recipe dozens of times, I’ve learned a few tricks that separate the good bars from the great ones. First, room temperature ingredients are your best friend. If your cream cheese is cold, it won’t blend smoothly, and you’ll end up with lumpy cheesecake. Take it out of the fridge at least an hour before you start. If you forget, you can microwave it in 5-second bursts, but be careful not to melt it.
Another pro tip is to use a scale for measuring your ingredients. Volume measurements for flour and crumbs can vary, but weight is precise. If you don’t have a scale, fluff your graham cracker crumbs before measuring them to avoid packing them down too tightly. This ensures you don’t end up with a crust that’s too thick or too thin.
Don’t overmix the filling once you add the pumpkin. Overmixing incorporates air, which can cause the bars to rise and then collapse in the fridge. You want a dense, creamy texture, not a fluffy mousse. Also, taste the filling before you spread it. If it’s not sweet enough for you, add a little more powdered sugar. If it’s too sweet, add a splash of lemon juice to balance it out. Trust your palate.
When it comes to chilling, time is everything. The longer you let them set, the better the flavor melds. I usually make these the night before a party, and they are always perfect. If you’re in a hurry, you can freeze them for an hour, but the texture might be slightly firmer. For the best results, stick to the refrigerator.
Finally, keep your workspace cool. If your kitchen is hot, the cream cheese filling might soften too quickly. Work efficiently and get the bars into the fridge as soon as possible. These small details make a big difference in the final product.
How Can I Fix Lumpy Cream Cheese?
If you accidentally use cold cream cheese and end up with lumps, you can try beating the mixture over a bowl of warm water for a few seconds while mixing. This helps melt the lumps without melting the entire batch. Alternatively, you can press the filling through a fine-mesh sieve, but that’s time-consuming.
Variations & Adaptations
One of the best things about this Creamy No-Bake Pumpkin Cheesecake Bars recipe is how adaptable it is. You can tweak it to fit your dietary needs or taste preferences without losing the core flavor.
- Gluten-Free Option: Simply use gluten-free graham crackers or almond flour for the crust. Almond flour adds a nutty flavor that pairs beautifully with pumpkin. Make sure to check that your pumpkin pie spice is gluten-free, as some brands may have cross-contamination.
- Dairy-Free Version: Use coconut cream cheese alternatives and dairy-free butter for the crust. For the topping, use coconut whipped cream instead of heavy cream. The texture will be slightly different, but the flavor will still be delicious.
- Lower Sugar Option: Reduce the powdered sugar to ½ cup and use a sugar substitute like erythritol or monk fruit. You may need to adjust the consistency slightly, as some sugar substitutes don’t absorb moisture the same way.
- Flavor Twist: Add ½ cup of chopped pecans or walnuts to the crust for extra crunch. You can also swirl in some caramel sauce or chocolate chips for a different flavor profile. I once added a layer of dulce de leche, and it was heavenly.
- Seasonal Swap: In the winter, you can swap the pumpkin puree for apple sauce and use apple pie spice. In the spring, try lemon cheesecake bars with a graham cracker crust. The base recipe is very versatile.
I personally love adding a layer of salted caramel on top of the cheesecake filling before chilling. It adds a salty-sweet contrast that elevates the dessert. Just pour a thin layer over the filling and smooth it out before adding the whipped cream topping.
Can I Freeze These Bars?
Yes, you can freeze them for up to two months. Wrap them tightly in plastic wrap and then in foil. Thaw them in the refrigerator overnight before serving. The texture may be slightly softer after thawing, but they will still taste great.
Serving & Storage Suggestions
These Creamy No-Bake Pumpkin Cheesecake Bars are best served chilled. They hold their shape well at room temperature, but they are much more refreshing cold. For presentation, dust the tops with a little extra pumpkin pie spice or garnish with a small sprig of fresh mint. They look elegant enough for a dinner party but casual enough for a weeknight treat.
Pair these bars with a cup of hot coffee or tea. The warmth of the drink complements the cool, creamy dessert perfectly. I also like to serve them with a side of fresh fruit, like sliced apples or pears, to add a bit of freshness to the plate.
For storage, keep the bars in an airtight container in the refrigerator for up to five days. If you have leftovers, they will last that long, but they probably won’t last that long! You can also freeze them for longer storage. Just make sure to wrap them well to prevent freezer burn.
When reheating, I don’t recommend it. These bars are best cold. If you must warm them, let them sit at room temperature for 15 minutes to soften slightly. The flavors develop over time, so they often taste even better the next day as the spices have time to meld with the cream cheese.
How Do I Prevent the Bars from Sticking to the Container?
Place a piece of parchment paper between layers if you are stacking them in a container. This prevents them from sticking together and keeps the presentation intact. Also, ensure the container is airtight to prevent the bars from absorbing other fridge odors.
Nutritional Information & Benefits
While these bars are a dessert and should be enjoyed in moderation, they do offer some nutritional benefits. Pumpkin puree is rich in vitamin A, which is great for eye health and immune function. It’s also a good source of fiber, which aids in digestion. The cream cheese provides calcium and protein, though it is also high in saturated fat.
Each bar contains approximately 250 calories, 15g of fat, 25g of carbohydrates, and 4g of protein. These values can vary depending on the specific brands of ingredients used and the size of the bars. If you are watching your sugar intake, consider using a sugar substitute or reducing the amount of powdered sugar.
For those with dietary restrictions, remember that this recipe contains dairy and gluten in its standard form. Use the variations I mentioned earlier to adapt it to your needs. Overall, this is a balanced treat that satisfies your sweet tooth while providing some nutrients from the pumpkin.
Is This Recipe Keto-Friendly?
Not in its standard form, as it contains sugar and graham crackers. However, you can make a keto-friendly version by using almond flour for the crust and a keto-friendly sweetener like erythritol for the filling. You may need to adjust the liquid content, as almond flour absorbs moisture differently.
Conclusion
Making Creamy No-Bake Pumpkin Cheesecake Bars is more than just following a recipe; it’s about capturing a moment in time. It’s about recreating that perfect taste from a place that’s gone, and making it your own. I hope these bars bring you the same joy and comfort they’ve brought me. They are easy to make, delicious to eat, and perfect for sharing with loved ones.
Feel free to customize them with your favorite toppings or spices. Make them your own, and enjoy the process. I’d love to hear how they turn out for you. Leave a comment below with your thoughts, or share a photo on social media and tag me. Let’s celebrate the joy of baking together.
Happy cooking, and enjoy every bite!
FAQs
Can I use fresh pumpkin instead of canned puree?
Yes, you can use fresh pumpkin, but you need to roast and puree it first. Canned puree is more consistent and convenient, but fresh pumpkin offers a brighter flavor. Make sure to drain the fresh puree well to remove excess moisture.
Why did my cheesecake filling separate?
This usually happens if the cream cheese was too cold or if you overmixed the filling. Ensure your cream cheese is at room temperature and mix gently once the pumpkin is added. Also, make sure your pumpkin puree is not too watery.
Can I make these bars ahead of time?
Absolutely. In fact, they are better when made ahead. You can make them up to three days in advance. Just store them in the refrigerator in an airtight container. They will hold their shape and flavor beautifully.
What is the best way to slice the bars?
Use a sharp knife dipped in hot water. Wipe the knife clean between each cut. This ensures clean slices without smearing the filling. A serrated knife can also work well for cleaner cuts.
Can I add nuts to the crust?
Yes, adding ½ cup of chopped pecans or walnuts to the crust adds a nice crunch and flavor. Toast the nuts first for an extra depth of flavor. Just mix them with the graham cracker crumbs before pressing into the pan.
Pin This Recipe!
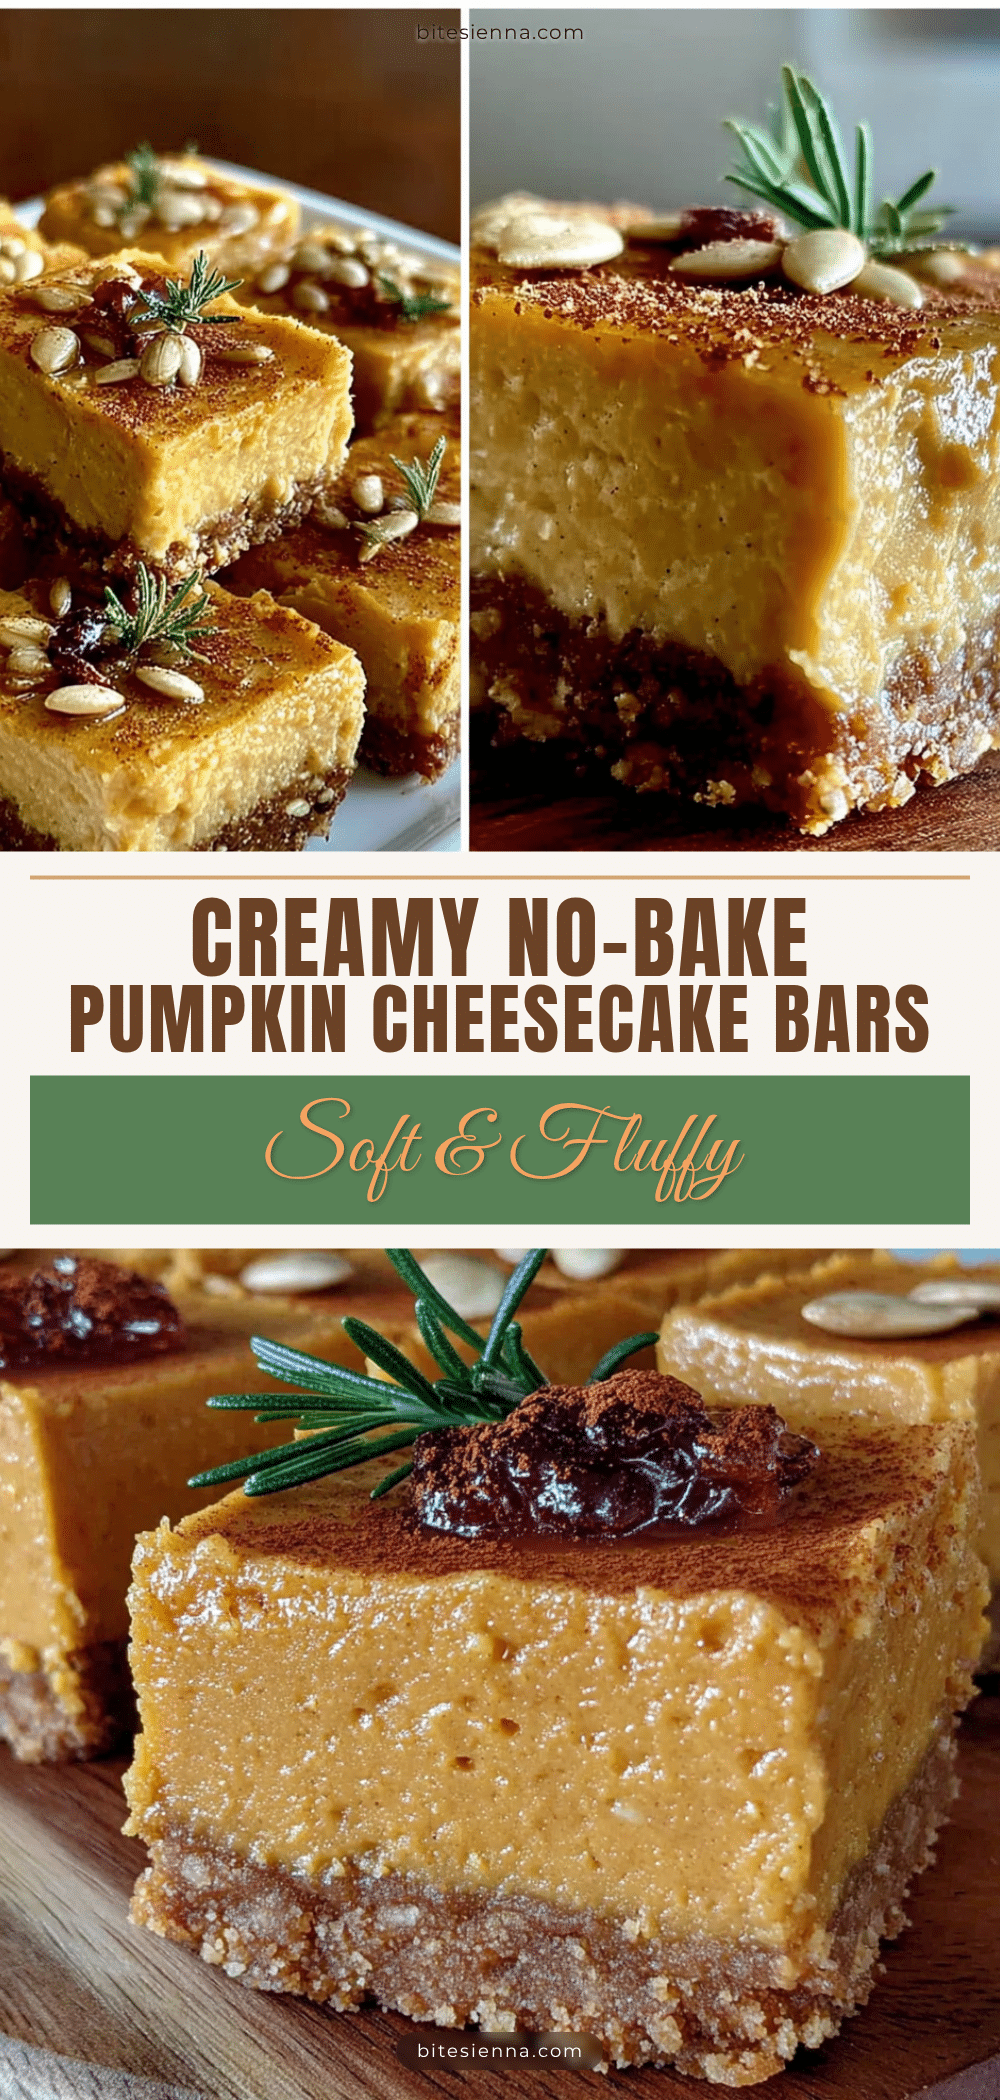
Creamy No-Bake Pumpkin Cheesecake Bars
Rich, silky, and perfectly spiced no-bake pumpkin cheesecake bars with a buttery graham cracker crust. This easy fall dessert captures the cozy flavors of autumn without heating up the kitchen.
- Prep Time: 15 minutes
- Cook Time: 0 minutes
- Total Time: 4 hours 15 minutes
- Yield: 12 servings 1x
- Category: Dessert
- Cuisine: American
Ingredients
- For the Crust:
- 1 ½ cups graham cracker crumbs
- 6 tablespoons unsalted butter, melted
- 2 tablespoons granulated sugar
- ½ teaspoon cinnamon
- For the Cheesecake Filling:
- 16 ounces (2 blocks) full-fat cream cheese, softened to room temperature
- 1 cup powdered sugar
- ½ cup 100% pure pumpkin puree
- 1 teaspoon vanilla extract
- 1 ½ teaspoons pumpkin pie spice
- A generous pinch of salt
- For the Optional Topping:
- ½ cup heavy cream, whipped to soft peaks
- 1 tablespoon maple syrup
Instructions
- Line a 9×13 inch baking pan with parchment paper, leaving an overhang on the long sides, and spray lightly with non-stick spray.
- In a medium bowl, combine graham cracker crumbs, granulated sugar, cinnamon, and melted butter. Stir until the mixture resembles wet sand.
- Press the crust mixture firmly and evenly into the bottom of the prepared pan. Use the bottom of a glass to pack it down tightly. Refrigerate while making the filling.
- In a large mixing bowl, beat the softened cream cheese on medium-high speed until completely smooth and creamy (about 2 minutes). Scrape down the sides.
- Add powdered sugar and vanilla extract to the cream cheese. Beat on low speed until combined, then increase to medium-high and beat for another minute until fluffy.
- Add pumpkin puree, pumpkin pie spice, and salt. Beat on low speed just until combined. Do not overmix.
- Remove the crust from the refrigerator. Spread the pumpkin cheesecake filling evenly over the crust and smooth the top.
- If using the optional topping, gently fold whipped heavy cream and maple syrup into the pumpkin mixture before spreading.
- Cover the pan with plastic wrap or foil and refrigerate for at least 4 hours, preferably overnight, until set.
- Lift the bars out of the pan using the parchment paper overhang. Slice into squares using a sharp knife dipped in hot water and wiped clean between cuts.
Notes
Ensure cream cheese is at room temperature to avoid lumps. Use 100% pure pumpkin puree, not pumpkin pie filling. Chill bars for at least 4 hours or overnight for best slicing results. For clean cuts, dip the knife in hot water and wipe dry between each slice.
Nutrition
- Serving Size: 1 bar
- Calories: 250
- Sugar: 18
- Sodium: 180
- Fat: 15
- Saturated Fat: 9
- Carbohydrates: 25
- Fiber: 1
- Protein: 4
Keywords: pumpkin cheesecake, no-bake dessert, fall recipes, easy dessert, pumpkin bars, autumn baking, gluten-free option, dairy-free option