Spooky Severed Finger Cheese Straws: Best Halloween Appetizer
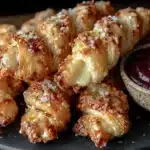
These aren’t just your average cheese straws. They are a full-on performance piece for your spooky spread. A crowd-pleaser that’s surprisingly easy to pull off, even when you’re juggling a dozen other party prep tasks.
- Prep Time: 15 minutes
- Cook Time: 15 minutes
- Total Time: 45 minutes
- Yield: 24 servings 1x
- Category: Appetizer
- Cuisine: American
Ingredients
Scale
- 1 ½ cups all-purpose flour, spooned and leveled
- ½ cup unsalted butter, very cold and cut into small cubes
- 1 ½ cups sharp cheddar cheese, freshly grated
- 3–4 tablespoons ice water
- ½ teaspoon salt
- ¼ teaspoon cayenne pepper (or to taste)
- ½ teaspoon paprika
- Sliced almonds (for the fingernails)
- Ketchup (for the ‘blood’)
Instructions
- Make the dough: In a food processor, pulse together the flour, salt, cayenne, and paprika. Add the cold butter cubes and pulse until the mixture looks like coarse sand, about 10-12 pulses. Add the grated cheddar cheese and pulse 3-4 more times to combine. With the processor running, drizzle in the ice water, one tablespoon at a time, until the dough just holds together when pinched. It should not be sticky. (Time: 5 minutes)
- Chill the dough: Turn the dough out onto a lightly floured surface. Shape it into a disc, wrap it tightly in plastic wrap, and refrigerate for at least 30 minutes. This is crucial—it relaxes the gluten and re-chills the butter, ensuring flaky straws. (Time: 30 minutes)
- Preheat and prep: Preheat your oven to 375°F (190°C). Line a baking sheet with parchment paper.
- Roll and cut: On a lightly floured surface, roll the dough out into a rectangle about ¼-inch thick. Use a sharp knife or bench scraper to cut the dough into strips that are about ½-inch wide and 3-4 inches long. These are your ‘fingers.’ Don’t worry if they aren’t perfectly straight—slight curves make them look more realistic. (Time: 5 minutes)
- Shape the fingers: Gently roll each strip between your palms to smooth out the edges and create a more finger-like shape. Pinch one end slightly to create a ‘knuckle’ shape. Place the straws on the prepared baking sheet, leaving about 1 inch of space between them.
- Add the fingernails: Press a sliced almond onto the pinched end of each straw to create the fingernail. Press gently so it sticks. (Time: 5 minutes)
- Egg wash and score: In a small bowl, whisk the egg with a tablespoon of water. Brush the egg wash over each straw. Use the back of a knife to gently score 2-3 lines across the straw to create ‘knuckle’ wrinkles. This is what sells the illusion.
- Bake: Bake for 12-15 minutes, or until the straws are golden brown and puffed. The cheese will be bubbly and the edges will be crisp. (Time: 12-15 minutes)
- Add the ‘blood’: Let the straws cool on the baking sheet for 5 minutes. While they are still warm, use a toothpick or the tip of a knife to dab a tiny bit of ketchup at the base of the almond ‘fingernail.’ It will look like a bloody cuticle. (Time: 2 minutes)
- Cool completely: Transfer the straws to a wire rack to cool completely. They will crisp up as they cool. Serve at room temperature or warm.
Notes
For the best texture, make sure your butter and cheese are very cold. If your kitchen is warm, pop the grated cheese in the freezer for 10 minutes before mixing. Don’t add the ketchup before baking—it will just burn and look like a dark scab. Adding it after baking gives it that fresh, gruesome look. A tiny dab goes a long way.
Nutrition
- Serving Size: 1 straw
- Calories: 95
- Sodium: 120
- Fat: 7
- Saturated Fat: 4
- Carbohydrates: 5
- Protein: 3
Keywords: Halloween appetizer, cheese straws, severed finger, spooky snack, party food, cheddar cheese straws, Halloween party